Enhancing Smart Homes with Pose Detection Using Neuromorphic Computing and Edge AI
Pose detection technology leverages advanced machine learning algorithms to interpret human movements in real-time, enabling seamless, intuitive device control through simple gestures.

21 May, 2024. 11 minutes read

Introduction
Edge AI transforms smart home technology by enabling real-time data processing directly on devices, reducing latency, and enhancing privacy. In home automation, this leads to more responsive and efficient control systems. One notable application is gesture recognition through pose detection, which allows users to control devices with simple movements.
This article features a project on developing a gesture-based appliance control system using the BrainChip Akida Neural Processor AKD1000 SoC and the Edge Impulse platform. We'll discuss hardware and software requirements, the setup process, data collection, model training, deployment, and practical demonstrations. Additionally, we'll explore integrating the system with Google Assistant for enhanced functionality.
Edge AI in Home Automation
In home automation, Edge AI enables smart devices to respond quickly to user inputs and environmental changes. This local processing power is crucial for applications requiring immediate feedback, such as security systems, smart lighting, and environmental controls.
By processing data at the edge, smart home devices can operate independently of an internet connection, ensuring continuous functionality. This also reduces the risk of data breaches as sensitive information remains within the local network.
Pose Detection with Edge AI
Pose detection is a technology that captures and analyzes human body movements and postures in real time. Using machine learning algorithms, pose detection systems identify key points on the human body, such as joints and limbs, and track their positions and movements. This data can then be used to recognize specific gestures and postures, enabling intuitive, hands-free interaction with various devices.
Pose detection typically involves several steps:
Image Capture: A camera or other sensor captures images or video of the user.
Preprocessing: The captured images are processed to enhance quality and remove noise.
Key Point Detection: Machine learning models identify and track key points on the body, such as elbows, knees, and shoulders.
Pose Estimation: The system estimates the user's pose by analyzing the positions and movements of the detected key points.
Gesture Recognition: Specific gestures are identified based on predefined patterns in the user's movements.
Pose detection has a wide range of applications beyond home automation, including:
Gaming: Enhancing user experience with motion-controlled games.
Healthcare: Monitoring patients' movements and posture for rehabilitation and physical therapy.
Fitness: Providing real-time feedback on exercise form and performance.
Security: Recognizing suspicious behavior in surveillance systems.
In home automation, pose detection can be particularly powerful, turning everyday tasks into seamless, interactive experiences, and enhancing the overall functionality and appeal of smart homes. In this context, the project "Gesture Appliances Control with Pose Detection" stands out as a great example of how pose detection can be used for home automation. Developed by Christopher Mendez, this innovative idea leverages the BrainChip AKD1000 to enable users to control household appliances with simple finger-pointing gestures.
Further reading: Gesture Recognition and Classification Using Infineon PSoC 6 and Edge AI
By combining neuromorphic processing with machine learning, the system achieves high accuracy and low power consumption, making it a practical and efficient solution for modern smart homes.
Gesture Appliances Control with Pose Detection - BrainChip AKD1000
Control your TV, Air Conditioner or Lightbulb by just pointing your finger at them, using the BrainChip AKD1000 achieving great accuracy and low power consumption.
Created By: Christopher Mendez
Public Project Link: Edge Impulse Experts / Brainchip-Appliances-Control-Full-Body
Introduction
Sometimes, it can be inconvenient to have to ask a personal assistant to turn our appliances on or off. It may be because it's simply too late at night to talk, or because we're watching our favorite movie and don't want annoying audio interrupting us.
This is why I thought, "What if we could control the whole house with just gestures?" It would be amazing to just point to the air conditioner and turn it on, turn off the light, and turn on our TV.
Hardware and Software Requirements
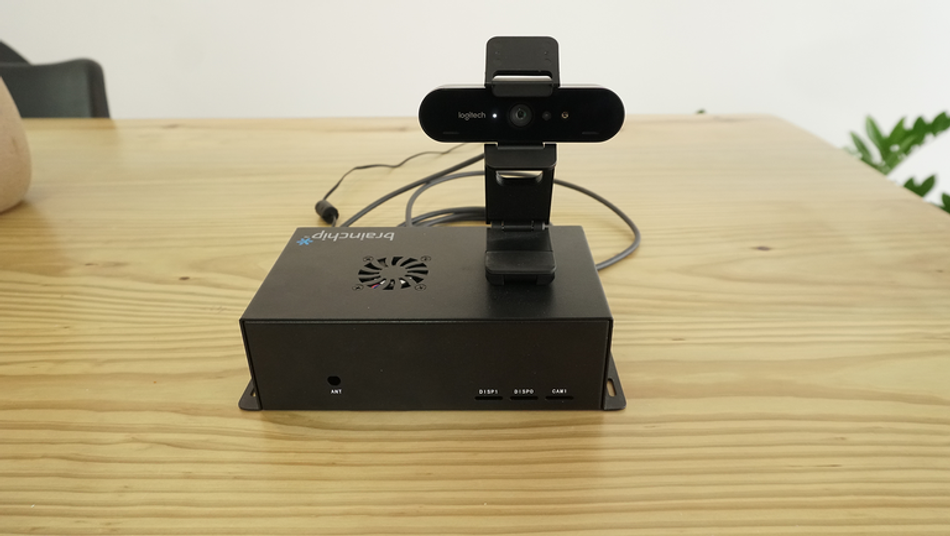
To develop this project, we will use a BrainChip Akida Development Kit, a Logitech BRIO 4K Webcam, and an Edge Impulse Machine Learning model for pose identification.
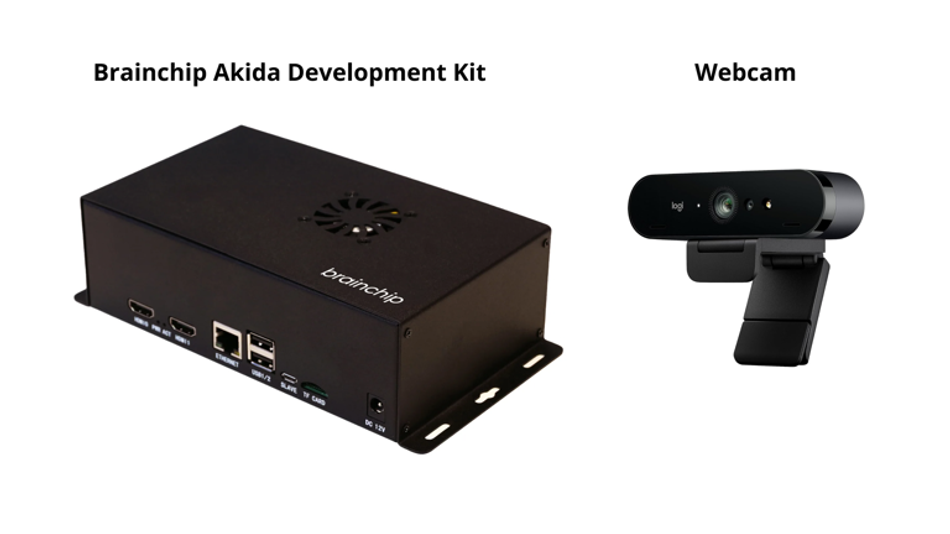
Akida Dev Kit
It should be noted that this kit is the main component of this project, thanks to some interesting characteristics that make it ideal for this use case. This kit consists of a Raspberry Pi Compute Module 4 with Wi-Fi and 8 GB RAM, its IO Board, which includes a PCIe interface to carry an Akida PCIe board with the AKD1000 Neuromorphic Hardware Accelerator.
Considering that our project will end up being one more smart device we will have at home, it's crucial that it can do its job efficiently and with very low energy consumption. This is where BrainChip's technology makes sense. Akida™ neuromorphic processor mimics the human brain to analyze only essential sensor inputs at the point of acquisition—processing data with unparalleled performance, precision, and energy economy.
Software
The whole system will be running independently identifying poses, if a desired pose is detected it will send an HTTP request to the Google Assistant SDK being hosted by a Raspberry Pi with Home Assistant OS.
Setting up the Development Environment
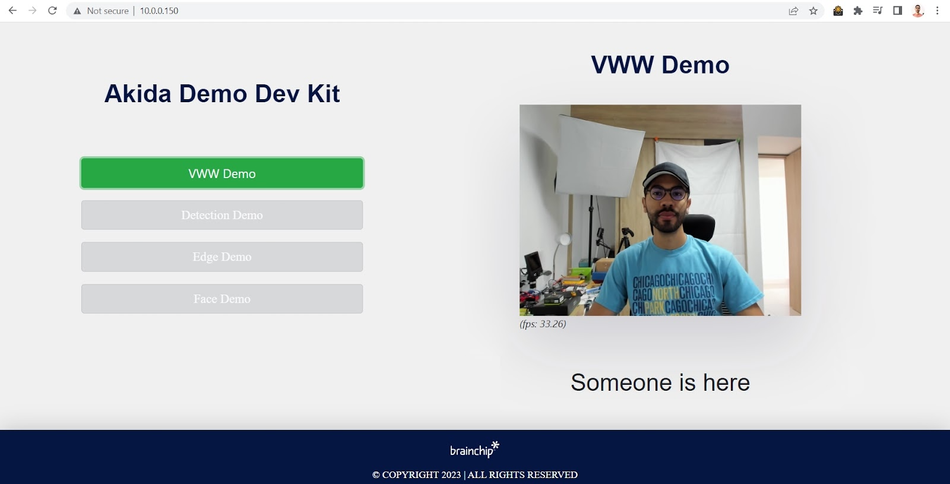
The system comes with the basic requirements installed to run machine learning models using Akida processor acceleration. Once the system is powered up and connected to the internet (I used an ethernet cable), you can access it by an SSH connection: you will need to know the device's local IP address, in my case, I got it from the list of connected devices of my router.

To verify the device is working properly, you can try an included demo by navigating to http://<your_kit_IP>, in my case to http://10.0.0.150, and try some of the examples:
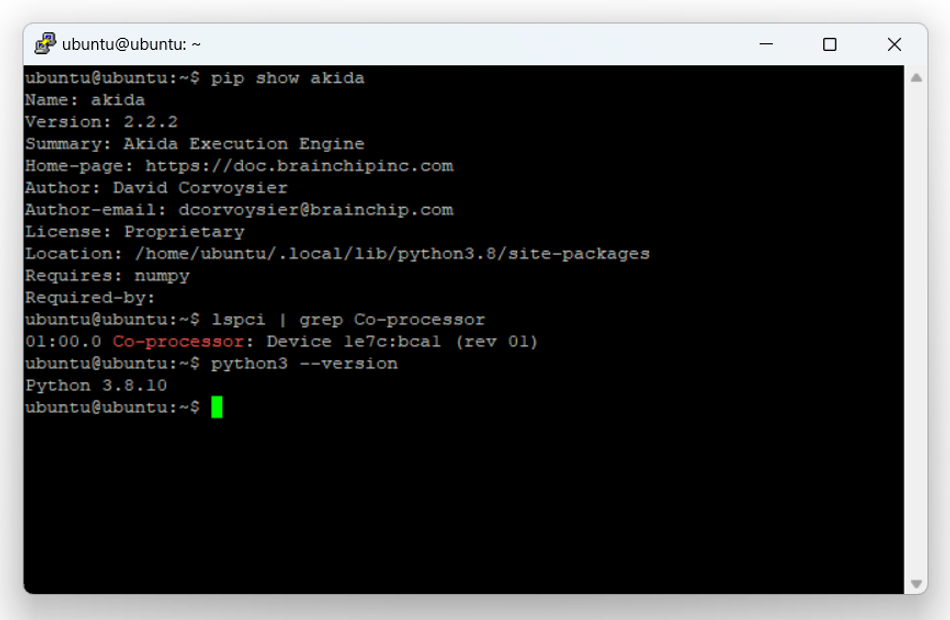
To start setting up the device for a custom model deployment, let's verify we have installed all the packages we need.
I am using Putty for the SSH connection. Log in using the Administrator credentials, in this case, the username is ubuntu and the password is brainchip.
Once inside, you will be able to install some required dependencies:
Running the built-in demos ensures us that the system already recognizes the Akida package and the PCIe drivers for the AKD1000, but we can verify it by running the following commands:
bash
pip show akida # will show the installed version.
lspci | grep Co-processor # will check if the PCIe card is plugged in correctly.
python3 --version # will check the installed Python version (3.8 is required).
You will also need Node Js v14.x to be able to use the Edge Impulse CLI. Install it by running these commands:
bash
curl -sL https://deb.nodesource.com/setup_14.x | sudo -E bash -
sudo apt-get install -y nodejs
node -v
The last command should return the node version, v14 or above.
Finally, let's install the Linux Python SDK, you just need to run these commands:
bash
sudo apt-get install libatlas-base-dev libportaudio0 libportaudio2 libportaudiocpp0 portaudio19-dev
pip3 install edge_impulse_linux -i https://pypi.python.org/simple
As we are working with computer vision, we will need "opencv-python>=4.5.1.48, "PyAudio", "Psutil", and "Flask"
Data Collection
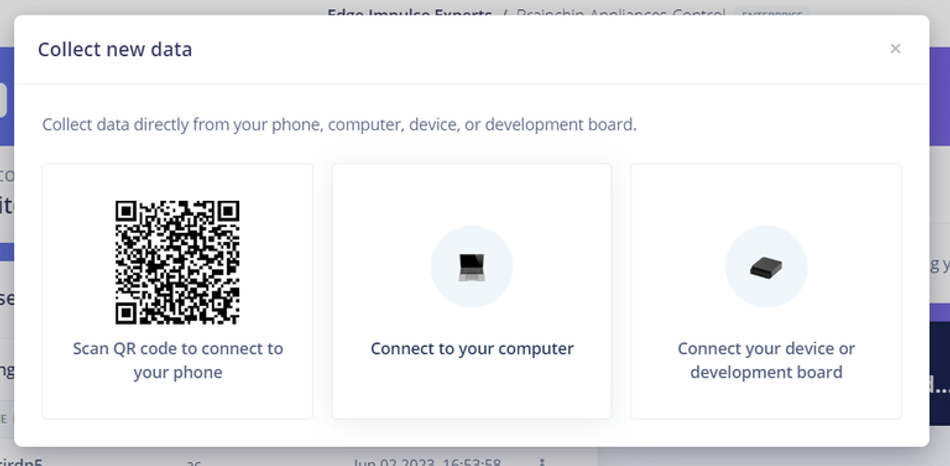
First, we need to create an Edge Impulse Studio account if we haven't yet, and create a new project:

For the creation of the dataset of our model, we have two options, uploading the images from the BrainChip Development Kit or using our computer or phone. In this case, I chose to take them from the computer using the same webcam that we are finally going to use in the project.
The dataset consists of 3 classes in which we finger point each appliance and a last one of unknown cases.
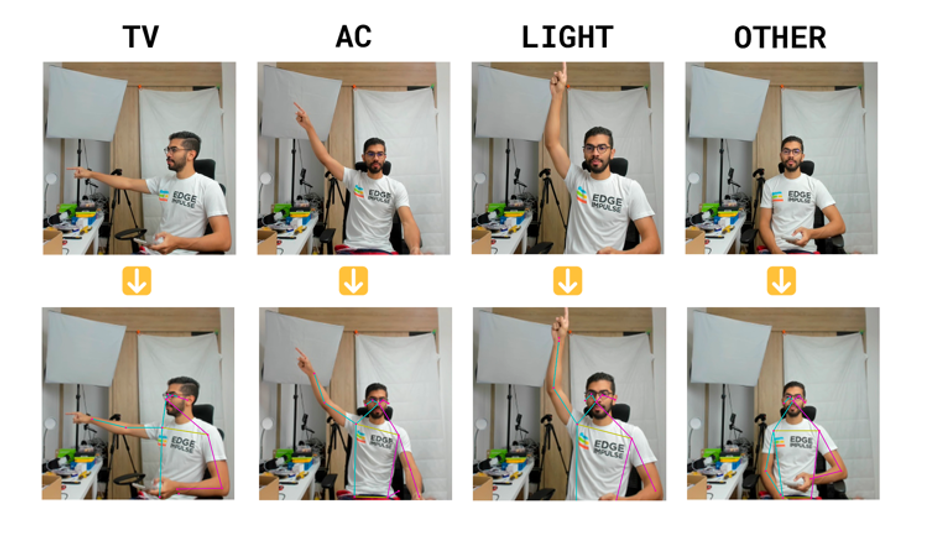
Taking at least +50 pictures of each class will let you create a robust enough model
Impulse Design
After having the dataset ready, it is time to define the structure of the model.
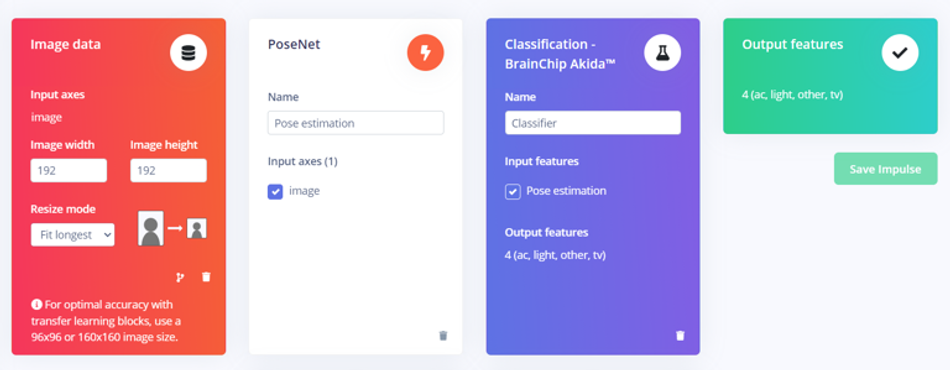
In the left side menu, we navigate to Impulse design > Create impulse and define the following settings for each block, respectively:
Input block (Image data):
Image width: 192
Image height: 192
Resize mode: Fit longest
Processing block (PoseNet):
Use this block to turn raw images into pose vectors, then pair it with an ML block to detect what a person is doing.
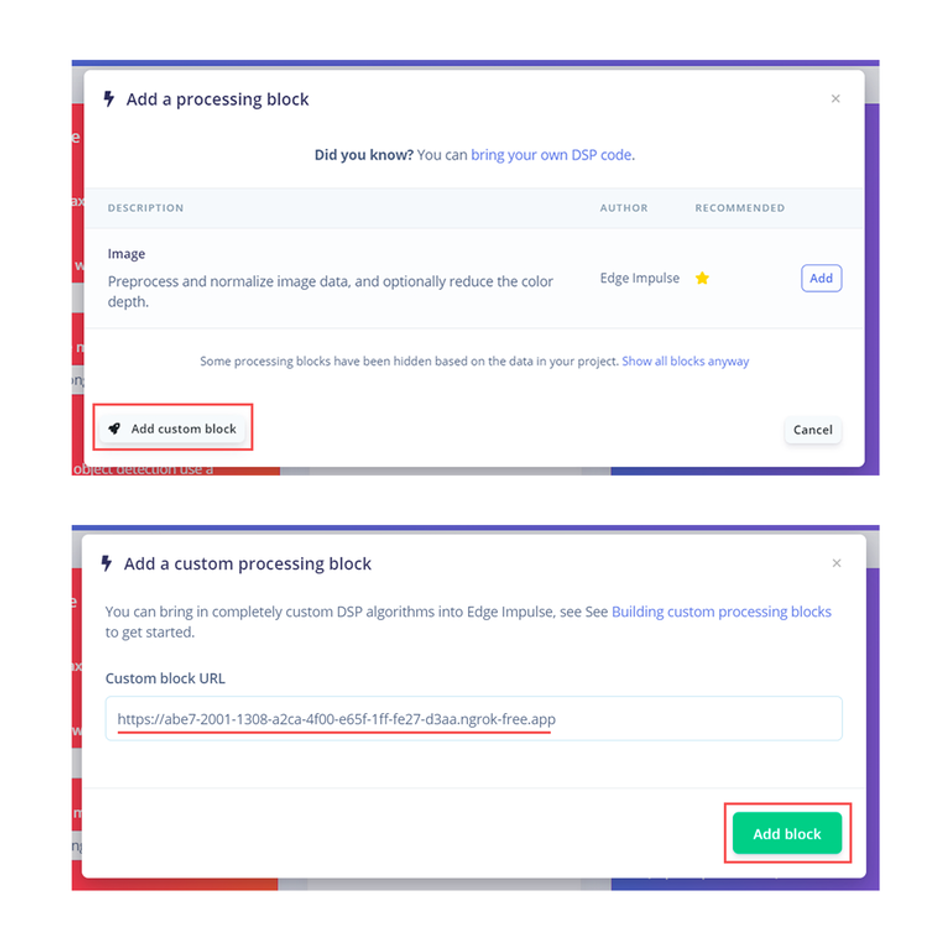
PoseNet processing block is just enabled for Enterprise projects, if we want to use it on a Developer one, we need to locally run the block, for this, you must clone the PoseNet block repository and follow the README steps.
You will end up with an URL similar to "https://abe7-2001-1308-a2ca-4f00-e65f-1ff-fe27-d3aa.ngrok-free.app" hosting the processing block, click on Add a processing block > Add custom block, then paste the ngrok generated URL, and click on Add block.
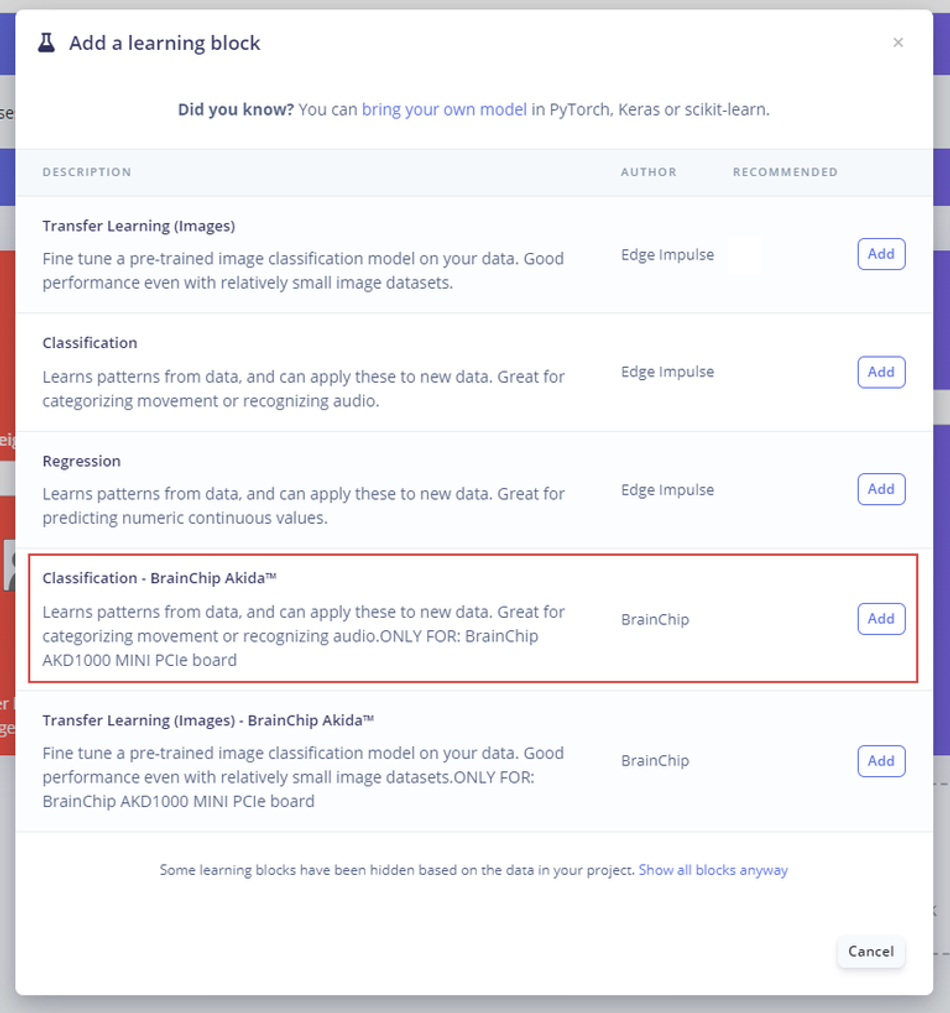
Learning block (BrainChip Akida)
To classify the features extracted from the different poses, we'll use a classification learn block specifically designed for the hardware we're using.
Finally, we save the Impulse design, it should end up looking like this:
Model Training
After having designed the impulse, it's time to set the processing and learning blocks. The Pose estimation block doesn't have any configurable parameters, so we just need to click on Save parameters and then Generate features.
In the classifier block define the following settings:
Number of training cycles: 100
Learning rate: 0.001
In the Neural network architecture, add 3 Dense layers with 35, 25 and 10 neurons respectively.
Here is the architecture "Expert mode" code (you can copy and paste the code from Edge Impulse page):
python
import tensorflow as tf
from tensorflow.keras.models import Sequential
from tensorflow.keras.layers import Dense, InputLayer, Dropout, Conv1D, Conv2D, Flatten, Reshape, MaxPooling1D, MaxPooling2D, AveragePooling2D, Rescaling, BatchNormalization, Permute, ReLU, Softmax
from tensorflow.keras.optimizers.legacy import Adam
EPOCHS = args.epochs or 100
LEARNING_RATE = args.learning_rate or 0.001
# this controls the batch size, or you can manipulate the tf.data.Dataset objects yourself
BATCH_SIZE = 32
train_dataset = train_dataset.batch(BATCH_SIZE, drop_remainder=False)
validation_dataset = validation_dataset.batch(BATCH_SIZE, drop_remainder=False)


# model architecture
model = Sequential()
#model.add(Rescaling(7.5, 0))
model.add(Dense(35,
    activity_regularizer=tf.keras.regularizers.l1(0.00001)))
model.add(ReLU())
model.add(Dense(25,
    activity_regularizer=tf.keras.regularizers.l1(0.00001)))
model.add(ReLU())
model.add(Dense(10,
    activity_regularizer=tf.keras.regularizers.l1(0.00001)))
model.add(ReLU())
model.add(Dense(classes, name='y_pred'))
model.add(Softmax())


# this controls the learning rate
opt = Adam(learning_rate=LEARNING_RATE, beta_1=0.9, beta_2=0.999)
callbacks.append(BatchLoggerCallback(BATCH_SIZE, train_sample_count, epochs=EPOCHS))


# train the neural network
model.compile(loss='categorical_crossentropy', optimizer=opt, metrics=['accuracy'])
model.fit(train_dataset, epochs=EPOCHS, validation_data=validation_dataset, verbose=2, callbacks=callbacks)


import tensorflow as tf


def akida_quantize_model(
    keras_model,
    weight_quantization: int = 4,
    activ_quantization: int = 4,
    input_weight_quantization: int = 4,
):
    import cnn2snn


    print("Performing post-training quantization...")
    akida_model = cnn2snn.quantize(
        keras_model,
        weight_quantization=weight_quantization,
        activ_quantization=activ_quantization,
        input_weight_quantization=input_weight_quantization,
    )
    print("Performing post-training quantization OK")
    print("")


    return akida_model


def akida_perform_qat(
    akida_model,
    train_dataset: tf.data.Dataset,
    validation_dataset: tf.data.Dataset,
    optimizer: str,
    fine_tune_loss: str,
    fine_tune_metrics: "list[str]",
    callbacks,
    stopping_metric: str = "val_accuracy",
    fit_verbose: int = 2,
    qat_epochs: int = 200,
):
    early_stopping = tf.keras.callbacks.EarlyStopping(
        monitor=stopping_metric,
        mode="max",
        verbose=1,
        min_delta=0,
        patience=10,
        restore_best_weights=True,
    )
    callbacks.append(early_stopping)


    print("Running quantization-aware training...")
    akida_model.compile(
        optimizer=optimizer, loss=fine_tune_loss, metrics=fine_tune_metrics
    )


    akida_model.fit(
        train_dataset,
        epochs=qat_epochs,
        verbose=fit_verbose,
        validation_data=validation_dataset,
        callbacks=callbacks,
    )


    print("Running quantization-aware training OK")
    print("")


    return akida_model


akida_model = akida_quantize_model(model)
akida_model = akida_perform_qat(
    akida_model,
    train_dataset=train_dataset,
    validation_dataset=validation_dataset,
    optimizer=opt,
    fine_tune_loss='categorical_crossentropy',
    fine_tune_metrics=['accuracy'],
    callbacks=callbacks)
Click on the Start training button and wait for the model to be trained and the confusion matrix to show up.
Confusion Matrix
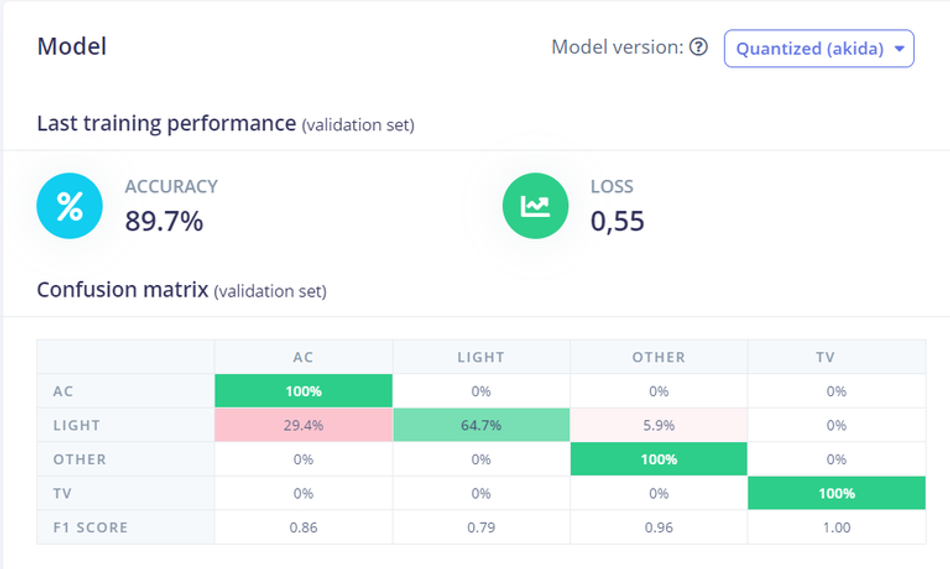
The results of the confusion matrix can be improved by adding more samples to the dataset.
Project Setup
To be able to run the project, we need to go back to our SSH connection with the device and clone the project from the Github repository, for this, use the following command:
bash
git clone https://github.com/edgeimpulse/pose-akida-classification.git
Install all the project requirements with the following command, and wait for the process to be done.
bash
pip install -r requirements.txt
Install these other required packages with:
bash
apt-get update && apt-get install ffmpeg libsm6 libxext6  -y
Deployment
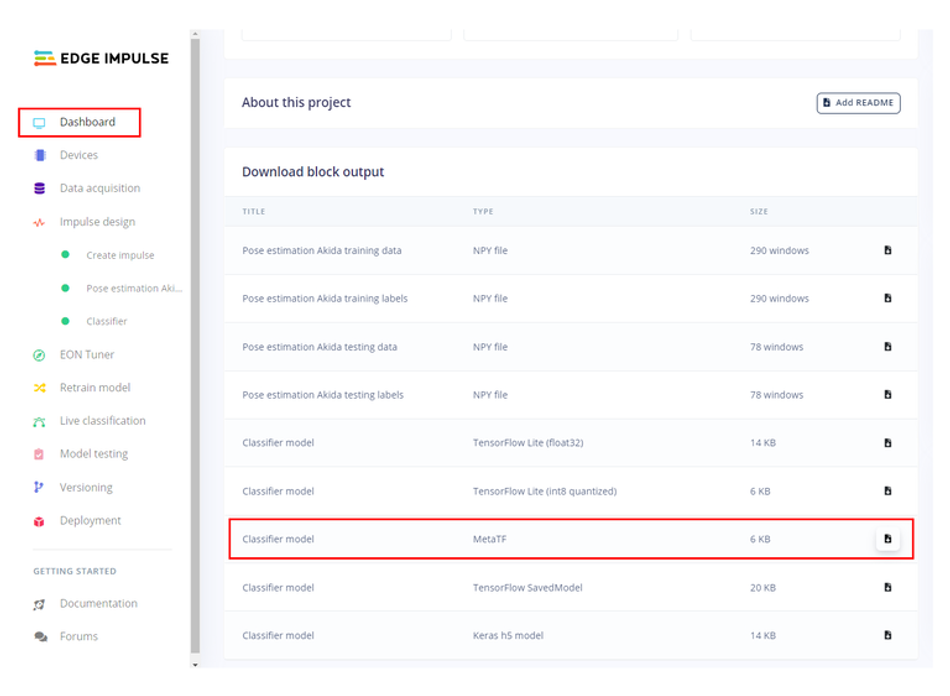
Once the project is cloned locally in the Akida Development Kit, you can download the project model from Edge Impulse Studio by navigating to the Dashboard section and downloading the MetaTF .fbz file.
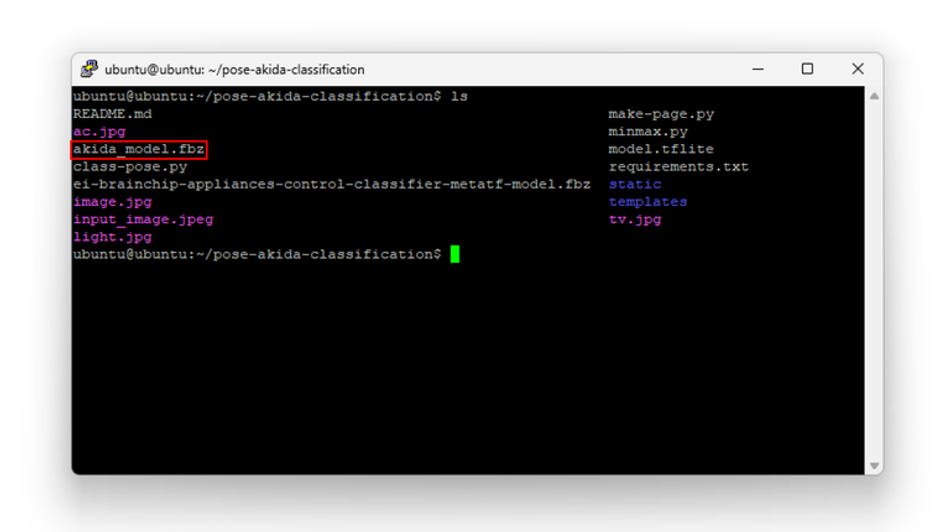
Once downloaded from the model path, open a new terminal and copy the model to the Dev Kit using scp command as follows:
bash
scp <model file>.fbz ubuntu@<Device IP>:~ # command format
scp akida_model.fbz ubuntu@10.0.0.154:~ # actual command in my case
You will be asked for your Linux machine login password.
Now, the model is on the Akida Dev Kit local storage (/home/ubuntu) and you can verify it by listing the directory content using ls.
Move the model to the project directory with the following command:
bash
mv akida_model.fbz ./pose-akida-classification/
Here we have the model on the project directory, so now everything is ready to be run.
Run Inferencing
To run the project, type the following command:
bash
python3 class-pose.py akida_model.fbz 0
- The first parameter class-pose.py is the project's main script to be run.
- akida_model.fbz is the Meta TF model name we downloaded from our Edge Impulse project.
- 0 force the script to use the first camera available.
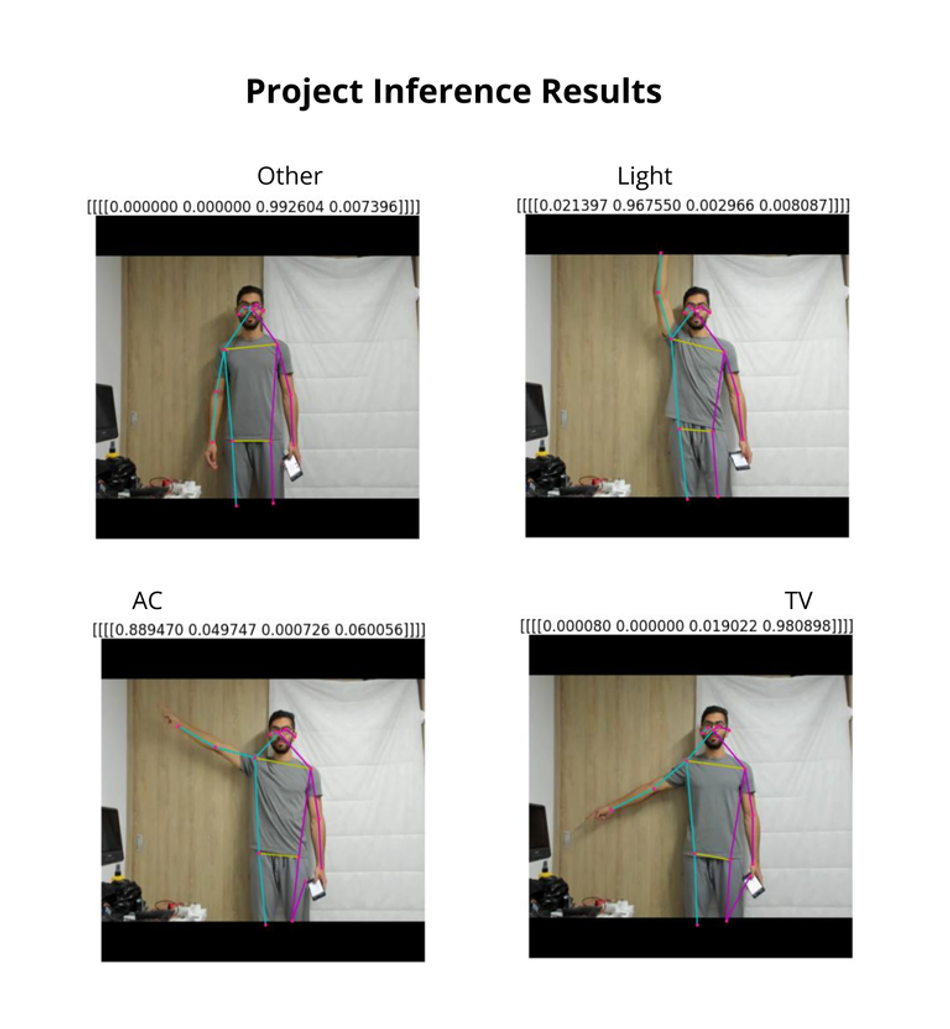
The project will start running and printing the inference results continuously in the terminal.

To watch a preview of the camera feed, you can do it by opening a new ssh session and running the make-page.py script from the project directory:
bash
python3 make-page.py
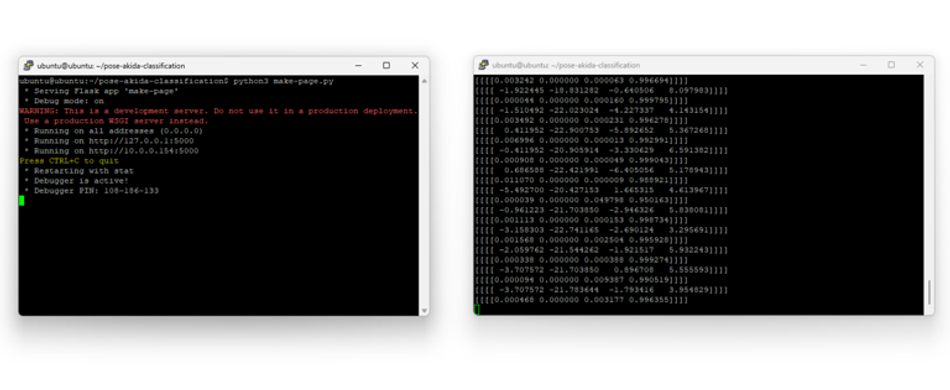
Finally, you will be able to see the camera preview alongside the inference results organized in the following order: AC, Light, Other and TV.
Google Assistant Setup
For the actual appliance control, I used the Google Assistant SDK integration for Home Assistant. Follow the documentation to configure it for your setup.
The Home Assistant is running on a separate Raspberry PI.
Once the integration is set, we can send HTTP requests to it with the following format:
- URL: http://<Raspberry Pi IP>:8123/api/services/google_assistant_sdk/send_text_command
- Headers:
Authorization: "Bearer "
Content-Type: "application/json" - Body: {"command":"turn on the light"}
You must edit the url and auth variables in the code with the respective ones of your setup.
python
url = 'http://<Raspberry Pi IP>:8123/api/services/google_assistant_sdk/send_text_command'
auth = 'Bearer ******************************************************************************'
Demo
Here I show you the whole project working and controlling appliances when they are pointed.
Further reading: A Practical Guide to Understanding Sensor Fusion with Edge Impulse: Building a Smart Running Jacket
Conclusion
By enabling users to control devices through simple gestures, pose detection eliminates the need for physical interaction or voice commands, offering a seamless and convenient user experience. This technology leverages advanced machine learning algorithms to interpret human movements accurately and efficiently, paving the way for innovative applications across various domains.
As we continue to explore and refine these capabilities, the potential for creating smarter, more interactive living spaces becomes a reality, bringing in a new era of convenience and automation in our daily lives.
References
[1] Gesture Appliances Control with Pose Detection - BrainChip AKD1000, Edge Impulse, [Online], Available from: https://docs.edgeimpulse.com/experts/featured-machine-learning-projects/gesture-appliances-control-brainchip
[2] Brainchip Akida AKD1000, Brainchip, [Online], Available from: https://brainchip.com/akida-neural-processor-soc/