How to 3D print overhangs: supports, bridging, new innovations
Overhangs represent one of the biggest challenges for FDM 3D printers. Here we look at how to safely print them using support structures, bridging, and other techniques.

29 Mar, 2023. 10 minutes read
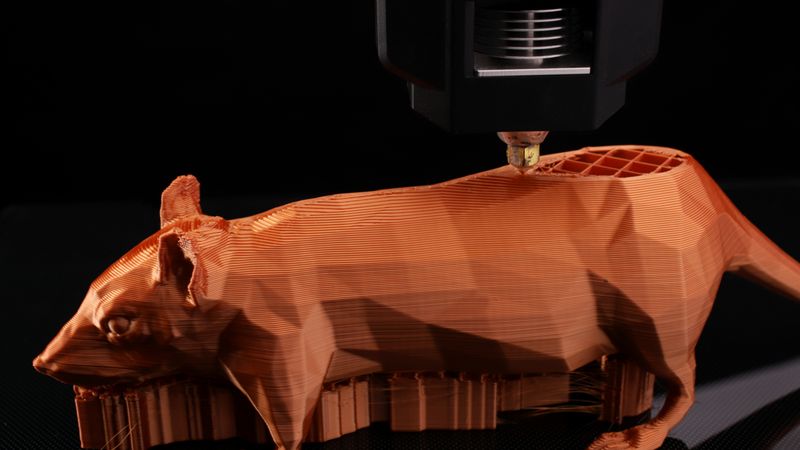
3D print with overhanging sections and supports
No time now? Save for later.
We only use your email to send this link. Privacy Policy.
FDM 3D printing is a valuable manufacturing technology for many reasons. It’s fast, has minimal up-front costs, and permits a broad range of geometries, including complex internal sections.
However, this prototype-friendly process has its limitations, including poor surface quality and part strength. Furthermore, unlike rival manufacturing techniques such as injection molding — and indeed other 3D printing processes like selective laser sintering (SLS) — FDM 3D printing runs into trouble when it comes to overhanging sections. Why? 3D printers work by printing layers of plastic one on top of the other, but overhangs have nothing underneath them to prop them up.
This article looks at how to 3D print overhangs. In it, we consider three main topics of interest: minimizing the use of overhangs, techniques for printing overhangs, and general tips and print settings that make it easier to print overhangs.
Why overhangs matter
When 3D models start to get complex, a reliable printer and good filament will only get you so far. Models with overhanging sections are harder to print than those without, so figuring out your printing strategy for overhangs is important if you want to prevent failed prints and achieve a high level of print quality.
Overhangs can sag and deform, and extreme ones can collapse completely — unless you take proactive steps to accommodate them, such as using support structures or adjusting the overhang angle.
However, be prepared to make compromises. Many overhang solutions come with a tradeoff, either in terms of added time and material usage, altered part geometry, or simply investing in more expensive hardware.
How to avoid overhangs
We will later discuss the best techniques for printing overhangs, some standard and some experimental. However, sometimes the best way to deal with overhangs is to avoid them altogether. Crucially, this doesn’t have to impact the form or function of the part.
Part design

When designing parts for FDM 3D printing, you should aim to avoid overhangs in your 3D model if at all possible. As a general rule, don’t incorporate overhanging areas if they aren’t critical to the design. If they are critical, try the following tactics.
Acceptable angles
When printing without support structures or other specialist overhang techniques, the largest acceptable overhang angle is 45° from the vertical axis.
If overhanging sections are angled at, for example, 60° degrees, consider whether an adjustment to 45° would be feasible, as this could significantly reduce the need for support structures. A simple solution to some design issues is the use of chamfers (sloping edges) instead of right angles.
Automatic deformation
If your parts do not have strict dimensional criteria — if they are purely cosmetic items, for example — then you can use Cura’s “make overhang printable” feature to automatically deform a section and reduce its overhang angle to a maximum of 45°.
Note that this experimental feature does not provide much user control, so it may be preferable to redesign your model using CAD software instead.
Part orientation
A part with several overhanging sections may actually have none at all if oriented differently on the print bed. For example, a part shaped like a T would require supports, but the same part flipped upside down (⊥) would not.
Slicers like Cura do not automatically orient parts to minimize supports, but there are third-party plugins that can.
Remember that part orientation can affect the build in other ways. 3D printed parts are weakest along the Z-axis, so you should not not randomly orient a part if it needs to be strong in a particular direction.
Part splitting
A simple and economical way to deal with overhangs is to split your 3D model into different components then assemble them after printing via gluing or welding. For example, an overhang-heavy 3D model of a tree could be split into trunk and branches, with each separate component printed flat along the print bed.
It’s usually easier to split up a model with your 3D modeling software rather than with slicing software. In Meshmixer, the relevant function is called “Plane Cut.”
Methods of adhesion depend on the printing material. Low-temperature filament like PLA can be welded by gently heating the mating surfaces, while ABS components can be stuck together by dissolving the surfaces with acetone. Cyanoacrylate glue (superglue) works with most FDM materials.
Techniques for printing overhangs
If your overhang issues can’t be solved by design adjustments, part reorientation, or part splitting, you’ll need to tackle them head-on using supports, bridging, or a more creative method.
Supports
- Pros: reliable, geometric freedom
- Cons: adds time, uses extra material
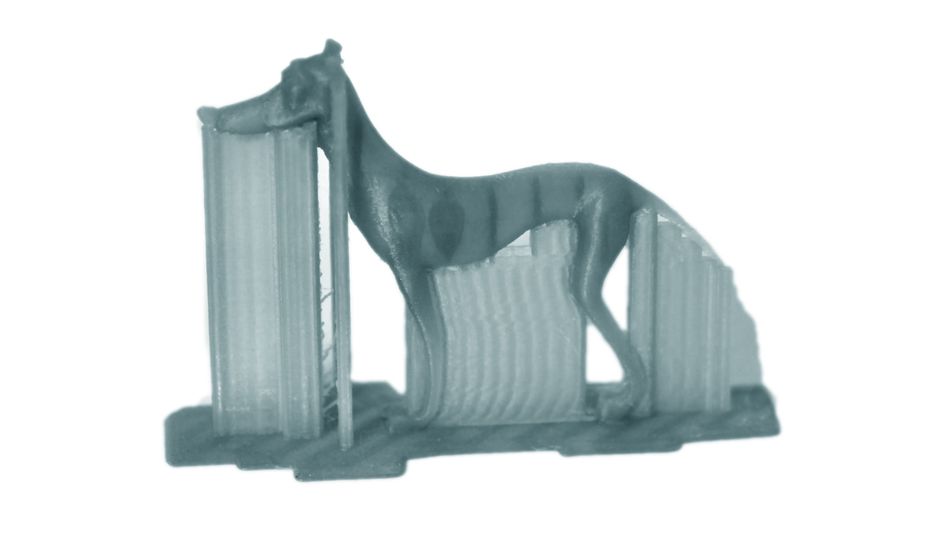
When it comes to printing overhangs, supports are a 3D printer’s best friend. These temporary structures — which can take the form of towers, walls, or trees — are printed underneath overhangs to prevent them from collapsing during printing. Once the build is complete, the supports must be manually removed.
There are advantages to using supports. For one, they are the least risky option in terms of preventing the collapse of overhangs. Secondly, slicers can automatically generate the support structures, in addition to providing a range of user-adjustable parameters: supports can be shaped like vertical towers or have “branches” like a tree, and they can also have a range of infill patterns and densities.
But supports also have their limitations. For instance, the additional material required to build the support structures adds time and cost to the print. Furthermore, supports need to be removed after printing, and this can be a laborious process.
Support removal becomes faster and simpler if the 3D printer has a second extruder, because this allows for the printing of a separate support material. Specialist support materials are typically either soluble in water or easy to break off by hand.
Type of support | Removal method |
Insoluble (standard) support | Cut away with pliers or knife |
Soluble support | Dissolve in water or chemical |
Breakaway support | Snap off by hand |
Recommended reading: 3D print post-processing steps: supports, sanding, smoothing, more
Bridging
- Pros: uses no extra material
- Cons: needs two or more supporting areas, bridges can sag
Overhangs that stick out to the side of a part are notoriously tricky to print. However, overhangs that hang between two or more vertical sections are a different story. Using a technique called bridging, it is sometimes possible to print such overhangs without support structures. As a rule, shorter bridges are easier to print, as they are less likely to sag and deform.
Rule number one of FDM 3D printing is that a nozzle cannot extrude filament into thin air. Unsupported material will flop down onto the build plate below, causing a sticky mess. However, a line of material can remain suspended in midair if it is kept taut by the nozzle until it reaches a stable upright section.
Think of it like this. If you had two upright bottles in front of you, about 10 inches apart, you could stretch a piece of chewing gum between the two bottlenecks. Because of the tension, the long, thin strand of gum would stay horizontal and wouldn’t collapse (although it might sag a little bit). However, if you pulled the gum five inches across then tried to go back the other way, the tension would be lost and the gum would flop downwards.
Most slicers offer configurable bridging settings (e.g. bridge printing speed) and can automatically detect bridging areas.
Arc overhangs
- Pros: uses no extra material, geometric freedom
- Cons: still experimental, unusual appearance
One specific type of 90° overhang that 3D printers can sometimes print without supports is a sequence of concentric arcs, i.e. allowing the extruded filament to wrap around itself. The innermost arc is supported by the stable printed area, and each subsequent arc adheres to the edge of the one before.
In late 2022, 3D printer user Steven McCulloch shared a new technique based on the above principle for printing overhangs of various geometries. He developed an algorithm that recursively prints overlapping arcs — some larger, some smaller — in order to realize any polygon shape. Because no supports or bridge pillars are required, it could be an effective method for printing internal overhangs (where manual support removal would be difficult or impossible).
The GitHub repository currently has four contributors, and McCulloch’s arc-generating algorithm has been turned into a post-processing script for PrusaSlicer.
Belt 3D printing
- Pros: uses no extra material
- Cons: expensive hardware, overhangs limited to one axis
Normal FDM printers can print overhangs up to 45° without support structures. For example, you could print a Y shape without supports because the “arms” are about 45° from the vertical, but you couldn’t print a T shape where the arms are at exactly 90°. Conveyor belt printers change this.
By tilting the printhead 45° and using a conveyor belt to move the build incrementally, it becomes possible to print overhangs without support structures, as the layers are stacked diagonally.[1] However, the catch is that the overhangs can only go in one direction (along the Y-axis).
Recommended reading: Belt 3D printers explained: Technology, best machines, advantages
4-axis 3D printing
- Pros: very high level of geometric freedom
- Cons: still experimental, requires modded hardware
A highly promising innovation in overhang printing is the use of 3D printers with a print head that is tilted 45° — like a belt 3D printer — but which can also rotate about the Z-axis, giving the printhead access to all sides of the build. One example of such a 3D printer is the RotBot, a modified Prusa Mk3 developed by researchers from the Zurich University of Applied Sciences.[2]
With the swiveling printhead of the RotBot, it becomes possible to print 90° overhangs in any direction. This technology is still in its infancy, though it is only a matter of time before FDM catches up with existing multi-axis technologies like CNC machining.
Tips for printing overhangs
The last two techniques mentioned above require nonstandard hardware and have unique printing requirements. However, the first three techniques — supports, bridging, and arc overhangs — all require a broadly similar approach.
As a general rule, overhang printing requires a slow pace, cool temperatures, and minimal layer heights.
Print speed
Overhangs require a great deal of patience, so be prepared for long print times. By printing slowly — sometimes as slow as 5 mm/s! — the extruded filament has more time to cool down and solidify, giving the overhang more support and stability.
Conversely, printing at fast speeds means that new layers are being added on top of not-yet-solid filament, increasing the risk of part failure.
Printing temperature and cooling
Finding the right extrusion temperature is key to successful 3D printing. Too cold and layers won’t adhere to one another; too hot and you could encounter oozing and stringing. Temperature also plays a vital role when printing overhangs.
The thing to remember here is that extruded filament is more likely to sag or collapse if it is runny. With that in mind, printing as cold as possible — i.e. with the lowest temperature that doesn’t cause blockages or layer adhesion problems — will keep the filament in a more viscous state and lead to less perilous overhangs.
The printer’s cooling fan can also play a big role here, as it helps the filament solidify faster after it leaves the nozzle.
Layer height
Decreasing the layer height in your slicer settings can lead to better overhang printing. A 45° overhang with thick layers requires each layer to jut out more above the preceding layer in order to create the necessary slope. Conversely, thin layers only need to stick out a small distance, as there are more of them for any given distance along the Z-axis.
PrusaSlicer is notable for its variable layer height feature, which can be used to print overhangs with thin layers and stable regions of the build with thicker layers.
Conclusion
Printing overhangs can be tricky, but there are many ways to deal with them. First off, ask yourself whether your design needs overhangs at all. If it does, consider whether the part can be reoriented so the overhangs are supported by the print bed or the rest of the build.
If you do need to print overhangs, perhaps with extreme angles, there are several strategies available to you. Support structures and bridges are a good starting point, as your slicer will do most of the hard work for you, while the more creative techniques described above may work for advanced users.
References
[1] Shaik YP, Schuster J, Shaik A. A Scientific Review on Various Pellet Extruders Used in 3D Printing FDM Processes. Open Access Library Journal. 2021 Jul 28;8(8):1-9.
[2] Wüthrich M, Elspass WJ, Bos P, Holdener S. Novel 4-axis 3D printing process to print overhangs without support material. InIndustrializing Additive Manufacturing: Proceedings of AMPA2020 2020 Sep 1 (pp. 130-145). Cham: Springer International Publishing.
in this article
1. Why overhangs matter2. How to avoid overhangs3. Techniques for printing overhangs4. Tips for printing overhangs5. Conclusion6. ReferencesNo time now? Save for later.
We only use your email to send this link. Privacy Policy.