DLP 3D Printing: Exploring Technology, Challenges, and Applications
What is DLP is a 3D printing? This article aims to provide an in-depth understanding of DLP 3D printing, its working principles, advantages, limitations, and diverse applications in various sectors.

Last updated on 24 Apr, 2024. 17 minutes read
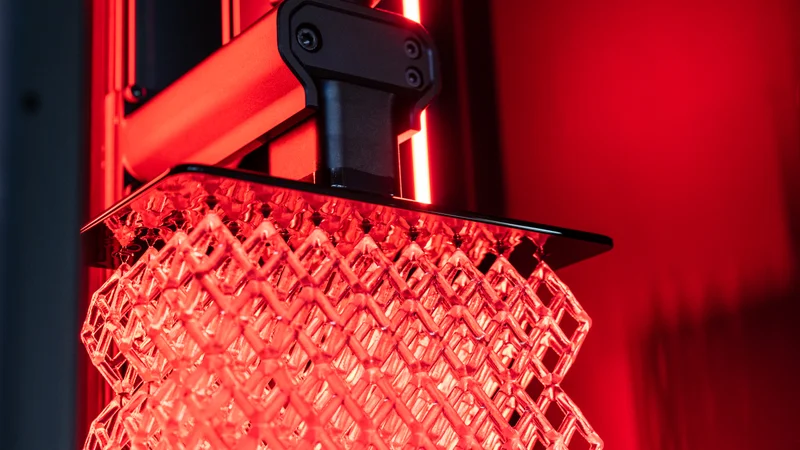
Image courtesy Origin.io
Digital Light Processing (DLP) 3D printing is a significant technology in additive manufacturing. It leverages the power of digital light projectors to convert liquid photopolymers into solid, intricately detailed objects with exceptional speed and precision. This technology is known for its high resolution and high-speed, making it a preferred choice across a wide spectrum of applications. From the intricate demands of dental and medical fields to the precision required in jewelry design and the efficiency needed in manufacturing. DLP technology has emerged as a versatile solution for rapid prototyping, product development, and small-scale manufacturing. The core of DLP 3D printing lies in the science of photopolymers and uv light. This article aims to provide an in-depth understanding of DLP 3D printing, its working principles, advantages, limitations, and diverse applications in various sectors.
DLP 3D Printing Technology
Digital Light Processing (DLP) 3D printing is a form of stereolithography (SLA) technology, operates by using light to cure a photosensitive polymer. At its core, the science of DLP 3D printing revolves around the interaction of light with a special type of polymer known as a photopolymer.
Photopolymers are a class of polymers that respond to light, specifically ultraviolet (UV) light. When exposed to UV light, the photopolymer undergoes a chemical reaction known as photopolymerization. In DLP 3D printing, a digital light projector screen is used to project UV light onto the photopolymer resin. The light is projected in the shape of the desired layer of the 3D object, causing the resin in those areas to harden. This process is repeated layer by layer until the entire object is formed.
Recommended reading: Is UV Resin Toxic? Risks and Safety Measures Explained
Science Behind Photopolymerization
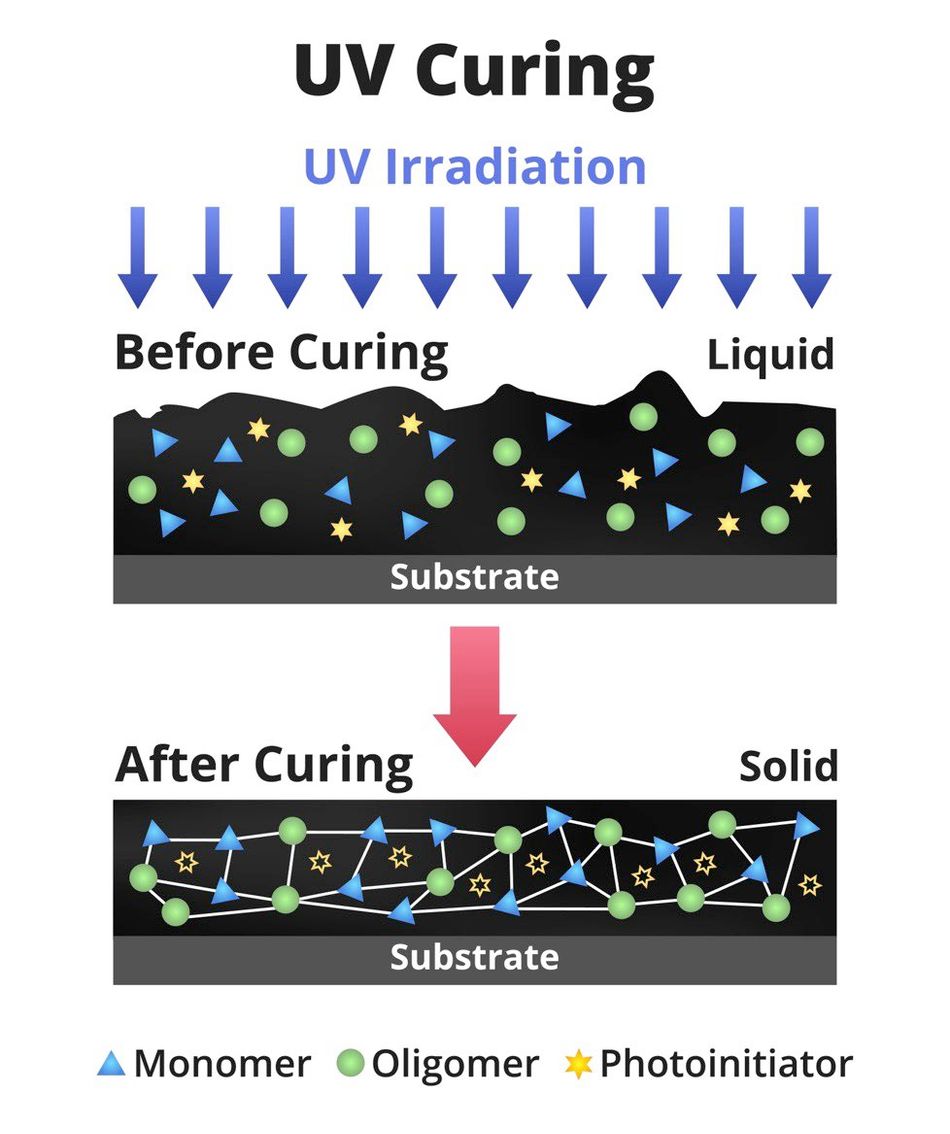
Photopolymers are essential in DLP 3D printing, as they are polymers that undergo a transformation when exposed to light. In this process, the photopolymer resin, in its liquid form, solidifies or cures upon exposure to UV light. This resin consists of a blend of monomers and oligomers, combined with a photoinitiator. The monomers and oligomers serve as the foundational components of the polymer.
The photoinitiator is a compound that absorbs UV light, initiating the crucial polymerization process. Upon absorbing UV light, the photoinitiator releases energy, catalyzing the reaction between the monomers and oligomers. This reaction results in the formation of long chains or cross-links, a process known as photopolymerization.
Photopolymerization Chemical Reaction
In photopolymerization, the chemical reaction involves light triggering the polymerization process, where small molecules (monomers) join together to form a larger polymer chain. Here's a basic equation to represent the process:
Monomer (M) + UV Light -> Polymer (P)
Monomer (M): These are the individual molecules that make up the photopolymer. They are typically small and have reactive groups.
UV Light: The light source, usually ultraviolet (UV) light, provides the energy needed to initiate the reaction.
Polymer (P): This is the resulting long-chain polymer formed from the monomers.
Example:
Let's take an example using a common photopolymer used in DLP 3D printing:
Monomer (M): Acrylate monomer
UV Light: Projected from the DLP 3D printer
Polymer (P): Polymerized acrylate resin
Chemical Reaction:
Acrylate Monomer + UV Light → Polymerized Acrylate Resin
When the acrylate monomer is exposed to UV light, the double bond in the monomer reacts with the UV energy, causing the bond to break and form a new bond with another nearby monomer. This chain reaction continues, with monomers linking together to form a long polymer chain, resulting in a solid, cross-linked polymer structure.
This photopolymerization process is rapid and allows for precise control over the solidification of the resin in DLP 3D printing.
Common types of photopolymers used in DLP 3D printing
Acrylates: Acrylate-based resins are widely used in DLP 3D printing. They offer a good balance of properties, such as strength, flexibility, and hardness. Acrylates are versatile and can be tailored for various applications.
Epoxies: Epoxy-based photopolymers are known for their high strength and chemical resistance. They are often used in applications where durability and robustness are key, such as in engineering and industrial settings.
Polyurethanes: Polyurethane-based resins offer a range of properties depending on their formulation. They can be flexible or rigid, making them suitable for a variety of applications from prototyping to product design.
Polyesters: Polyester-based photopolymers are known for their toughness and durability. They are commonly used in applications where impact resistance and strength are important, such as in automotive parts and functional prototypes.
These photopolymers can be further customized with additives to achieve specific properties like color, transparency, flexibility, or heat resistance.
The Role of UV Light
Ultraviolet (UV) light plays a pivotal role in the DLP 3D printing process. It is the UV light that triggers the photopolymerization reaction in the photopolymer resin, causing it to transform from a liquid to a solid state.
This process begins when the UV light, projected by a digital light projector, interacts with the photopolymer resin. The UV light is absorbed by photoinitiator molecules within the resin, initiating a reaction between the resin's monomers and oligomers. This reaction leads to the formation of solid layers through a process known as curing.
The precise use of UV light enables high-resolution printing in DLP 3D printing. The projector displays UV light images corresponding to the layers of the object being printed, ensuring intricate details. Additionally, the intensity and wavelength of the UV light can be adjusted to influence the properties of the printed object. Higher intensity light speeds up curing, while different wavelengths impact curing depth. This level of control over the UV light provides flexibility in the printing process, affecting the final characteristics of the printed object.
DLP PRINTERS
Digital Light Processing (DLP) printers are a cutting-edge type of 3D printer renowned for their speed and precision. These printers utilize a digital light projector as their primary component to create objects layer by layer. Key components of a DLP printer include:
Light Source
Typically a high-intensity UV light, this is the core of a DLP printer. It's directed through a series of mirrors and lenses before reaching the Digital Micromirror Device (DMD) chip.
Digital Micromirror Device (DMD)
The DMD chip contains thousands to millions of tiny mirrors, each representing a pixel of the projected image. These chips contain an array of microscopic mirrors, each representing a pixel of the projected image. In DLP printing, each voxel (a volumetric pixel, measured in microns) corresponds to a mirror on the DMD chip.
When the mirror tilts towards the resin vat, it exposes a specific voxel to the UV light, causing it to cure. Conversely, when the mirror tilts away, the corresponding voxel remains uncured. This meticulous manipulation of voxels by the DMD chip allows for the creation of complex shapes with high resolution and accuracy in DLP 3D printing.
Resin Vat
Holding the liquid photopolymer resin, the resin vat (tank) is crucial, determining the size and shape of the printed objects. The depth and dimensions of the resin tank directly affect the maximum build volume and the overall height of objects that can be printed in a single layer. Additionally, the quality and material of the vat can impact print accuracy and consistency.
Build Platform
This platform is where the printed object gradually forms layer by layer. It moves up and down or tilts to allow each layer to be cured and then descends slightly to make room for the next layer. The movement of the build platform is controlled along the Z-axis, allowing it to move up and down or tilt as each layer is cured.
Cooling and Heating Elements
Cooling and Heating Elements in DLP printers are components designed to regulate the temperature of the liquid photopolymer resin during the printing process.
Cooling system: These elements help to prevent the resin from overheating, which can lead to issues like warping or poor layer adhesion. By maintaining an optimal temperature, cooling elements ensure that each layer of resin solidifies uniformly.
Heating system: Conversely, heating elements can be used to warm the resin if it is too viscous or thick. This helps to improve flow properties, making it easier for the resin to spread evenly across the build platform.
How SLA Printer differs from DLP printer
Stereolithography (SLA) printers are another type of resin-based 3D printer that operates similarly to DLP printers. However, instead of a digital light projector, SLA printers use a laser beam to cure the resin layer by layer. This laser traces the pattern of each layer onto the resin, solidifying it as it moves.
While SLA and DLP printers share the same basic concept of curing liquid resin, their methods of light projection result in differences in print speed, resolution, and surface finish. Both SLA and DLP printers are known for their ability to create highly detailed and precise 3D prints, with SLA printers often excelling in resolution and surface finish, while DLP printers are typically faster due to their ability to cure entire layers at once.
Recommended reading: How do Resin Printers Work: SLA, DLP & More
Steps in DLP 3D Printing
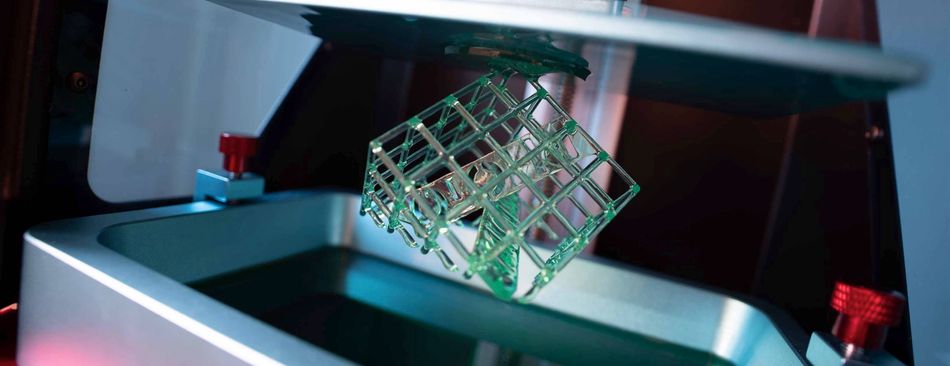
The DLP 3D printing process involves several steps, starting from digital model preparation to printing and post-processing. The process begins with a digital 3D model, which is sliced into thin layers using specialized software. These layers are then projected onto the photopolymer resin using a digital light projector, causing the resin to harden layer by layer until the entire object is formed.
The DLP projector plays a crucial role in the process. It projects UV light in the shape of the desired layer onto the resin. The light causes the photoinitiator in the resin to release energy, triggering the photopolymerization reaction that transforms the liquid resin into a solid layer. This process is repeated for each layer until the entire object is printed.
Since the entire layer is projected and cured at once, rather than point by point or line by line as in other 3D printing technologies, DLP 3D printing can be much faster.
Digital Model Preparation
Step 1: Creating the 3D Model
Creating the 3D model is the foundational step in the DLP 3D printing process. Whether it's designing from scratch using advanced CAD software or selecting a pre-existing model from a repository, this stage sets the blueprint for the final object.
Step 2: Importing into Slicing Software
Once the 3D model is ready, it's imported into slicing software. This specialized tool divides the model into precise, ultra-thin layers, similar to the cross-sections of the final printed object. This step ensures accurate reproduction of the 3D design.
Step 3: Generating Support Structures
Support structures are crucial elements in DLP 3D printing, especially for parts of the model that extend outward or overhang. These temporary structures, created by the slicing software, anchor the design to the build platform. They prevent deformities and ensure the integrity of the final product. Once printing is complete, these supports are carefully removed, leaving behind the pristine object.
Slicing and File Generation
The slicing software meticulously slices the 3D model into countless layers, each represented as a digital file. These files contain intricate details about the geometry, thickness, and position of each layer. They serve as the instructions for the DLP 3D printer, guiding its precise movements during the printing process.
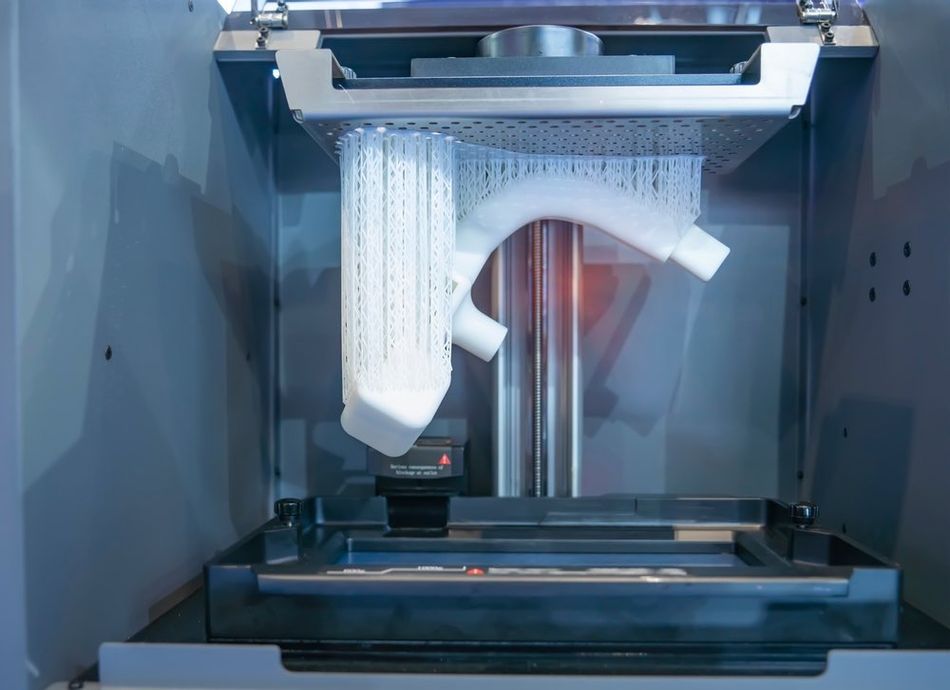
Printing Operation
With the digital files ready, they are transferred to the DLP 3D printer, where a high-resolution projector shines light onto a vat of liquid resin, solidifying each layer according to the digital design. This precise process continues until the entire object is constructed within the resin.
The Printing Process
The actual printing process in DLP 3D printing begins once the digital model is prepared and the file containing the layer information is sent to the printer. The printer contains a vat of photopolymer resin and a build platform that is initially positioned just below the surface of the resin. The digital light projector, located beneath the vat, projects the image of the first layer onto the resin. The UV light triggers photopolymerization in the resin, hardening it where projected, forming the initial layer of the 3D object.
Curing Time
Once the first layer is cured, the build platform moves up, and the projector projects the image of the next layer onto the resin. This process is repeated, with each new layer being cured on top of the previous one, until the entire object is printed.
In DLP 3D printing, the curing time for each layer is a crucial element. This time frame varies based on factors such as UV light intensity, resin composition, layer height, and layer thickness. Typically, curing can range from a few seconds to several minutes per layer.
Peeling Process
Following curing, the peeling process commences. Here, the build platform ascends to delicately separate the newly cured layer from the bottom of the resin vat. This step, known as peeling, is pivotal. Excessive peeling force can lead to defects or print failure.
Balance of Factors
The printing process in DLP 3D printing demands a delicate equilibrium. It necessitates precise calibration of the printer and meticulous control over printing parameters. This balance ensures dimensional accuracy and the successful creation of high-quality 3D printed objects.
Post-Processing
In the final stage of DLP 3D printing, known as post-processing, meticulous steps are taken to refine the printed object for optimal use.
Removal from Build Platform
The initial task involves delicately detaching the object from the support structures that were integral to its printing. Careful precision is necessary to avoid any damage to the object during this crucial step.
Cleaning with Solvent
Once removed, the object undergoes a thorough cleaning process to eliminate any residual uncured resin. This is typically achieved by immersing the object in a solvent solution, such as isopropyl alcohol. The solvent dissolves the uncured resin, leaving behind a clean and cured object. After cleaning, the object is carefully dried to remove any remaining solvent.
Support Structure Removal
Next, the support structures that provided stability during printing need to be removed. This can be accomplished manually using tools like pliers or cutters for simpler structures. For more complex designs, a solvent specific to the support material is used. This process preserves the integrity of the object while ensuring the removal of all support materials.
Additional Curing for Final Properties
Following support removal, the object may require additional curing to enhance its mechanical properties. Exposure to UV light is a common method for this final curing stage. The object can be placed in a UV curing chamber or exposed to sunlight. This additional curing solidifies any partially cured resin and improves the object's durability.
Finishing Touches
Lastly, the object may undergo further finishing touches to achieve the desired aesthetic appearance. Additional post-processing techniques in DLP 3D printing include sanding, polishing, and surface smoothing for refined finishes. Texturing methods add tactile feel, while coloring, dyeing, and coating techniques enhance appearance and durability. These finishing steps are tailored to the object's intended use and the desired final appearance.
Importance of Post-Processing
Post-processing is a critical phase in the DLP 3D printing process, requiring meticulous attention to detail and precision. Each step, from support removal to final curing and finishing, contributes to the production of high-quality 3D printed objects. The careful execution of post-processing ensures that the printed objects are not only functional but also visually appealing and durable.
Advantages of DLP 3D Printing
DLP 3D printing offers several advantages over other 3D printing technologies, making it a popular choice for various applications. Some of the key benefits include:
High Resolution and Detail
DLP 3D printing is known for its ability to produce objects with high resolution and intricate details. The digital light projector can project images with a high level of accuracy, allowing for the creation of objects with fine features, complex geometries, and smooth surfaces. This high resolution ensures that even the smallest details are faithfully reproduced in the printed object, making DLP 3D printing ideal for applications that demand precise and intricate designs.
Fast Printing Speed
One of the main advantages of DLP 3D printing is its high-speed. Since the entire layer is projected and cured at once, the printing process can be significantly faster than other 3D printing technologies that build objects point by point or line by line. This makes DLP 3D printing suitable for rapid prototyping and the production of multiple parts in a short amount of time.
Material Versatility
DLP 3D printing can work with a wide range of photopolymer resins, each with its own unique properties. This allows for the production of objects with varying levels of hardness, flexibility, and durability, depending on the specific resin used. This versatility makes DLP 3D printing suitable for a diverse range of applications across different industries.
Consistent Mechanical Properties
Objects printed using DLP 3D printing tend to have consistent mechanical properties throughout the entire structure. This is because the photopolymerization process ensures that the material is uniformly cured, resulting in a homogenous structure. This consistency can be beneficial for applications that require predictable and reliable performance from the printed parts.
Efficient Material Usage
DLP 3D printing is an efficient process in terms of material usage. Since the light is projected only onto the areas where the object is being formed, there is minimal waste of DLP resin. Additionally, any unused resin in the vat can be reused for subsequent prints, further reducing material waste and lowering the overall cost of production.
Recommended reading: Resin vs. Filament 3D Printer: Pros and Cons of Curing and Extrusion
Limitations and Challenges of DLP 3D Printing
Despite its numerous advantages, DLP 3D printing also has some limitations and challenges that need to be considered when using this technology.
Limited Build Volume
One of the main limitations of DLP technology is the relatively small build volume compared to other 3D printing technologies. The size of the build volume is determined by the size of the digital light projector, which is typically smaller than the print beds used in other technologies like Fused Deposition Modeling (FDM). This can be a constraint for applications that require large objects or a high number of parts to be printed simultaneously.
Material Constraints
While DLP 3D printing offers material versatility in terms of photopolymer resins, it is limited to using only these types of materials. This means that DLP 3D printing cannot work with materials like thermoplastics, metals, filaments or ceramics, which can be used in other 3D printing technologies. This limitation can restrict the range of applications for which DLP 3D printing is suitable.
Support Structure Removal
The removal of support structures in DLP 3D printing can be a time-consuming and labor-intensive process. Since the supports are made of the same material as the object, they can be difficult to remove without damaging the object itself. This can be particularly challenging for objects with intricate details or complex geometries.
Post-Processing Requirements
DLP 3D printed objects often require extensive post-processing to achieve the desired finish and properties. This can include cleaning, support removal, additional curing, and finishing steps like sanding or painting. These post-processing steps can add time and cost to the overall production process.
Sensitivity to Environmental Factors
DLP 3D printing relies on the precise control of light and the photopolymerization process. This makes the process sensitive to environmental factors like temperature, humidity, and ambient light. These factors can affect the curing process and the properties of the printed object, making it essential to maintain a controlled environment during printing.
Applications of DLP 3D Printing
DLP 3D printing has found applications in a wide range of industries due to its high resolution, speed, and material versatility. Some of the key industries where DLP 3D printing is being used include healthcare, manufacturing, jewelry, and prototyping. In each of these industries, DLP 3D printing offers unique benefits that make it a preferred choice for specific applications.
DLP 3D Printing in Healthcare
The healthcare industry has greatly benefited from the adoption of DLP technology. The high resolution and precision offered by DLP 3D printing make it ideal for creating medical devices and models with intricate details and complex geometries.
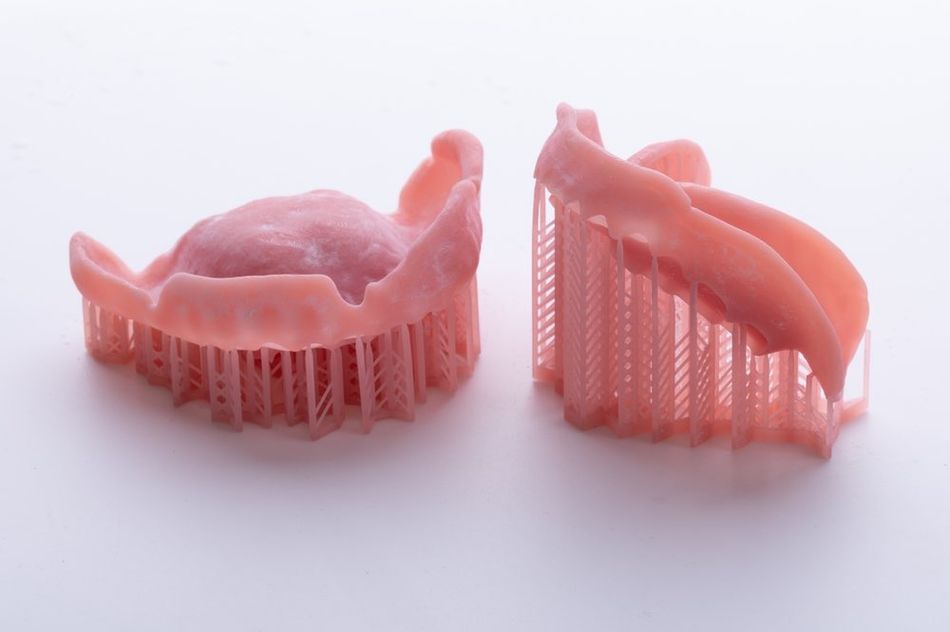
Dental Applications: In dentistry, DLP 3D printing has become indispensable for fabricating a wide range of dental devices and models. Dental laboratories utilize this technology to produce highly accurate dental models, surgical guides, and custom dental appliances including crowns, bridges, and orthodontic aligners. The exceptional resolution and accuracy of DLP 3D printing ensure that these devices fit precisely and comfortably within a patient's mouth, improving both functionality and patient satisfaction.
Hearing Aids: The production of custom hearing aids is another application of DLP 3D printing in healthcare. By using DLP 3D printing, manufacturers can create hearing aids that are tailored to the unique shape of a patient's ear canal, providing a comfortable fit and better sound quality for the wearer.
Medical Models: DLP 3D printing is instrumental in the creation of detailed anatomical models used for surgical planning, medical training, and patient education. Surgeons can utilize these accurate models to simulate surgeries, plan intricate procedures, and explain treatment options to patients. The ability to print models in various materials, including transparent resins, allows for clear visualization of internal structures, aiding in more informed decision-making..
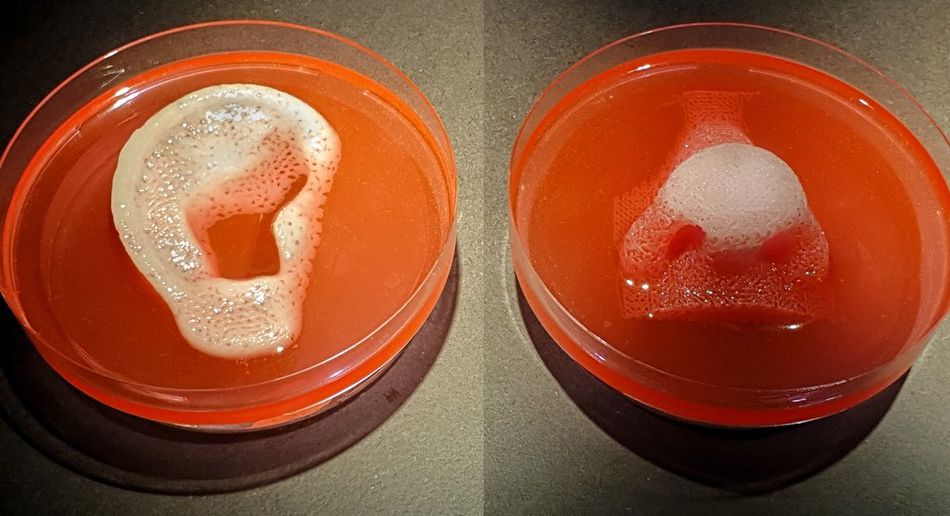
Bioprinting: Although still in the early stages of development, DLP 3D printing has shown potential in the field of bioprinting. Researchers are exploring the use of DLP 3D printing to create scaffolds and structures for tissue engineering and regenerative medicine. By using biocompatible photopolymer resins, DLP 3D printing could pave the way for customized implants and tissue constructs tailored to individual patients.
DLP 3D Printing in Manufacturing
DLP 3D printing has become a valuable tool in the manufacturing industry, particularly in the production of complex and high-precision parts. Its high resolution, speed, and material versatility make it a suitable choice for various manufacturing applications.
Rapid Prototyping: DLP 3D printing is extensively used for rapid prototyping in the manufacturing industry. The speed of DLP 3D printing allows for quick turnaround times, enabling manufacturers to iterate and refine their designs more efficiently. The high resolution of DLP 3D printing also allows for the creation of prototypes with intricate details and smooth surfaces, providing a more accurate representation of the final product.
Production of Small, Detailed Parts: DLP 3D printing is ideal for the production of small, detailed parts that would be difficult or impossible to produce using traditional manufacturing methods. This includes parts with complex geometries, internal channels, or fine features. Industries such as aerospace, automotive, and electronics often use DLP 3D printing for the production of these types of parts.
Custom Manufacturing: DLP 3D printing enables the production of custom parts without the need for expensive tooling or molds. This makes it a cost-effective solution for low-volume production or for products that require a high degree of customization. Examples include custom designed jewelry, personalized consumer products, and bespoke industrial components such as custom brackets, housings, or connectors can be rapidly fabricated with specific geometries and material properties .
Tooling and Molds: DLP 3D printing can also be used to create tooling and molds for other manufacturing processes. For example, DLP 3D printing can be used to create injection molds for plastic parts, or patterns for investment casting. This can significantly reduce the time and cost of tooling production, particularly for complex or custom tools.
End-Use Parts: With the development of high-performance photopolymer resins, DLP 3D printing is increasingly being used for the production of end-use parts. These resins can offer properties such as high strength, durability, and heat resistance, making them suitable for functional parts in various applications. However, the use of DLP 3D printing for end-use parts is still limited by factors such as the size of the build volume and the range of available materials.
Conclusion
DLP 3D printing has emerged as a powerful technology in the field of additive manufacturing, offering high resolution, speed, and material versatility. Its ability to produce intricate and detailed parts quickly and efficiently has made it a preferred choice in industries such as healthcare and manufacturing. However, like any technology, it has its limitations and challenges, including a relatively small build volume, material constraints, and the need for extensive post-processing. Nevertheless, ongoing advancements in materials and process control continue to expand its potential applications, paving the way for new possibilities in the realm of manufacturing and beyond.
Frequently Asked Questions (FAQs)
Q: What is the resolution of DLP 3D printing?
A: The resolution of DLP 3D printing is determined by the pixel size of the digital light projector. The smaller the pixel size, the higher the resolution. Typical DLP 3D printers can achieve a resolution of around 50 to 100 micrometers, but high-end machines can achieve resolutions as low as 25 micrometers.
Q: How fast is DLP 3D printing?
A: The speed of DLP 3D printing depends on several factors, including the size of the object, the layer thickness, and the properties of the resin. However, because DLP 3D printing cures an entire layer at once, it is generally faster than other 3D printing technologies that build objects point by point or line by line.
Q: What materials can be used in DLP 3D printing?
A: DLP 3D printing uses photopolymer resins. These resins come in different formulations to achieve specific properties such as flexibility, hardness, or transparency. Ceramic and metal-filled resins are also used for producing functional prototypes and parts. Biocompatible resins are utilized in medical applications for creating surgical guides and anatomical models. Additionally, specialty resins such as casting resins are employed for jewelry and casting applications.
Q: What are the post-processing steps for DLP 3D printing?
A: Post-processing for DLP 3D printing typically involves cleaning the object to remove any uncured resin, removing the support structures, and curing the object under UV light to fully harden the material. Additional finishing steps may include sanding, painting, or coating to achieve the desired appearance and properties.
Q: Can DLP 3D printing be used for mass production?
A: While DLP 3D printing is highly efficient for producing small, detailed parts and for rapid prototyping, it is not typically used for mass production due to its relatively small build volume and the cost of photopolymer resins. However, it can be a cost-effective solution for low-volume production or for products that require a high degree of customization.
References:
[1] Gibson I, Rosen D, Stucker B. Additive Manufacturing Technologies: 3D Printing, Rapid Prototyping, and Direct Digital Manufacturing. New York: Springer; 2015.
[2] Huang J, Zhang B, Xiao J, Zhang Q. An Approach to Improve the Resolution of DLP 3D Printing by Parallel Mechanism. Appl. Sci. 2022; 12(24):12905.
[3] Chaudhary R, Fabbri P, Leoni E, et al. Additive manufacturing by digital light processing: a review. Prog Addit Manuf. 2023;8:331-351.
[4] Wan L, Chen X, Hu P, Wang L, Xiong G, Gou Y, Ai F. DLP-printed standard tooth-colored ceramic dentures and its biocompatibility study. Ceram Int. 2024
[5] Li H, Dai J, Wang Z, Zheng H, Li W, Wang M, Cheng F. Digital light processing (DLP)-based (bio)printing strategies for tissue modeling and regeneration. Adv Geosci Technol. 2022;[First published: October 3, 2022]
in this article
1. DLP 3D Printing Technology2. DLP PRINTERS3. How SLA Printer differs from DLP printer4. Steps in DLP 3D Printing5. Advantages of DLP 3D Printing6. Limitations and Challenges of DLP 3D Printing7. Applications of DLP 3D Printing8. Conclusion9. Frequently Asked Questions (FAQs)10. References: