Fastest Infill Patterns in 3D Printing
Known for its continuous 3D structure, the gyroid infill pattern is among the best for its strength-to-density ratio. The infill pattern is also highly rated for print speed. Let’s take a look at why that is.

16 Oct, 2023. 11 minutes read
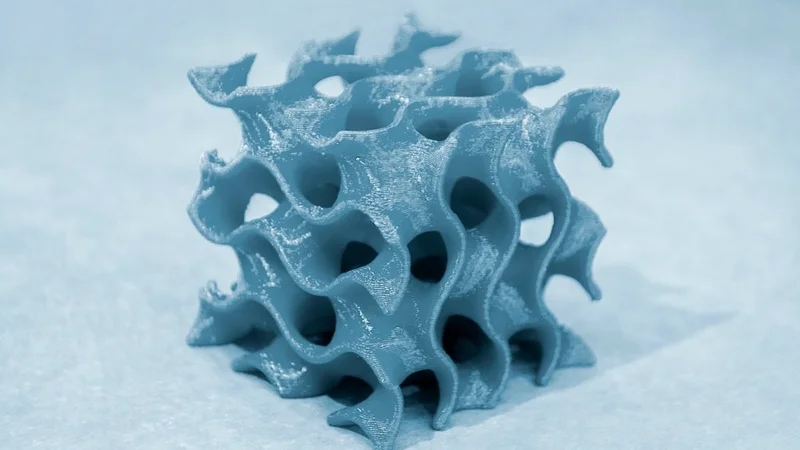
With an excellent strength-to-density ratio, the gyroid infill can also be among the fastest to 3D print.
Infill patterns play a crucial role in 3D printing, as they determine the internal structure of printed objects and provide strength to all types of parts, from prototypes and figurines to functional end-use components. The choice of infill pattern can significantly impact print speed and the strength of the final product. In this article, we will be focusing on gyroid infill, which is the best infill pattern in terms of strength-to-density and is also among the fastest infill patterns. We will also take a quick look at other common infill patterns, as well as how to adjust 3D print settings for optimal speed. Let's go.
What is an Infill Pattern
Infill patterns are the structures that fill the interior of a 3D printed object. They provide support, strength, and stability to the object while minimizing the amount of material used. The choice of infill pattern (as well as infill density) can significantly influence overall print time, material usage, and the mechanical properties of the final product.
Several factors influence the choice of infill pattern, including the desired strength, print speed, and material usage. For instance, some infill patterns offer higher strength and durability, while others prioritize print speed or material efficiency. Striking the right balance between these factors can help you achieve the desired outcome when 3D printing.
When choosing an infill pattern, it’s important to understand the relationship between infill pattern and density. In general, a denser infill provides greater strength but requires more material and longer print times. Less dense patterns can reduce print time and material usage but may compromise the strength and durability of the printed object. The choice of infill pattern can also affect the print head movement, with some patterns requiring more complex and time-consuming movements than others. Certain patterns also offer greater strength than others, even at a lower density, due to the structure and direction of the infill walls. Gyroid is one such infill pattern.
Recommended reading: Infill 3D Printing: All You Need to Know
Gyroid: the Strong and Fast Infill Pattern
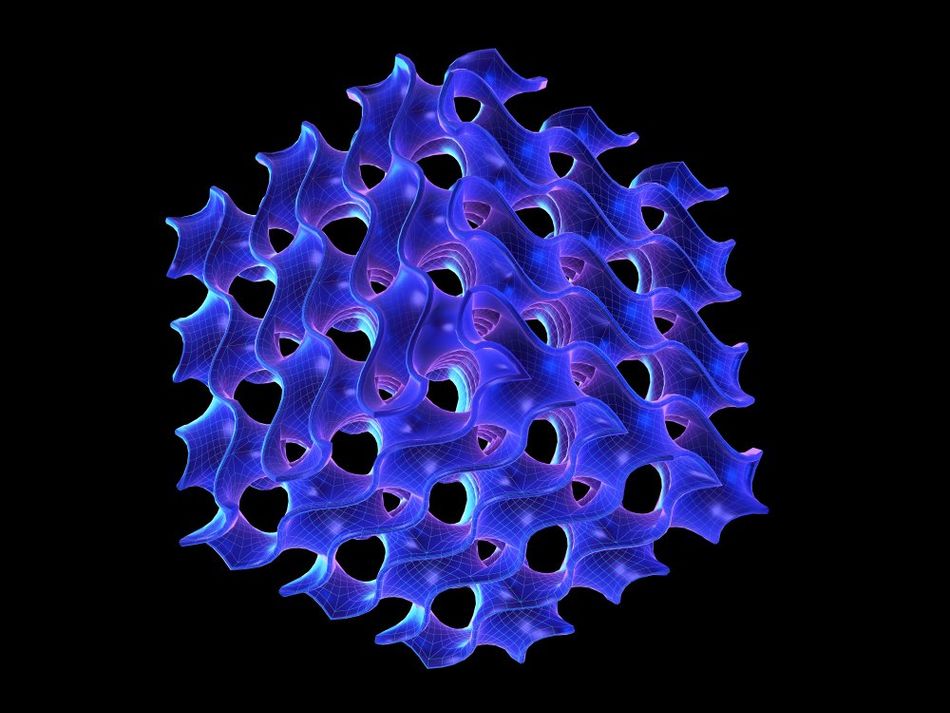
Gyroid is recognized as the strongest infill pattern, which can also print quickly due to its continuous, curving structure. Gyroid infill is a unique and highly efficient pattern that has gained popularity in recent years due to its combination of speed, strength, and material efficiency. Gyroid infill is a three-dimensional, sinusoidal pattern that provides near isotropic properties. The gyroid structure itself, which is an organic structure, was discovered by NASA scientist Alan Shoen in 1970.[1]
One of the main advantages of using gyroid infill is its ability to provide both fast print times and high strength. The pattern's continuous, smooth curves minimize the need for abrupt print head movements, reducing travel time and improving print speed. Additionally, the gyroid pattern's interconnected structure distributes stress evenly, resulting in improved strength and durability compared to other infill patterns.
Another benefit of gyroid infill is material efficiency. The pattern's unique structure allows for a high strength-to-weight ratio, using less material than other patterns while providing superior strength. This makes gyroid infill particularly suitable for applications where weight reduction and material efficiency are important considerations. Gyroid infill can be used in combination with most filaments, including PLA, PETG, and ABS, as well as flexible filaments like TPU.
Unlike most other infill patterns, the gyroid infill can actually be printed without an external shell or top layer. The attractive curving structure of the infill can therefore make for an interesting design or aesthetic. One potential downside of using the gyroid infill (which can influence the overall length of the printing process) is that that slicing times can be longer than standard 2D infill patterns.
Recommended Reading: Understanding the Gyroid Infill in 3D Printing
Gyroid Infill and Print Speed
The gyroid infill pattern's ability to improve print speed can be attributed to several factors. One of the primary reasons is the pattern's continuous, smooth curves, which minimize abrupt print head movements. This reduces the amount of travel time required for the print head to navigate the pattern, resulting in faster print times compared to patterns with more angular structures.
Gyroid’s interconnected structure also allows for more efficient print head movement, as the print head can follow a continuous path without the need for retractions or travel moves. This not only reduces the overall print time but also minimizes the risk of print errors or inconsistencies that can occur during travel moves.
Additionally, the gyroid pattern's material efficiency plays a role in its faster print times. Since the pattern uses less material than other infill patterns while still providing excellent strength, the print head needs to extrude less material, further reducing the time required to complete the print. In other words, you can achieve superior strength using a lower density gyroid infill compared to more traditional infill patterns.
Overall, the gyroid infill pattern's unique combination of smooth curves, interconnected structure, and material efficiency contributes to its ability to improve print speed while maintaining high strength and durability.
Strength and Durability of Gyroid Infill
The gyroid infill pattern offers exceptional strength and durability due to its unique three-dimensional wavy structure. This structure provides near isotropic strength, meaning it offers equal strength in all directions, which is particularly beneficial for applications where uniform strength is crucial.[2]
One of the key factors contributing to the strength and durability of gyroid infill is its ability to distribute stress evenly across the pattern. Unlike other infill patterns, such as rectilinear or honeycomb, the gyroid pattern does not have stress concentrations at specific points or intersections. This even distribution of stress reduces the likelihood of failure or deformation under load, resulting in a more durable and reliable printed object.
Another factor contributing to the strength of gyroid infill is its interconnected structure. This continuous, interlocking pattern provides excellent resistance to shearing forces and helps maintain the structural integrity of the printed object. This is particularly beneficial for applications where the printed object will be subjected to dynamic loads or stresses, such as mechanical components or load-bearing structures.
Optimizing Print Settings for Gyroid Infill Pattern
To maximize the benefits of using gyroid infill, it’s important to choose the right 3D printer settings. Specific slicer settings can ensure your print job has the right balance between print speed, strength, and filament usage. Here are the settings you should know.
Infill density
Infill density (also known as infill percentage) is arguably the most important setting when using gyroid infill. Unlike standard infill densities, where higher density correlates to greater strength, the optimal density for gyroid is typically between 10-25%. With this pattern, a higher infill percentage can actually lead to vibrations in the 3D printer, which can cause inaccuracies or print errors. Gyroid infill offers one of the best strength-to-infill density ratios of all the infill patterns.
Layer thickness
Layer thickness also plays a role in print speed and quality. Using a larger layer thickness for infill can reduce print time, as fewer layers are needed to complete the object. In slicing software programs such as Cura, it is possible to set the infill layer height higher than the outer layer height. This ensures that the surface quality is maintained, while speeding up the infill print time. If you are using this technique, make sure that the infill layer height corresponds to a multiple of the outer layer height.[3]
Print speed
Print speed settings can also be adjusted to optimize the use of gyroid infill. Faster print speeds can reduce overall print time but may compromise print quality or lead to errors. Slower print speeds can improve print quality, layer adhesion, and accuracy but increase print time. In most slicer programs it is possible to set an infill print speed, meaning that the infill can print faster than the outer layer. This is good if your 3D model requires a good surface quality and strength isn’t a major priority.
Common Infill Patterns
Most slicer programs will offer users a range of different pre-set infill patterns to choose from. Here are some of the most common ones.
Rectilinear
The rectilinear infill pattern is one of the most basic and widely used patterns in 3D printing. It consists of straight lines that intersect at right angles, forming a grid-like structure. This pattern is relatively simple to print, as it requires minimal print head movement and can be printed quickly.
One of the main advantages of using rectilinear infill is its simplicity, which translates to faster print times compared to most more complex patterns. If your 3D application does not require significant strength, rectilinear is often the fastest option, even beating out gyroid.
That said, there are some disadvantages to using rectilinear infill. Due to its grid-like structure, it can be less efficient in terms of material usage compared to other patterns. Furthermore, the right-angle intersections can create stress concentrations, which may lead to reduced strength and durability in certain applications.
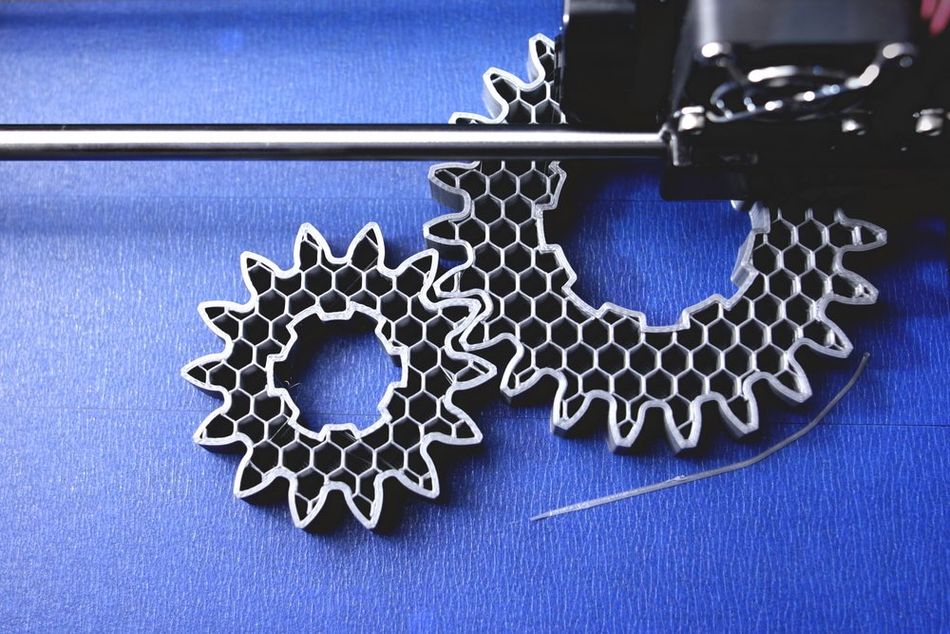
Honeycomb
The honeycomb infill pattern is another common choice in 3D printing. Inspired by the hexagonal structure found in natural honeycombs, this pattern consists of interconnected hexagons, which create a strong and efficient internal structure.
One of the main advantages of using honeycomb infill is its strength-to-weight ratio. The hexagonal structure provides excellent strength and rigidity while using less material compared to other patterns, such as rectilinear. This makes honeycomb infill particularly suitable for applications where weight reduction and material efficiency are important considerations.
There are some caveats to be aware of when using honeycomb infill. For one, the complexity of the pattern can result in longer print times compared to simpler patterns like rectilinear infill. Additionally, the print head needs to make more intricate movements to create the hexagonal structure, which can increase the likelihood of print errors or inconsistencies.
Triangular
The triangular infill pattern is another option and is characterized by its arrangement of equilateral triangles that form a tessellated pattern. This pattern offers a balance between strength, material usage, and print speed, making it a good choice for various applications.
One of the main advantages of using triangular infill is that it is strong in every horizontal direction. This is due to the uniform distribution of stress across the triangular structure, which can result in improved durability and resistance to deformation compared to other patterns like rectilinear.
While the triangular infill offers a good balance between strength and material usage, it may not be the most efficient option in terms of print speed. The print head needs to make more complex movements to create the triangular pattern, which can result in longer print times compared to simpler patterns. This infill pattern is particularly suitable for applications where equal strength in all directions is a critical requirement, such as mechanical components or load-bearing structures.
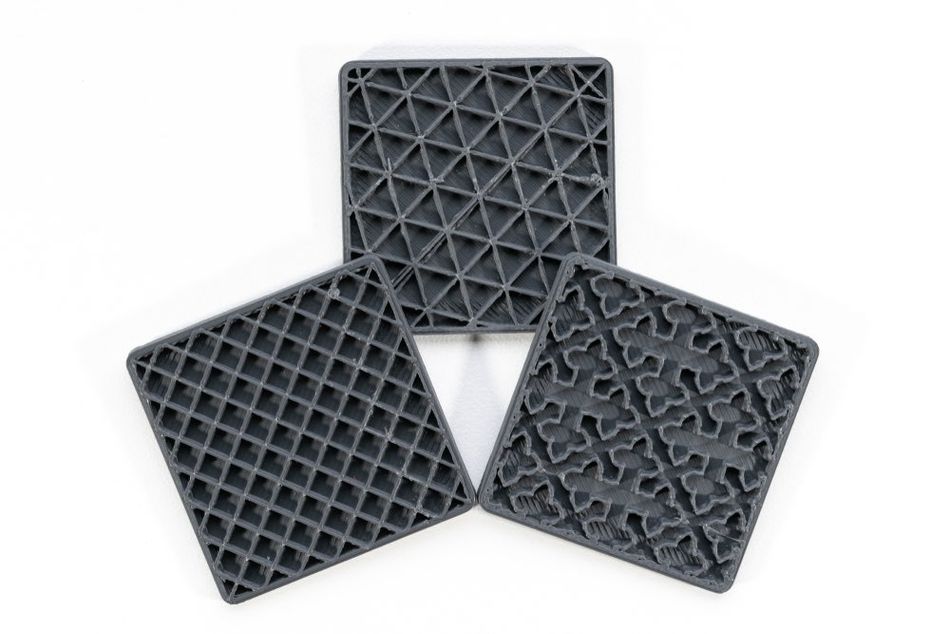
Of course, that is just the tip of the iceberg when it comes to different infill patterns, there are also many other types of infill pattern, such as grid infill, cross 3D infill, hexagon infill, octet infill, cubic infill concentric infill, zig-zag infill, lightning infill, and more.
Recommended Reading: Cura infill patterns: What they are and when to use them
Factors Affecting Infill Speed
Regardless of the pattern, one of the primary factors that affect print speed is infill density. Infill density refers to the amount of material used in the infill: for example 100% infill density will be a solid object, while a 0% infill density will be a hollow print. It should go without saying that higher infill densities require more material to be extruded, which increases the overall print time. Lower infill densities use less material and can result in faster print times.
If print speed is a top priority, it can be tempting to use a low infill density to speed things up, however it’s important to think about the trade-off between print speed and final part strength. In short, while lower infill densities are faster to print, they are typically weaker than higher infill densities.
The complexity of infill patterns also influences print speed. Many more complex patterns, such as honeycomb, require the print head to make intricate movements, which can increase print time compared to simpler patterns like rectilinear. Additionally, complex patterns may require more travel moves, further increasing print time. It is crucial to balance the benefits of a complex pattern, such as improved strength or material efficiency, with the potential increase in print time. Gyroid is an exception to this: despite being a complex 3D pattern, its continuous curving lines are easy for the printhead to follow.
The relationship between infill pattern and print head movement is another factor that influences print speed. Patterns that require fewer print head movements or shorter travel distances can result in faster print times. For example, rectilinear infill requires relatively simple print head movements, while more complex patterns like honeycomb or triangular infill necessitate more intricate movements. Understanding the relationship between infill pattern and print head movement can help guide the selection of an appropriate pattern to optimize print speed for a given project.
Recommended reading: 3D print speed: What it is and why it matters
Advanced Techniques for Faster 3D Printing
In addition to optimizing print settings for gyroid infill, there are several advanced techniques that can further improve print speed while maintaining quality and strength. These techniques can be combined with gyroid infill to achieve even faster printing times and better results.
Adaptive layer height
Adaptive layer height is a technique that adjusts the layer height throughout the print based on the geometry of the object. By using larger layer heights in areas with less detail and smaller layer heights in areas with more detail, adaptive layer height can reduce print time while maintaining print quality.
Variable infill density
Variable infill density is another technique that can be used to improve print speed and material usage. This approach involves using different infill densities in different areas of the object, depending on the required strength and support. For example, areas that need more strength can have a higher infill density, while areas with less stress can have a lower infill density.
Print acceleration and jerk settings
Print acceleration and jerk settings can also be adjusted to improve print speed. Acceleration settings control how quickly the print head speeds up to reach the maximum print speed, while jerk settings determine the minimum speed that requires any acceleration. Increasing acceleration and jerk settings can reduce the time it takes for the print head to reach its target speed, resulting in faster print times. It’s worth remembering that excessive acceleration and jerk can lead to print errors or reduced print quality.
Conclusion
In the end, gyroid infill is a highly efficient infill pattern in 3D printing, offering an excellent combination of speed, strength, and material efficiency for printed parts. By understanding the factors that affect print speed, such as infill density, pattern complexity, and print head movement, you can optimize your print settings to maximize the benefits of using gyroid infill. Experimenting with these techniques and finding the right balance for your specific application can help you achieve the best possible results in your 3D printing projects.
Frequently Asked Questions
Q: What is the fastest infill pattern in 3D printing?
A: While simple patterns like rectilinear typically rank as the fastest, gyroid infill is also a strong contender. This is because the gyroid has a wavy structure which can be printed continuously, as well as its excellent strength-to-density ratio, which enables users to attain greater strength with less density and material usage.
Q: How does infill pattern affect print speed?
A: Infill pattern affects print speed by influencing print head movement, travel time, and material usage. Simpler patterns like rectilinear require less complex print head movements, while more intricate patterns like honeycomb may require more complex movements and longer travel distances. Gyroid, while complex, has a continuous structure which is easy for the print head.
Q: What is the relationship between infill density and print speed?
A: A higher infill density typically provides greater strength, but requires more material and longer print times. Lower infill densities can reduce print time and material usage but may compromise the strength and durability of the printed object. In short, the more material that needs to be deposited (higher density infill), the longer the print time will take.
Q: How can I optimize print settings for the fastest infill pattern?
A: To optimize print settings for the fastest infill pattern, consider adjusting infill density, layer height, print speed, acceleration, and jerk settings. Balancing these settings can help you achieve the best possible balance between print speed, strength, and material usage.
References
[1] Weyhaupt, Adam G. “Meet the Gyroid”. Plus Magazine, September 12, 2011. [Internet] https://plus.maths.org/content/meet-gyroid
[2] Parab S, Zaveri N. Investigating the influence of infill pattern on the compressive strength of fused deposition modelled PLA parts. InProceedings of International Conference on Intelligent Manufacturing and Automation: ICIMA 2020 2020 (pp. 239-247). Springer Singapore. https://link.springer.com/chapter/10.1007/978-981-15-4485-9_25
[3] “Infill Settings.” Ultimaker, March 9, 2022. [Internet] https://support.ultimaker.com/hc/en-us/articles/360012607079-Infill-settings
in this article
1. What is an Infill Pattern2. Gyroid: the Strong and Fast Infill Pattern3. Optimizing Print Settings for Gyroid Infill Pattern4. Common Infill Patterns5. Factors Affecting Infill Speed6. Advanced Techniques for Faster 3D Printing7. Conclusion8. Frequently Asked Questions9. References