Lines in 3D Prints: How to Fix Them
Unwanted lines in 3D prints can show up for many reasons and take different forms. Here we look at the most common types of lines in 3D prints and how to eliminate them.

Last updated on 04 Sep, 2024. 12 minutes read
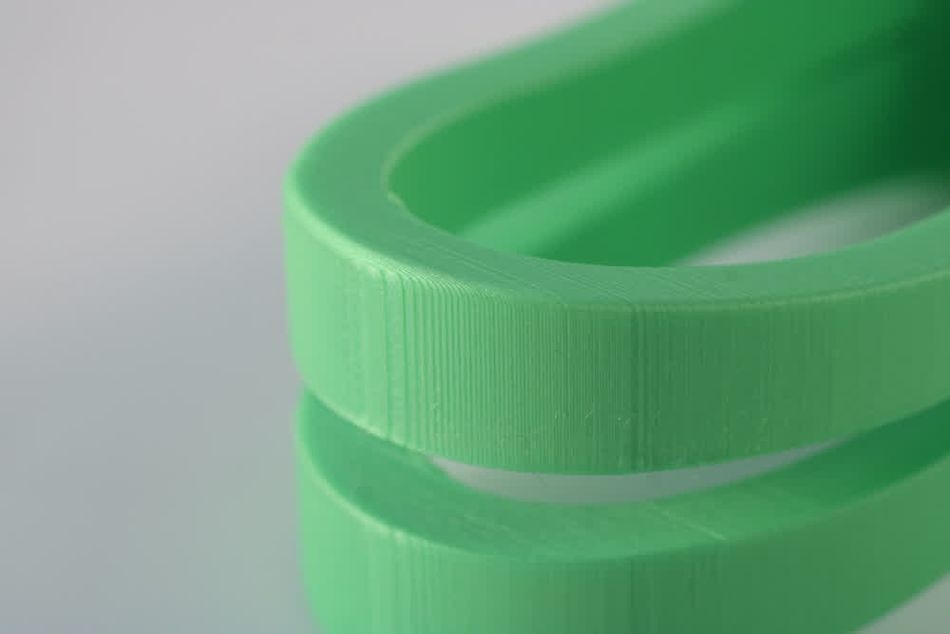
Common lines in 3D prints include layer lines
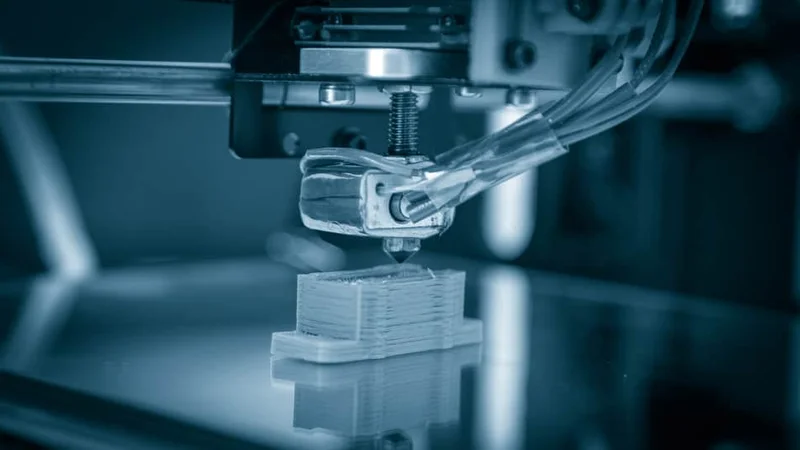
3D printing is a revolutionary technology that offers huge potential across many industries, from manufacturing to medicine. However, as with any technology, it comes with its own set of challenges. One common issue faced by FDM/FFF 3D printing enthusiasts and professionals alike is the appearance of unwanted lines on the surface of prints. These lines can detract from the aesthetic quality of the printed object and, in some cases, compromise its structural integrity.
The most common instance of unwanted lines in 3D prints is layer lines. These are a natural result of the layer-by-layer printing process and are virtually unavoidable, though their effect can be minimized with slicer settings and post-processing. However, other line issues and fluctuations can appear in addition to layer lines, and these often indicate an issue with the printer hardware or print setup.
This article will delve into the various types of lines that can appear in 3D prints, including layer lines, Z banding, layer shifts, and Z seams. We will also look at the best materials and colors for avoiding these lines, and the surface finishing techniques that can minimize their appearance and improve print quality.
Types of Lines in 3D Prints
Lines in 3D prints can appear for different reasons. Each type of line can arise from different issues, and each requires a different approach to fixing the problem. Below is a more in-depth exploration of the most common types of lines that can appear on 3D printed parts and detailed guidance on how to address them effectively.
Layer Lines
Regular layer lines are the most common type of line issue seen in 3D prints. These evenly spaced horizontal lines result from the additive process inherent in 3D printers, where layers of material are deposited one on top of the other. The thickness of each print layer determines the visibility of these lines.[1] Curved or round parts generally look worse. While layer lines are a natural outcome of the process, they can be minimized or, in some cases, made nearly invisible.
Causes:
The primary cause of regular layer lines is the layer height setting. Thicker layers create more pronounced lines, resulting in a stepped appearance on curved surfaces, while thinner layers produce a smoother surface. However, thinner layers can also extend the print time significantly.
Fixes:
Adjust Layer Height: The most straightforward way to reduce the visibility of regular layer lines is to decrease the layer height. Lowering the layer height from 0.2 mm to 0.1 mm, for example, can dramatically reduce the appearance of lines. However, this will also increase print time, so finding a balance between quality and speed is key.
Optimize Nozzle Size: Using a smaller nozzle can help create finer layers, which in turn reduces the appearance of layer lines. For instance, switching from a standard 0.4 mm nozzle to a 0.2 mm nozzle will allow for more precise printing, resulting in smoother surfaces.
Calibrate Extrusion Settings: Over-extrusion can exacerbate the visibility of layer lines, as excess material may bulge out between layers. Ensuring that your extrusion multiplier or flow rate is properly calibrated can help prevent this. Run a series of test prints to fine-tune these settings.
Enable Smoothing Features in Slicer: Many slicer software options like Cura offer features designed to smooth out surfaces, such as adaptive layers, which dynamically adjust layer height based on the geometry of the model. Utilizing these features can help reduce the visibility of layer lines on curved surfaces or complex geometries.
Z Banding
Z banding, or ribbing, is a more problematic and visually disruptive type of line that appears as periodic horizontal ridges on a print [4]. Unlike ordinary layer lines, these Z banding lines typically appear only at intervals. These ridges can give the print an uneven, rippled appearance, detracting from its overall quality.
Causes:
Z banding is often caused by inconsistencies in the movement of the Z-axis, which may result from mechanical issues such as lead screw wobble, Z-axis misalignment, or imperfections in the lead screw itself. Variations in the printer’s frame alignment or inconsistencies in the Z-stepper motor can also contribute to this issue.
Fixes:
Check and Tighten the Lead Screw: One of the most common causes of Z banding is a loose or wobbling lead screw. Ensure that the lead screw is properly aligned and tightly secured to both the motor and the printer's frame. Lubricating the lead screw can also help ensure smooth movement.
Align Z-Axis Components: Misalignment in the Z-axis can lead to uneven layer heights and contribute to Z banding. Use a spirit level or digital gauge to check that the Z-axis is perfectly vertical. Adjustments may be needed to the printer's frame or Z-axis rods to achieve proper alignment.
Upgrade Z-Axis Hardware: If Z banding persists despite alignment and tightening efforts, consider upgrading the Z-axis hardware. Switching to a dual Z-axis setup or upgrading to higher-quality lead screws can significantly reduce Z banding. Additionally, using anti-backlash nuts can help prevent any play in the lead screw, resulting in more consistent layer heights.
Optimize Z-Axis Stepper Motor Settings: Ensure that the Z-axis stepper motor is properly calibrated, with correct steps per millimeter settings. In some cases, increasing the microstepping resolution can lead to smoother vertical movement, reducing the likelihood of Z banding.
Use a Consistent Layer Height: Z banding can also occur when the layer height is not a proper multiple of the Z-axis step distance. To minimize this, calculate your optimal layer height based on your printer’s Z-axis step size, which is often determined by the pitch of the lead screw and the stepper motor's step angle.
Recommended reading: Z Banding: Rooting out the Cause and Fixing the 3D Printing Defect
Layer Shift
Layer shifts are a severe issue that occurs when a layer is misaligned relative to the previous one, creating a visible offset in the print and, typically, a thick horizontal line at the shifted layer. This misalignment can ruin the entire print and is often a symptom of mechanical or electronic problems within the printer.
Causes:
Layer shifts are typically caused by loose belts, slipping pulleys, or stepper motor issues. External factors, such as a bump or jolt to the printer during the print, can also cause shifts. In some cases, insufficient current to the stepper motors or overheating stepper drivers may be to blame.
Fixes:
Tighten Belts: Loose belts are a common cause of layer shifts, as they can slip during rapid movements, leading to misalignment. Regularly check the tension of the belts and tighten them as needed. The belts should be taut but not overly tight, as excessive tension can wear out the pulleys and reduce the lifespan of the belts.
Check and Secure Pulleys: Pulleys that are not properly secured to the stepper motor shafts can slip during printing, causing layer shifts. Ensure that the set screws on the pulleys are tightened and properly aligned with the flat part of the motor shaft. Using thread-locking compounds like Loctite can help keep the screws from loosening over time.
Inspect Stepper Motors: If the belts and pulleys are in good condition, the issue may lie with the stepper motors. Ensure that they are receiving adequate power by checking the voltage settings on the stepper drivers. If the motors are underpowered, they may not be able to maintain position under load, resulting in shifts. Additionally, check for overheating, which can cause stepper drivers to temporarily shut down, leading to missed steps.
Stabilize the Printer: External forces, such as a bump or a draft, can cause layer shifts by physically moving the printer during the print. Place your printer on a stable, vibration-dampening surface, and consider using an enclosure to protect it from drafts or accidental contact.
Reduce Print Speed: High print speeds can exacerbate the risk of layer shifts, especially if your printer's mechanical components are not up to the task. Reducing the print speed can alleviate the strain on the motors and belts, resulting in more accurate layer placement.
Upgrade to Closed-Loop Stepper Systems: For advanced users, upgrading to closed-loop stepper systems can virtually eliminate the risk of layer shifts. These systems use feedback from the stepper motors to ensure that the position is always accurate, even if a missed step occurs.
Z Seam
A Z seam is a vertical line that appears on the print, intersecting the points at which each layer starts and ends. This type of line is especially noticeable in cylindrical or spherical objects, where the printer must make continuous loops to build up the object. The Z seam can disrupt the smoothness of the surface, particularly when it consistently occurs in the same vertical line.
Causes:
The Z seam is primarily caused by the printer’s retraction settings, the slicing algorithm used, and the starting point of each layer. If the printer retracts the filament too slowly or too quickly when moving to a new layer, it can leave a small blob or gap at the seam. Additionally, if the layer start point is always in the same position, the seam will be more noticeable.
Fixes:
Adjust Retraction Settings: Fine-tuning your printer’s retraction settings can significantly reduce the visibility of the Z seam. Start by adjusting the retraction distance and speed in your slicer software. A longer retraction distance can help reduce the amount of filament that oozes out when the print head moves to a new layer, while a faster retraction speed can help minimize stringing and blobs.
Use Z Seam Alignment Features: Many slicers offer a Z seam alignment feature that allows you to control where the seam appears on the print. You can choose to randomize the seam position, align it with a particular corner, or hide it in a less noticeable area, such as the back of the print.[2] By strategically placing the seam, you can minimize its impact on the overall appearance of the print.
Experiment with Coasting: Coasting is a feature in some slicers that stops the extrusion slightly before the end of a layer, allowing the pressure in the nozzle to equalize. This can help reduce the amount of filament that oozes out at the end of the layer, which is a common cause of Z seam marks. Start with a small coasting distance and gradually increase it until you achieve the desired effect.
Optimize Print Speeds: Printing too quickly can exacerbate Z seam issues, as the print head may not have enough time to properly retract and move to the new layer start point. Reducing print speeds, particularly on outer walls, can help improve the quality of the seam.
Try a Different Slicer or Settings Profile: If you’re still struggling with Z seam issues, consider trying a different slicer or using a different settings profile. Some slicers handle Z seam placement better than others, and a fresh approach might yield better results. Additionally, updating your slicer software to the latest version can provide access to improved algorithms and features that may help mitigate seam visibility.
Best Materials and Colors for Avoiding Lines
The type of material and color you choose for your 3D print can significantly impact the visibility of surface lines. While print settings and machine calibration are crucial, material choice can provide an extra layer of control.
Materials
Some materials may be more prone to showing lines than others, though research in this area is limited. For example, PLA (Polylactic Acid) is known for producing relatively smooth prints, but it is also more likely to show Z banding if the printer is not well-calibrated. PETG (Polyethylene Terephthalate Glycol) offers a good balance between strength and smoothness but can sometimes highlight Z seams if not properly managed.
ABS (Acrylonitrile Butadiene Styrene) is more challenging to print with but can offer smoother surfaces when printed correctly. It’s also less prone to issues like Z banding because of its higher printing temperature and better layer adhesion. However, ABS can be more susceptible to warping, which might lead to layer shifts.
Colors
Color plays an important role in the visibility of lines. Darker colors, particularly black and dark gray, tend to hide lines better than lighter colors like white or yellow. Matte finishes also help in reducing the visibility of lines compared to glossy finishes, which can highlight even the smallest imperfections.
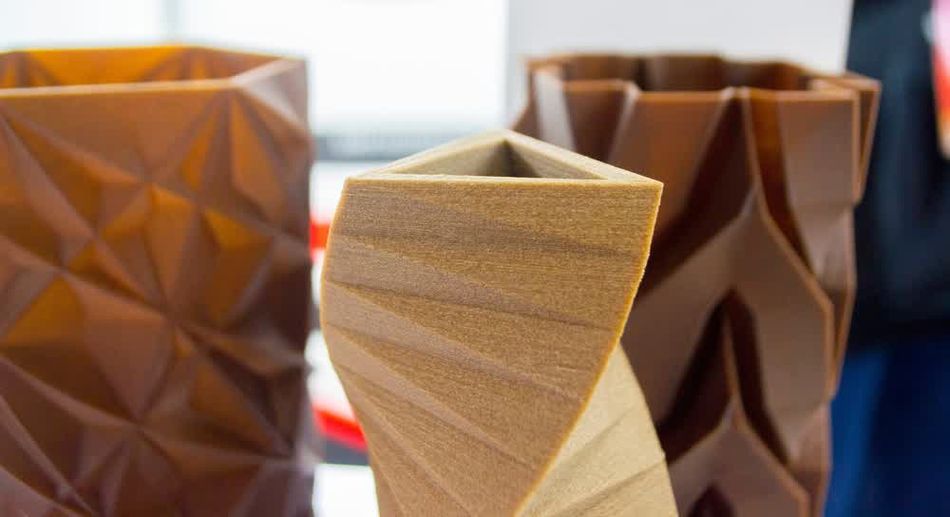
If your project allows for it, choosing a material with a slight transparency can help diffuse light through the layers, making lines less visible. Additionally, composite materials that include fibers or particles, like carbon-fiber-filled PLA or wood-filled PLA, can mask lines due to their textured appearance.
Textures
Using a slicer like Cura to add texture to the surface of a 3D printed part can effectively reduce the appearance of layer lines and other blemishes. By intentionally adding surface texture, you can disguise the inherent imperfections of FFF/FDM printing, such as visible layer lines or minor surface inconsistencies.
In Cura, this can be achieved by applying the "Surface Mode" setting or by using special infill patterns. For example, a “fuzzy skin” feature can create a slightly rough, irregular surface on the outer shell of the print. This adds a uniform texture that masks the uniformity of layer lines, making them less noticeable. Additionally, you can adjust the layer height, line width, and extrusion multiplier to fine-tune the surface finish.
Another approach is to design your 3D model with built-in textures, which Cura can then interpret and apply during slicing. By using textures like stippling, woodgrain, or other patterns, the printed object can appear more polished and less prone to showing lines.
Hiding Lines in 3D Prints Via Surface Finishing
Even with the best materials and printer settings, some lines may still appear on your prints. This is where surface finishing techniques come in. These methods can help you minimize or even eliminate the appearance of lines, giving your print a smooth surface and a professional, polished look.
Sanding
Sanding is one of the most straightforward ways to smooth out surface lines. Start with a coarse grit sandpaper (around 100-200 grit) to remove the most pronounced lines, then gradually move to finer grits (up to 1000 grit or higher) for a smoother finish. Wet sanding can be particularly effective, as it reduces dust and helps achieve a more even surface.
Priming and Painting
Priming is an excellent way to fill in minor surface imperfections before painting. Apply a few coats of primer, allowing each layer to dry before lightly sanding. Once primed, you can paint your model to not only achieve the desired color but also to further mask any remaining lines. Using a filler primer can be especially effective for covering up layer lines.
Chemical Smoothing
For certain materials, chemical smoothing can be an effective method to remove lines. ABS, for example, can be smoothed using acetone vapor. The acetone slightly melts the surface of the print, causing the lines to blend together and create a glossy, smooth finish. However, this method requires careful handling, as overexposure can cause loss of detail or even structural integrity.
PETG can be smoothed using specific solvents like dichloromethane, but this requires a well-ventilated area and protective equipment due to the toxic nature of the chemicals involved.[3] PLA, on the other hand, is more resistant to chemical smoothing, and alternative methods like sanding and painting are usually more effective.
Recommended reading: PLA Smoothing: How to Smooth 3D Prints
Resin Coating
Applying a resin coating is another effective method to smooth out 3D prints. Epoxy resin, for example, can be brushed or sprayed onto the surface of the print. Once it cures, it forms a hard, smooth layer that covers up any lines or imperfections. This method is particularly popular for prints that will be used for display or as prototypes.
Resin coating can also be tinted or colored, adding an extra layer of customization to your print. However, this method requires a steady hand and some practice to achieve a flawless finish.
Heat Treatment
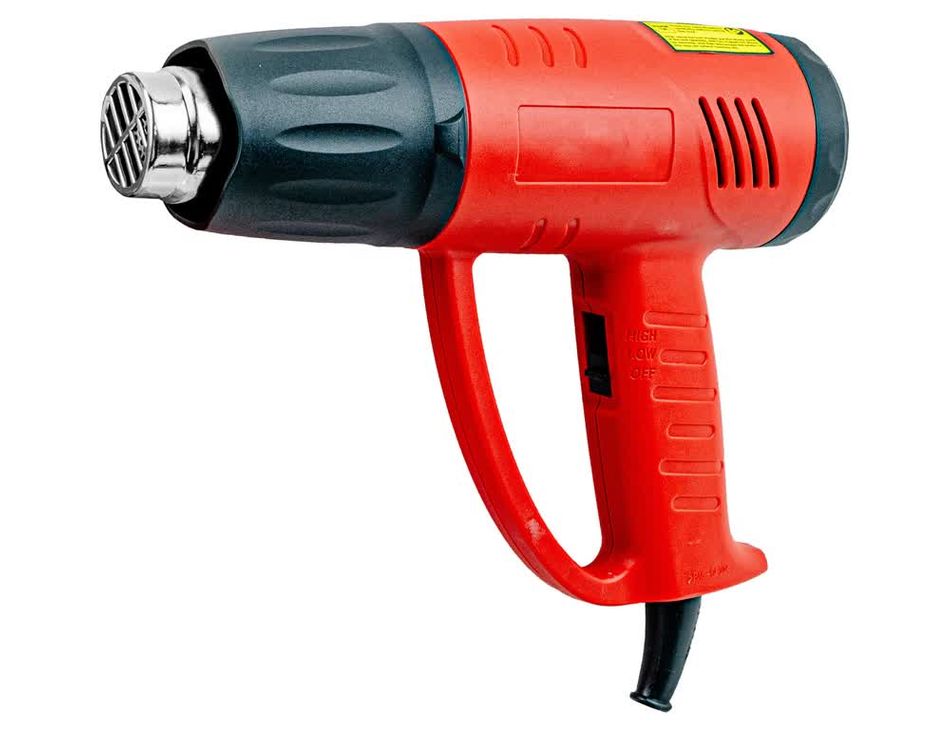
Heat treatment is another technique that can help in reducing the appearance of lines in certain materials. By carefully heating the print, you can soften the outer layers just enough to cause them to flow slightly, filling in any gaps or lines. This method works well with materials like ABS, which soften at relatively low temperatures.
However, heat treatment requires precision. Too much heat can deform the print, while too little may not have any noticeable effect. It’s also essential to heat the entire surface evenly to avoid creating new imperfections.
Conclusion
Lines in 3D prints are a common issue that can detract from the overall quality of your project. By understanding the different types of lines, identifying them correctly, and choosing the right materials, you can significantly reduce their appearance. Additionally, employing surface finishing techniques like sanding, priming, chemical smoothing, resin coating, and heat treatment can help you achieve a professional-grade finish.
With the right approach, you can minimize or even eliminate lines in your 3D prints, ensuring that your final product looks as good as it performs. Whether you're a hobbyist or a professional, mastering these techniques will take your 3D printing skills to the next level.
Frequently Asked Questions (FAQ)
Why are my 3D prints showing visible lines even after adjusting the settings?
Visible lines can persist despite adjustments due to a variety of factors. Mechanical issues such as loose belts, misaligned Z-axis components, or lead screw wobble can still cause problems. Material choice, nozzle size, and print speed also play crucial roles. Ensure all mechanical parts are secure, consider switching to a finer nozzle, and experiment with different materials to achieve smoother surfaces.
What’s the best way to minimize lines on curved surfaces?
Minimizing lines on curved surfaces can be challenging due to the increased likelihood of visible layer lines and Z seams. Use adaptive layer height settings in your slicer to adjust layer thickness based on the curvature of the model. Also, consider randomizing the Z seam placement to distribute it around the surface rather than having it in a single location. Using a finer nozzle and printing at a slower speed can also help achieve smoother curves.
Can I eliminate lines completely, or are they always going to be present?
Completely eliminating lines in 3D prints is difficult, as they are a natural consequence of the layer-by-layer printing process. However, you can significantly reduce their visibility through careful calibration, proper material choice, and surface finishing techniques such as sanding, priming, or chemical smoothing. For most prints, the goal should be to minimize lines to the point where they are barely noticeable rather than to eliminate them entirely.
References
[1] Loflin WA, English JD, Borders C, Harris LM, Moon A, Holland JN, Kasper FK. Effect of print layer height on the assessment of 3D-printed models. American Journal of Orthodontics and Dentofacial Orthopedics. 2019 Aug 1;156(2):283-9.
[2] Zapciu A, Tasca GD, Amza CG. Considerations on 3D printing joints parts. InIOP Conference Series: Materials Science and Engineering 2018 Aug 1 (Vol. 400, No. 2, p. 022061). IOP Publishing.
[3] Erokhin KS, Gordeev EG, Ananikov VP. Revealing interactions of layered polymeric materials at solid-liquid interface for building solvent compatibility charts for 3D printing applications. Scientific Reports. 2019 Dec 27;9(1):20177.
[4] Hernandez D. “Factors Affecting Dimensional Precision of Consumer 3D Printing.” *International Journal of Aviation, Aeronautics, and Aerospace* 2 (4): Article 5, 2015. https://doi.org/10.15394/ijaaa.2015.1085