How to Fix 3D Printing Layer Separation (AKA Delamination)
The causes behind 3D printing delamination and eight ways to improve inter-layer adhesion for stronger 3D prints.

Last updated on 22 Apr, 2024. 8 minutes read
Adjust temperature, speed, and cooling settings to fix delamination
If you notice that there are horizontal cracks in your 3D print or that layers seem to be coming apart, particularly in the middle of a build, you are likely dealing with a problem known as 3D printing layer separation (aka delamination). In the 3D printing process, delamination is caused by poor adhesion between the layers. In other words, as each new layer is deposited, something is preventing it from fusing properly to the preceding layer, which causes it to pull apart and crack as it dries. This phenomenon can have serious consequences for not only the appearance of 3D models but also part strength and structural integrity.
3D printing layer separation has similarities to first layer adhesion problems (when the first layers of a build do not stick to the print bed resulting in warping). For example, some of the primary causes of 3D printing layer separation are incorrect print temperature and under-extrusion. But there are also important differences between the two. In this article, we are diving into the common 3D printing problem and troubleshooting delamination.
How to Improve Layer Adhesion
There are a number of ways to improve layer adhesion and minimize the risk of 3D printing layer separation, ranging from adjusting print temperature and speed settings, to cleaning or changing nozzles, to playing with cooling settings. We outline each of these potential fixes below.
Increase print temperature
One of the first steps to fixing delamination is to increase the print head temperature. If the print head isn’t hot enough for the type of material you are printing with, the filament won’t melt consistently, which can lead to under-extrusion and weak bonding between layers. A higher temperature will cause the filament to melt faster and result in a stronger filament flow through the nozzle. This in turn will encourage the filament layers to fuse together and create a stronger part.
Finding the correct print temperature depends entirely on the type of filament you are using. For example, PLA has a relatively low melting point and prints at a lower temperature than ABS. For PLA, we recommend starting off with a print temperature of about 210 °C. If layer separation is occurring at this temperature, try increasing the hot end temperature by 5-10 degrees at a time. For ABS, the recommended range for nozzle temperature is 220–250 °C. If you are still seeing delamination within this range, gradually increase the nozzle temperature to see if layer adhesion improves.
Clean the nozzle
As we saw, 3D printing layer separation occurs when layers of filament do not properly bond to each other. This could be due to incorrect printing temperatures, but it can also be caused by inconsistencies in extrusion. If your nozzle is under-extruding, there won’t be enough thermoplastic filament to create strong adhesion between the layers. We therefore recommend checking your 3D printer’s hotend to make sure there isn’t any plastic or dust clogging the nozzle. If there is, unclog the nozzle and remove the blockage.
There are a number of ways to clean your printer’s clogged nozzle. One of the simplest methods involves inserting a fine needle or wire (smaller than the nozzle’s diameter) into the heated nozzle tip to break up any debris. You can also purchase dedicated cleaning filament, which catches any blockages and pulls them through the hot end. Other cleaning methods include the cold pull and atomic pull techniques. If these methods are insufficient, it could be time to replace the nozzle entirely. Ultimately, a clean nozzle won’t just help solve layer separation, it can also improve other 3D printing issues, such as stringing.
Recommended reading: How to Clean 3D Printer Nozzles and Prevent Clogs
Decrease print speed
Print speed, which refers to how quickly the printhead moves along the X and Y axes while depositing filament, has a significant impact on the quality of 3D printing.[1] While a fast print speed is often desirable, it also comes with an increased risk of issues like ringing, under-extrusion, and poor layer adhesion. These problems happen when the melting and extrusion rate of the filament can’t quite keep up with the printhead’s movement.
Decreasing the print speed can thus improve your 3D print outcomes. For regular prints, we recommend a print speed within the range of 50–60 mm/s. If you are experiencing delamination within this range, decrease the print speed by about 5 mm/s at a time. In general, the slower the print speed you use, the better the adhesion between layers and the stronger the final part will be. Additionally, the optimal print speed is highly dependent on the type of filament you are printing: PLA can handle faster printing speeds, while a material like TPU needs to be printed slowly (20 mm/s).
Recommended reading: 3D print speed: What it is and why it matters
Adjust flow rate
Another setting that can influence inter-layer adhesion is the flow rate, or extrusion multiplier. A parameter found in slicer programs like Cura, flow rate controls how quickly filament is fed into the hot end. In general, the flow rate is linked to the print speed, so if you increase or decrease the print speed, the flow rate should adjust automatically.
If you’ve cleaned your 3D printer’s nozzle and have adjusted the print temperature and speed but are still seeing the signs of under-extrusion and poor layer adhesion, you can try adjusting the flow rate incrementally. When facing under-extrusion, you want to gradually increase the flow rate so that more material will flow through the nozzle. We should note, however, that increasing the flow rate too much can lead to other problems, namely over-extrusion and blobs.
Decrease cooling rate
Layer delamination or layer splitting can also occur if the thermoplastic layers cool too quickly on the print bed and don’t have enough time to bond before the plastic solidifies. There are a couple strategies for slowing the cooling process down. For starters, using an enclosed build chamber will help ensure a more consistent print environment and slow down the filament’s rate of solidification. This not only gives each new filament layer more time to fuse with the previous layer, it can also reduce the risk of shrinking and warping. If your printer does not have an enclosure, you can make or buy one.[2]
If you are still seeing the signs of delamination, you can further decrease the cooling rate by lowering the printer’s cooling fan speed. We suggest doing this in increments—by 5 to 10% at a time—to see if it improves layer bonding. We should also point out that certain materials benefit from lower fan speeds, including ABS and PETG, while other materials, like PLA, can print well with a fan speed of 100%.
Adjust layer height
Decreasing the layer thickness in your slicer software can also help to improve layer adhesion and solve delamination. In general, the layer height measurement should be smaller than the nozzle diameter.[2] This difference ensures that the nozzle puts a bit of pressure on each layer it deposits, gently squishing it and encouraging the thermoplastic to stick to the layer under it. If the layer height is too big, the surface area between the two layers will be smaller and have a weaker bond.
When setting your layer height, it should be a maximum 80% of the nozzle diameter size. For example, if you are using a 0.4 mm nozzle, the maximum layer height should be 0.32 mm.[3] With this size of nozzle, 0.2 mm is a fairly standard layer height. If this layer height isn’t solving delamination, you can try decreasing it, but if you set your layer height too small you risk other problems, like thin layers and clogged nozzles.
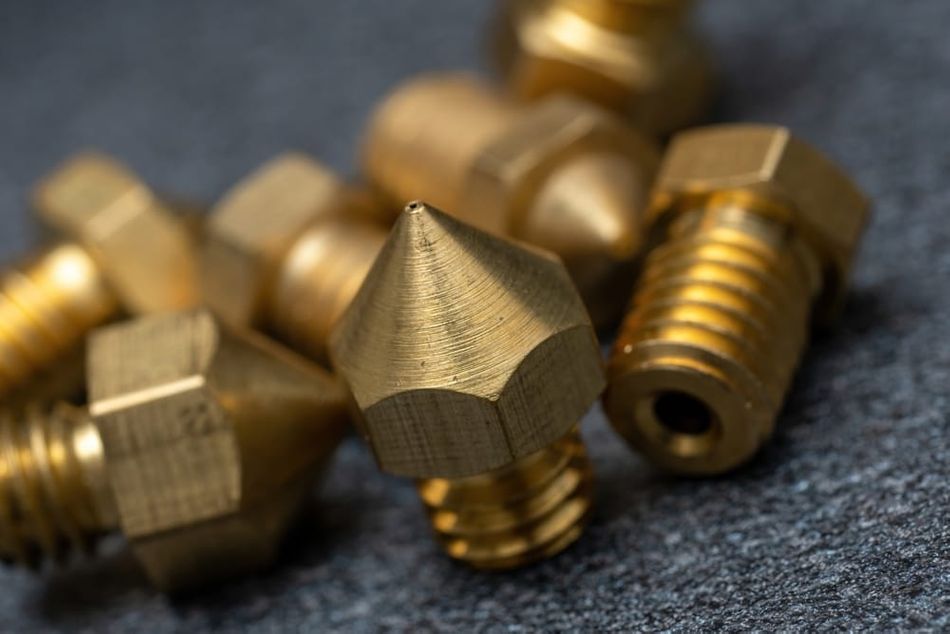
Increase nozzle diameter
Another effective tactic for combatting layer separation is to swap out your nozzle for one with a larger diameter. A wider nozzle diameter will allow more material to flow through onto the print bed, and will result in layers with a thicker width. The wider layers can improve layer adhesion thanks to the simple fact that there is a greater surface area for the next layers to stick to.
Most FDM 3D printers come equipped with a 0.4 mm nozzle, so that’s likely what you’re working with. It is possible to purchase and install smaller and larger nozzles: a smaller diameter nozzle (0.2 mm) will enable you to print finer details, while a larger diameter will encourage layer adhesion and strength and can increase print speeds (this will inevitably compromise precision and the quality of details). Larger nozzles are also less prone to clogging and are suitable for specialty filaments, like fiber-reinforced materials.
Recommended reading: Nozzle diameter and layer height explained
Proper filament storage
The materials you are using to 3D print can also influence the quality of finished models, and bad quality of moisture-affected filaments can contribute to common 3D printing problems like delamination. Proper material storage and handling are therefore very important when it comes to FDM 3D printing. Hygroscopic filaments like PLA and nylon can absorb moisture from the air, which then evaporates when the filament is melted in the print head. The air bubbles created from the evaporating moisture trapped in the thermoplastic ultimately cause inconsistent extrusion, bubbling, and poor layer adhesion. To prevent this, filaments should be stored in airtight containers with desiccants. If you are concerned that your filament may have been exposed to moisture already, it is possible to dry it out before the printing. We have a helpful guide on drying filament here.
It is also a good idea to invest in high-quality filament from reputable manufacturers for consistent diameter, material properties, and minimal impurities. That’s because low-quality filament contains impurities or inconsistencies that can affect flow properties and bonding characteristics, leading to weak adhesion and separation. To check the quality of your 3D printing filament, simply measure the filament’s diameter at various points using calipers and check for visible defects or inconsistencies.
Key Takeaways
By following these various steps (one by one because sometimes a single adjustment will solve the problem!) you should be able to overcome delamination and ensure that your prints benefit from strong bonds between layers. Here’s a rapid summary of what we covered:
3D printing layer separation occurs when printed layers of plastic do not fuse together properly during the printing process, causing weaknesses in the 3D printed structure.
Increasing the print temperature can fix delamination by improving filament flow and ensuring that layers are sufficiently melted to bond together.
Build up in the 3D printer nozzle can cause under-extrusion and lead to delamination. Clean your nozzle regularly to avoid this problem.
Adjusting the print speed can also improve delamination: a slower print speed will result in stronger adhesion between layers and a stronger final part.
Other factors, like flow rate, fan speed, and nozzle size can also impact the quality of inter-layer bonding.
By applying the information in this article, 3D printing users can solve the issue of delamination and reduce the risk of it happening again. This ultimately will help you to achieve more consistent and reliable 3D prints.
Frequently Asked Questions (FAQs)
Q: What is layer separation in 3D printing?
A: Layer separation occurs when the individual layers of a 3D printed object fail to bond or adhere properly, resulting in visible gaps, cracks, or complete separation between layers.
Q: What causes layer separation?
A: Layer separation can be caused by various things, including incorrect temperature, flow rate, speed, and cooling settings, or issues with the printer nozzle or filament.
Q: How can I prevent layer separation?
A: To prevent layer separation, optimize print settings for the specific material, ensure proper material storage and handling, and perform regular maintenance and cleaning on the 3D printer nozzle.
Q: Can layer separation be fixed after a print is completed?
A: In most cases, layer separation cannot be effectively fixed after a print is completed, particularly when it has a functional application. However, in some cases it is possible to minimize the signs of delamination in a 3D print. For example, applying a coating (such as an epoxy resin) will help smooth out the surface of the print. When using ABS, acetone can also help soften the layers and help fuse them together.
Q: Can layer separation influence the strength and integrity of a 3D printed part?
A: Yes, layer separation can significantly impact the structural integrity, dimensional accuracy, and overall functionality of a 3D print, making it unsuitable for functional applications or end-use products.
References
[1] Agarwal KM, Shubham P, Bhatia D, Sharma P, Vaid H, Vajpeyi R. Analyzing the impact of print parameters on dimensional variation of ABS specimens printed using fused deposition modelling (FDM). Sensors International. 2022 Jan 1;3:100149
[2] Zuza, Mikolas. How to Build a simple, cheap enclosure for your 3D printer [Internet]. Prusa Research, April 13, 2018. Available from: https://blog.prusa3d.com/cheap-simple-3d-printer-enclosure_7785/
[3] Layer Separation and Splitting [Internet] Simplify 3D, 2022. Available from: https://www.simplify3d.com/support/print-quality-troubleshooting/layer-separation-and-splitting/