How to Clean 3D Printer Nozzles and Prevent Clogs
Understanding the causes behind 3D printer nozzle clogs and learning the best ways to clean nozzles for superior 3D printing results.

Last updated on 08 Aug, 2024. 11 minutes read
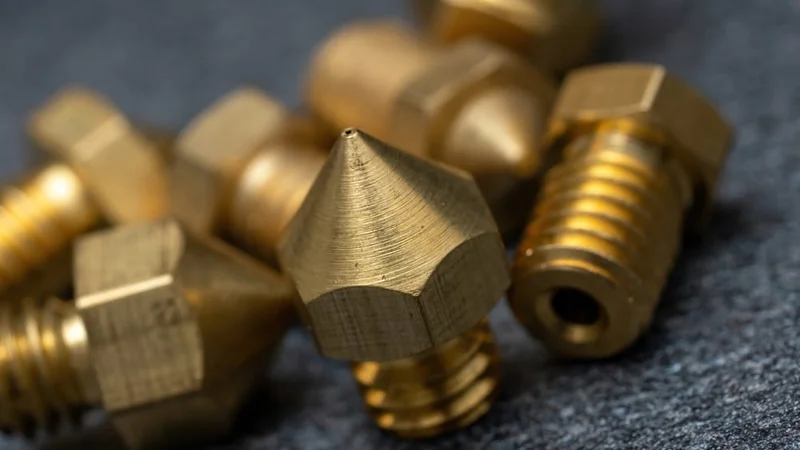
A clean nozzle is vital to achieving high-quality 3D prints
Choosing the right method for cleaning 3D printer nozzles is important. A clogged 3D printer nozzle can lead to all sorts of problems, from under-extrusion and missing layers to no filament coming through at all. In this article, you’ll learn how to tell if your nozzle is clogged, identify what is causing the problem, how to clean the 3D printer nozzle, and ultimately how to prevent nozzle clogs from happening in the future.
How to identify a clogged 3D printer nozzle
Safety notice: Cleaning or replacing a hot-end nozzle involves parts that can exceed 200 °C and chemical solvents. Always power-off and unplug the printer, let the nozzle cool below 50 °C, and wear heat-resistant gloves, safety glasses, and work in a well-ventilated area.[3]
There are a few telltale signs that your 3D printer nozzle could be clogged. Material stringing, missing layers, clicking sounds in your extruder gears, and inconsistent extrusion patterns—specifically thin layers—are all symptoms of a partially clogged nozzle. And if no filament is coming through your extruder onto the build platform, you could be dealing with a fully clogged nozzle.
If you suspect your 3D printer nozzle is clogged, but want to be sure that is what is causing defects in your 3D prints, disable the extruder gear and try to manually feed filament through the hot nozzle. If the nozzle is not clogged, this should be a fairly easy task and the filament should move through the nozzle consistently. If you experience resistance, you are likely dealing with a clog. Similarly, if the filament does extrude through the nozzle hole but appears thinner than it should be or starts to curl up onto the exterior of the nozzle, there is likely some obstruction inside the nozzle that is stopping the full material flow.
Recommended reading: 3D printer stringing: How to fix it
What causes a clogged nozzle?
There are a few culprits when it comes to a clogged 3D printer nozzle. Often, the cause is related to something fairly simple and easily preventable, such as dust contamination. Sometimes, the problem can be more complex and related to the printing temperature and temperature of the nozzle. Let’s take a closer look at the leading causes of a clogged 3D printer nozzle.
Clogged nozzle causes | |
Dirty filament from poor filament storage | Dust particles on improperly stored filament can cause build-up in the 3D printer nozzle, leading to blockages. |
Switching between filaments | Failing to clean the nozzle in between switching filaments can lead to nozzle clogs. |
Printing temperature too high/low | Using the wrong printing temperature can cause nozzle clogs through material buildup or heat creep. |
Incorrect nozzle height | If the nozzle height is too small, it can cause filament buildup on the outside of the nozzle. |
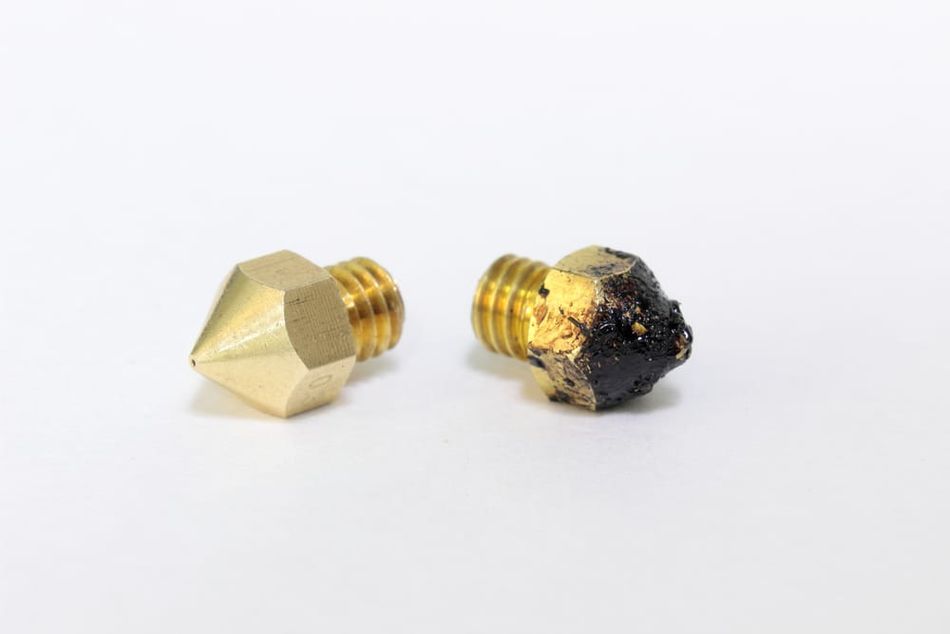
Dirty filament: Particles of dust or dirt in the printing environment can get stuck to filament if it isn’t properly stored. These contaminating particles are then carried into the nozzle as filament is fed through. Inside the nozzle, the dust particles burn eventually causing a buildup of carbonized material and a blockage. This is also a risk if the 3D printer itself collects dust.
Switching materials: Another cause of nozzle jams is not cleaning your nozzle in between material transitions. For example, if you 3D printed PLA and want to switch to ABS, you should always clean the nozzle in between. There are a few techniques for cleaning the nozzle in between filament changes to remove residue, including cold pulling or using a wire brush to remove residue from the outside of the hot end.
Printing temperature: Setting your 3D printer extruder to the wrong temperature can also lead to clogs. On the one hand, if the nozzle temperature is too low, the filament will not melt properly, which can lead to material buildup and pressure inside the nozzle. On the other hand, if the printing temperature is too hot, it can lead to a phenomenon called heat creep. This is when the heat from the nozzle extends farther up the extruder mechanism, which starts to melt the filament before it reaches the hot end. If this happens, the 3D printer’s extrusion gears will not be able to feed the filament through properly leading to clogs.
Nozzle height: If your 3D printer nozzle is set too close to the print bed, it can result in clogging. This is because the nozzle will not be able to properly deposit the first layer of melted filament onto the print bed. Instead, the melted thermoplastic will coat the outside of the nozzle and adhere to it. This can cause an external blockage as well as lead to filament to retract inside the filament, which can cause an internal clog.
How to clean the 3D printer nozzle
If your 3D printer is showing the signs of a clogged nozzle, there’s no need to fret. You can often fix a clogged hot end using a combination of easy techniques, which we’ll explore below. It is also worth mentioning that the cleaning method will vary depending on whether your 3D printer is experiencing a partial clog (i.e. material is still being extruded but at inconsistent rates) or a full clog (i.e. no melted filament is being extruded). Here’s how to clean a 3D printer nozzle:
Partial Clog
Cleaning filament: If you are dealing with a partial clog, using a dedicated cleaning filament is an effective way to clear away nozzle debris. Cleaning filaments are often nylon-based but they are specifically designed for cleaning, not for 3D printing. To use cleaning filament, simply heat your 3D printer to a slightly higher temperature than you used for your most recent print job. Be wary of setting the temperature too high as this can cause the filament clog inside the nozzle to burn.
When the nozzle is at the right temperature, feed the cleaning filament through the nozzle. You should notice traces of the original filament coming out with the cleaning filament, which means the cleaning is working. Keep extruding the cleaning filament until it comes out clean. Your 3D printer should be good to go from there.
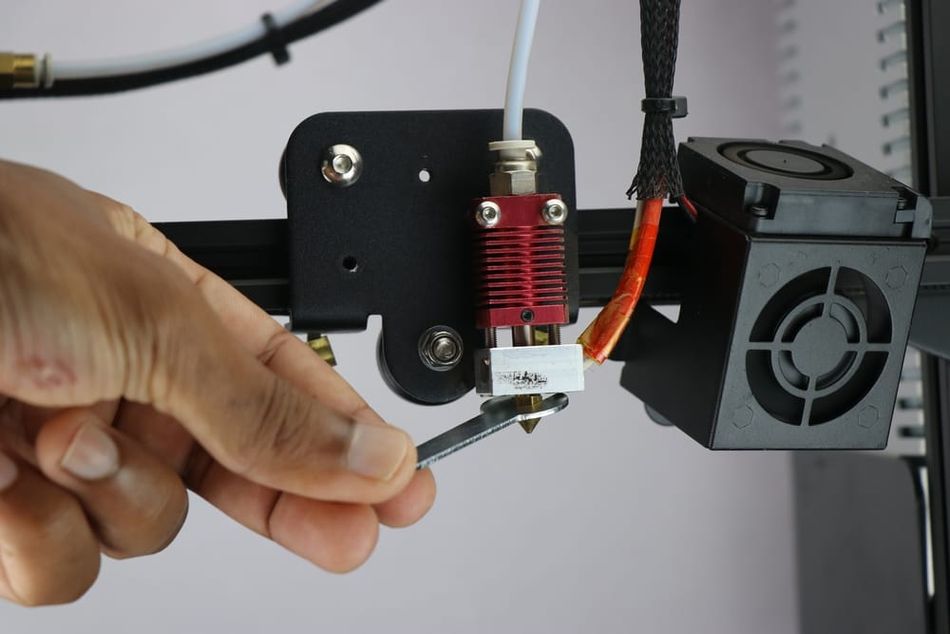
Wire brush: If the surface of your 3D printer nozzle is dirty and coated with melted filament, removing this residue should be the first step. To do this, use a brass wire brush (steel brushes are too abrasive) to scrub away any filament residue or dirt from the nozzle. Be sure to heat the nozzle up before using the brush so the filament is easier to remove. You can also try to wipe away any leftover filament using an alcohol wipe. Regular use of cleaning brushes helps prevent buildup and extends the time between deep cleanings.
Full Clog
Needle: This method is one of the easiest ways to remove debris from inside the 3D printer nozzle. Start by heating the hot end to the temperature that corresponds to the last material you 3D printed. Then, use a fine needle or wire, such as an acupuncture needle or a fine steel guitar string, to gently poke upwards through the nozzle hole. This should break up the filament debris that is blocking the nozzle so that it can be easily extruded.
If you are using the needle method, be sure that you are using a needle that is finer in diameter than the nozzle itself, otherwise you can damage the nozzle. It is also recommended to use an acupuncture needle instead of a drill bit because they are less prone to breaking inside the nozzle. Acupuncture needles are ideal for this task due to their fine tips, durability, and heat resistance. They can effectively dislodge carbonized filament residue and other contaminants that accumulate in the nozzle over time.
Cold Pull: To use the cold pull method, begin by heating up the 3D printer extruder to about 250°C. (If you are using this method with PLA, use a lower temperature, like 200°C.) When the nozzle is hot, push the filament through the print head. Next, let the nozzle cool down and the filament solidify. Then, reheat the extruder to a lower temperature (like 115°C) and when the temperature reaches 90°C quickly pull the filament up and out of the extruder nozzle. Soft filaments like nylon filament tend to work best for cold pulls.
You can tell the cold pull worked if the end of the 3D printer filament is shaped like the inside of the nozzle. This method is effective because the particle buildup inside the nozzle adheres to the filament as it solidifies. However, sometimes it takes a few cold pull tries to get a fully cleaned nozzle.
The science behind the cold pull method relies on the principle of thermal expansion and contraction. When heated, the filament expands and fills the nozzle cavity. As it cools, the filament contracts more than the metal nozzle, creating a tight fit. This contraction causes the filament to grip onto any debris or carbonized material inside the nozzle.
Atomic Pull: The atomic pull, also known as the atomic method, is similar in principle to the cold pull method for cleaning the nozzle. However, instead of letting the nozzle cool to room temperature, it remains heated the entire time. To use this method, start by removing the original filament from the 3D printer. Next, set the nozzle temperature to 250-260°C (or 220°C if you are using PLA). When the nozzle has reached the right temperature, manually feed filament through the hot end until it starts to extrude. From there lower the nozzle temperature to 160°C for ABS or PETG or 90°C for PLA. When this temperature has been reached, tug the filament up out of the nozzle.
Similar to the cold pull method, you know the atomic pull will have worked if the tip of the filament is shaped like the inside of the hot end. Again, you may need to repeat this process a few times to remove the debris that is causing the clog. The atomic pull method is recommended by Ultimaker for its desktop 3D printers. If you are working with an Ultimaker system or another 3D printer with a bowden tube that feeds into the nozzle, you may have to remove bowden tube before manually inserting the filament.[1]
Chemical soaking: If the pulling methods are not unclogging the nozzle sufficiently, the next step would be to remove the hot end from the 3D printer and clean it. A common method for cleaning the nozzle is to use a chemical solvent like acetone. Using acetone is most effective with ABS filament. PLA, for its part, can be dissolved using ethyl acetate.[2] With this method, simply submerge the nozzle in the acetone or solvent for a few hours. From there it should be easy to remove what is left of the filament particles that caused the clog.
When using the nozzle soaking method, always prioritize safety by wearing appropriate protective gear and following proper handling procedures for the chosen cleaning solution.
Recommended reading: PLA and Acetone? Here are Better Ways to Smooth PLA 3D Prints
Replacing the nozzle: If none of the aforementioned 3D printer nozzle cleaning methods work, it might be time to replace your nozzle. In general, it is a good idea to replace your 3D printer nozzle every three to six months, especially if you are using cheaper brass nozzles. When swapping out a 3D printer nozzle, start by heating up the hot end and removing any filament in the 3D printer. The heat will make it easier to unscrew the nozzle using a wrench or pliers. From there it’s as simple as screwing on the new nozzle onto the printer head.
Here are some signs that your nozzle is ready to be replaced:
Print quality consistently deteriorates despite regular cleaning.
The nozzle shows visible signs of wear, such as an enlarged or misshapen hole.
You experience frequent clogs that cannot be resolved through cleaning methods.
The nozzle has been damaged by collision with the print bed or other objects.
Recommended reading: Nozzle diameter and layer height explained
How to prevent a clogged nozzle
Cleaning the 3D printer nozzle is only one part of the solution, it is also critical to prevent clogs from happening in the first place. Fortunately, achieving clog-free 3D printing is pretty straight forward.
Clean your 3D printer and environment regularly
First, keep your 3D printing environment clean and dust-free. This consists of dusting and wiping down surfaces near your 3D printer, as well as the 3D printer itself. It also consists of keeping your 3D printer filaments safe from contaminants. Proper filament storage, in airtight containers with desiccant packets, will prevent dust or dirt from adhering to the materials and finding their way into your nozzle. You can also wipe your filament with a soft cloth or paper towel before 3D printing to remove any dust particles.
Use good quality filaments
Another key step in preventing clogs is to use good quality filament. Low-quality filaments can have inconsistent diameters, which can lead to inconsistent extrusion. Some filaments have also been found to contain foreign particles that can clog your 3D printer’s hot end. Reputable filament brands with high-quality, high-purity printing materials should print reliably and smoothly.
Follow a nozzle cleaning routine
There are also good habits that can ultimately help to prevent filament buildup and nozzle clogs, such as cleaning the nozzle whenever you switch the type of filament you are using, and ensuring the correct printing temperature and settings for a given material.
Implementing a consistent cleaning routine is crucial for maintaining optimal 3D printer performance and longevity. The frequency of cleaning and maintenance depends on the printer's usage, but here are some general guidelines to follow:
Frequency | Task |
Daily | Visual inspection of nozzle and print bed |
Weekly | Clean print bed, check belt tension |
Bi-weekly | Thorough nozzle cleaning, lubricate moving parts |
Monthly | Clean fans and air vents, check electrical connections |
Quarterly | Full hot end disassembly and cleaning, firmware updates |
Annually | Replace worn parts (belts, bearings), calibrate stepper motors |
Recommended reading: What to do when filament sticks to nozzle surfaces
Conclusion
In the end, a clogged 3D printer nozzle is a fairly common problem for FDM 3D printer users, but it is avoidable. By taking the right preventative steps—like keeping your 3D printing area free of dust and using good quality filaments—you can reduce the risk of nozzle clogs from the get-go. That being said, if you ever find yourself dealing with a blocked 3D printer nozzle, there are solutions. We saw how to clean a 3D printer nozzle in the event of a partial or full clog, using techniques like cleaning filament, cold pulling, and acetone solvents. For more 3D printing troubleshooting, see our article on solving first layer adhesion problems.
Frequently Asked Questions (FAQs)
Q: How often should I clean my 3D printer nozzle?
A: Nozzle cleaning frequency depends on usage. For light use (1-10 hours/week), perform a quick check before each print and a thorough cleaning monthly. For heavy 3D printer use (30+ hours/week), do a thorough cleaning weekly.
Q: What is the best method for fixing a partially clogged nozzle?
A: Using a dedicated nylon-based cleaning filament is an effective way of removing debris and filament buildup in a 3D printer nozzle. If the material buildup is on the outside of the nozzle, using a brass wire brush to remove the plastic particles is also effective.
Q: What is the best method for fixing a fully clogged nozzle?
A: If you are experiencing a fully clogged nozzle, there are several effective cleaning methods, including using a fine acupuncture needle to break up the debris inside the nozzle and then using a cleaning filament or cold pull technique to remove the plastic buildup. Soaking the nozzle in a chemical solvent like acetone can also help to remove stubborn blockages.
Q: What are the signs that a 3D printer nozzle is blocked?
A: There are several signs that your 3D printer has a clogged nozzle, including material stringing, missing layers, inconsistent extrusion patterns, and clicking sounds from the extruder. If the nozzle is completely blocked, no filament will be extruding.
Q: When should I replace my 3D printer nozzle?
A: Generally speaking, it is advisable to replace your 3D printer nozzle every three to six months, particularly if you are using brass nozzles, which wear down faster than steel hardened nozzles.
References
[1] 3DVerkstan, 2016. “The Atomic Method” [Internet] https://support.3dverkstan.se/article/10-the
[2] Thomas Sanladerer, December 29, 2016. “Basics: Cleaning out a clogged nozzle” [Internet] https://www.youtube.com/watch?v=g8uvh6kvr54
[3] Hodson L., Dunn K. L., Dunn K. H., Glassford E., Hammond D., Roth G. *Approaches to Safe 3D Printing: A Guide for Makerspace Users, Schools, Libraries, and Small Businesses.* NIOSH Publication 2024-103, U.S. CDC, 2023. https://doi.org/10.26616/NIOSHPUB2024103