PETG Stringing: 9 Effective Ways to Prevent It
As an affordable 3D printing filament with excellent mechanical properties, PETG is a must-have material for FDM users. But it is notorious for oozing and stringing during printing.

Last updated on 02 Nov, 2023. 8 minutes read
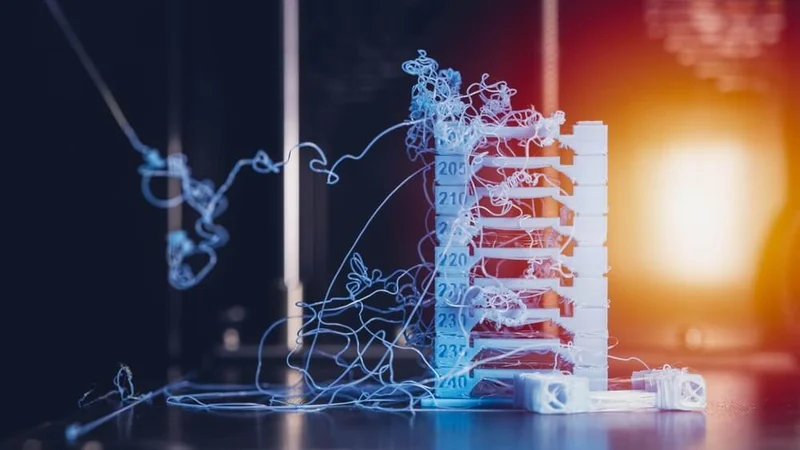
PETG: a useful 3D printing filament that is prone to stringing
There are many reasons why FDM users choose PETG (Polyethylene terephthalate) as a 3D printing material. Stronger and more impact-resistant than PLA, this inexpensive thermoplastic offers a good level of flexibility and is suitable for mechanical parts. Other advantages of PETG include its good chemical and moisture resistance, as well as its natural transparency.[1]
But while PETG offers several benefits, it can also cause headaches for FDM users, mainly due to PETG stringing. Without the right preparation and calibration, PETG prints can exhibit large amounts of filament oozing and stringing, an undesirable phenomenon where a printhead nozzle deposits hair-width strands of plastic as it travels from one part of the build to another.
This article takes an in-depth look at PETG stringing, discussing why PETG stringing occurs, how to diagnose it, and how to prevent it.
What is PETG Stringing?
FDM 3D printing is an excellent technology for making accurate, low-cost parts from thermoplastics. The FDM process involves heating up a filament to its melting point, extruding it from a nozzle, and depositing it in 2D layers.
Unfortunately, any technology that deals with hot liquid plastic is liable to run into occasional problems. One such problem is stringing: when the printer nozzle leaks excess molten material as it travels from one area to another. This leakage results in fine strands of plastic being deposited over the build — sometimes making the part unusable.
Stringing can occur with any kind of filament, but it is particularly common with PETG as the material has a high melting point and requires a high nozzle temperature in order to flow and print properly. High-viscosity materials, on the other hand, are less prone to stringing.
How to Identify Stringing
In most cases, stringing is easy to spot. Fine strands of plastic resembling hairs or cobwebs will be visible on the build, particularly when features are spaced far apart.
It is possible to gauge the extent of a stringing problem by printing a stringing test print or stringing tower, a simple STL model (like this) that is susceptible to stringing by design. Users can print the model to see whether changes to certain print parameters help mitigate the problem.
Since stringing is such a critical issue for 3D printing, some researchers have attempted to develop neural networks that can identify the occurrence stringing in real time. The researchers have suggested that Deep Learning could be used to identify stringing then correct 3D printer settings autonomously.[2]
How to Prevent PETG Stringing
There are several troubleshooting options for reducing stringing on PETG prints, from proper filament storage to adjustment of print settings.
Keep PETG Filament Dry
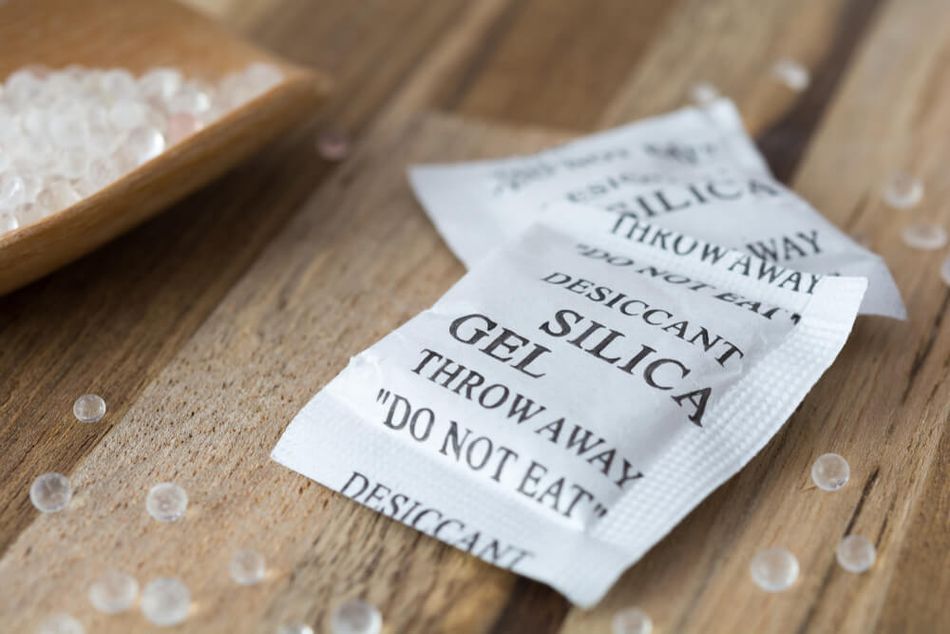
Moisture can cause stringing, regardless of the material. This is because moisture creates small air bubbles in the filament that burst when the material is heated. This bursting can cause leakage of the molten filament, which leads to stringing if the nozzle is in motion.
Because PETG is especially prone to stringing, it is imperative to keep spools of PETG filament dry: by keeping them in a sealed container with a desiccant, putting them through a filament dryer, or gently heating them in an oven before printing.
Adjust Retraction Settings
Retraction is a feature of FDM 3D printers in which the nozzle pulls back a small amount of filament before it travels to a new location.[3] It is a feature designed specifically to prevent oozing and stringing, so setting the right retraction parameters is key to successful PETG printing (particularly when using a Bowden extruder over a direct-drive extruder).
There are four main parameters to focus on here, each of which can be adjusted to reduce stringing:
Retraction distance: One way to reduce PETG stringing is to increase retraction distance, which means the nozzle will retract a longer section of filament before travel. Try increasing the distance in increments of 1 mm, using the stringing tower to see the effect.
Retraction speed: Another means of reducing PETG stringing is increasing retraction speed, i.e. making the nozzle retract the small portion of filament more quickly. Try increasing the retraction speed in increments of 5 mm/s.
Minimum travel distance: Stringing is most likely to occur over large travel distances (when the printhead makes a large jump along the X or Y axes), so your default settings may not enable retraction over smaller distances. Try reducing the minimum travel distance so that retraction occurs even for small jumps.
Vertical lift: Z-Hop is a feature of the Cura slicer application that instructs the printhead to move vertically (along the Z axis) during travel to avoid dragging along the surface of the part. Disabling Z-Hop can reduce PETG stringing.
Adjust Travel Speed
If adjusting the retraction settings alone does not fix stringing, adjusting the printhead travel speed might.
Travel speed is the speed at which the hot end moves between two points without (intentionally) depositing material. If the printhead travels more quickly, there is less time for blobs to form or for excess material to drip out of the nozzle.
Combining a faster travel speed with a lower print speed may also help to reduce stringing.
Adjust Nozzle Temperature

Extrusion of PETG requires a high-temperature nozzle to ensure good material flow and layer adhesion. MatterHackers recommends an extrusion temperature of around 245 °C.[4] However, higher temperatures and freely flowing material can lead to stringing.
When using PETG, try reducing the printing temperature in increments of 5 °C to see if stringing can be reduced without compromising print quality and durability, causing clogs, or negatively affecting adhesion (first layer or otherwise). You can also try increasing the cooling fan speed to cool the PETG after it leaves the nozzle.
Increase Wipe Distance
Another important slicer setting that can be tweaked to prevent PETG stringing is the wipe distance. In Cura, this can be adjusted via the Outer Wall Wipe Distance parameter. This setting is primarily used for hiding seams on prints, but it can also be utilized to help with stringing.
The wipe distance is a measure of how far the nozzle travels at the end of a layer without extruding material, "wiping" any excess material on the wall, rather than letting it spread elsewhere on the build. Try using a value of 0.4 mm or more to prevent filament oozing and stringing (and also tweak coasting and combing settings if needed).
Recommended reading: PETG print settings: Adjusting temperature, speed & retraction to improve printing
Post-Processing Techniques for Removing Stringing
Even after taking the steps outlined above, you may still encounter PETG stringing issues. (Or you might accidentally select the wrong parameters and not have time to re-print the part.) In such situations, post-processing techniques can be employed to remove excess stringing after printing and improve the appearance of your printed objects.
Manual Removal
For minor stringing, you can use a pair of tweezers, a hobby knife, a deburring tool, or a small pair of scissors to carefully remove the strings from your printed object. However, the solidified PETG may be tough and it may be difficult to get a clean break from the part. Be cautious not to damage the print or cut yourself while performing this task.
Heat Gun
A heat gun or a hairdryer can be an effective tool for removing excess PETG stringing. By carefully applying heat to the affected areas, you can soften the strings and make them ball up, making them easier to remove. Be cautious not to overheat the print, as this can cause warping or deformation to the part you're trying to improve. Use a low heat setting and keep the heat gun moving to avoid concentrating heat in one area.
Freezing
The opposite of heat application can also help with removal of fine PETG strands. Leaving your prints in the freezer for several hours can make the plastic brittle, and while this will make your parts temporarily fragile, it will also make it easier to snap or cut away the stringing.
Sanding
For more stubborn stringing — or as a secondary process once you've removed the bulk of the excess plastic — you can use fine-grit sandpaper to gently sand away the unwanted strands and smooth the surface of your print. Start with a higher grit (400) and work your way down to a finer grit (800–1000) for a smoother finish. Be careful not to sand too aggressively, as this can damage the print or remove too much material.
Recommended reading: 3D print post-processing steps: supports, sanding, smoothing, more
Conclusion
Printing PETG can be a challenge without due consideration of filament storage and printing parameters. However, while PETG may not be as user-friendly as PLA, the advantages of using the material — including impact resistance, chemical resistance, and flexibility — make it worth the effort.

Frequently Asked Questions (FAQs)
What is the ideal temperature for printing PETG?
The ideal temperature for printing PETG varies depending on the specific filament and printer setup. Generally, PETG prints well at temperatures between around 245 °C, but excessive stringing means that a reduction in nozzle temperature may be required.
Can I use a heated bed when printing with PETG?
Yes, using a heated bed can help improve bed adhesion and reduce warping when printing with PETG. The default bed temperature for PETG is typically between 70 °C and 90 °C.
How can I improve bed adhesion when printing with PETG?
To improve bed adhesion when printing with PETG, you can use a build surface such as PEI, BuildTak, or a glass bed with a layer of glue stick or hairspray. Additionally, you can experiment with different bed temperatures and first-layer settings to optimize adhesion.
Can I use a cooling fan when printing with PETG?
Using a cooling fan can help improve print quality and reduce stringing when printing with PETG. However, it is essential to use a lower fan speed (e.g. 30–50%) compared to PLA to prevent the material from cooling too quickly and causing warping or layer adhesion issues.
How do I store PETG filament properly?
To store PETG filament properly, keep it in a cool, dry place away from direct sunlight. Use a sealed container or a vacuum-sealed bag with desiccant packets to minimize moisture absorption, which can negatively impact print quality and cause stringing.
References
[1] Everything you need to know about PETG 3D printing [Internet]. MakerBot. 2020. [cited 2022 Feb 15].
[2] Paraskevoudis K, Karayannis P, Koumoulos EP. Real-time 3D printing remote defect detection (stringing) with computer vision and artificial intelligence. Processes. 2020 Nov 16;8(11):1464.
[3] How to fix stringing [Internet]. Ultimaker Support. [cited 2022 Feb 15].
[4] MH Build Series PETG [Internet]. MatterHackers. [cited 2022 Feb 15].