Filament Sticking To Nozzle? Settings, Cleaning & Other Tips
Filament sticking to nozzle? This article looks at how to get it flowing properly with improved print settings and general maintenance.

Last updated on 13 Mar, 2025. 12 minutes read
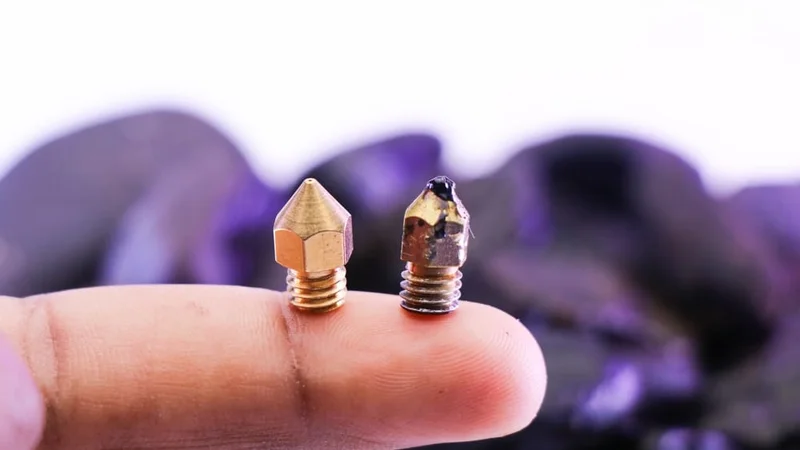
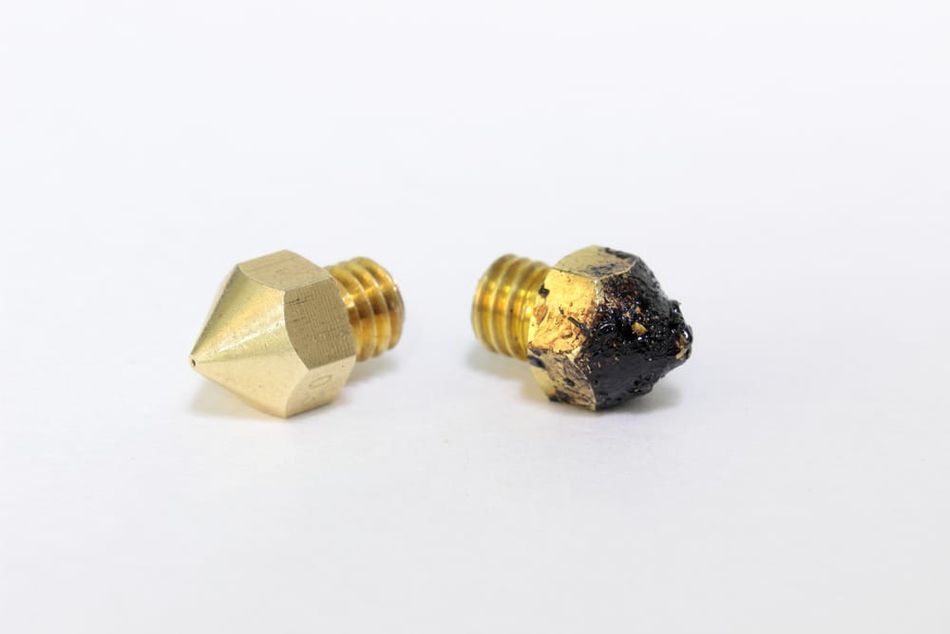
Filament residue can build up on the outside of a nozzle
3D printing filament is sticky by nature. Without proper adhesion, the first layer of a build wouldn’t stick to the build surface, and subsequent layers wouldn’t stick to each other. A print without a bit of stickiness would be no print at all.
But since molten print material can easily adhere to other surfaces, it can sometimes stick too firmly, or worse, stick to things it isn’t meant to stick to. A case in point is the phenomenon of over-adhesion: this is when builds get stuck on the print bed, and then require a great deal of scraping that can end up damaging the build surface. Another stickiness-related issue is filament sticking to nozzle surfaces—interior or exterior—often by curling back in on itself after it leaves the nozzle opening. This is a very common problem that can be caused by many factors, from clogged nozzles to improper extrusion temperatures.
This article looks at why filament sticks to nozzles and, more importantly, how to prevent this common issue from happening. It provides basic instructions for de-clogging nozzles, adjusting nozzle height, adjusting printing temperatures, and various other troubleshooting options for filament sticking to nozzle surfaces.
Why Does Filament Stick To Your 3D Printer Nozzle?
Almost all FDM printer users—even beginners—will have experienced it. A wad or strand of solidified filament stuck to the tip of their nozzle after a print, often curled around from the nozzle aperture. Sometimes the excess material can be easily removed; sometimes less so. Either way, it’s an undesirable occurrence that requires cleaning up before the next print can begin.
So why does it happen? In an ideal world, your extruder should deliver just the right amount of filament to the nozzle before it makes a travel movement or finishes the final layer of the print, allowing the hot end to then retract cleanly with no residue, buildup, or mess. In reality, this doesn’t always happen. Filament sticks to nozzle surfaces for many reasons, including clogged nozzles and incorrect extrusion temperatures.
Some of the more common causes of filament sticking to your nozzle include:
Clogged or partially clogged nozzle
Excessive nozzle height
Insufficient extrusion temperature
Poor bed adhesion (which can occur for several reasons)
How To Stop Filament Sticking To Nozzle Surfaces
Diagnosing the cause of the filament sticking to the nozzle can take a bit of trial and error, and may involve attempting various fixes. Below are some of the most common and proven solutions for when filament sticks to nozzle surfaces.
Unclog a Blocked Nozzle
One of the most common causes of filament curling around the nozzle tip is a partial blockage within the nozzle. Over time, filament residue can build up within the nozzle, especially if certain types of filament weren’t extruded properly, resulting in overly thin strands of filament being deposited.
A clogged nozzle also produces symptoms like stringing, missing layers, or clicking sounds during extrusion. If you notice these symptoms alongside filament sticking to the nozzle, then a blockage is the most likely culprit.
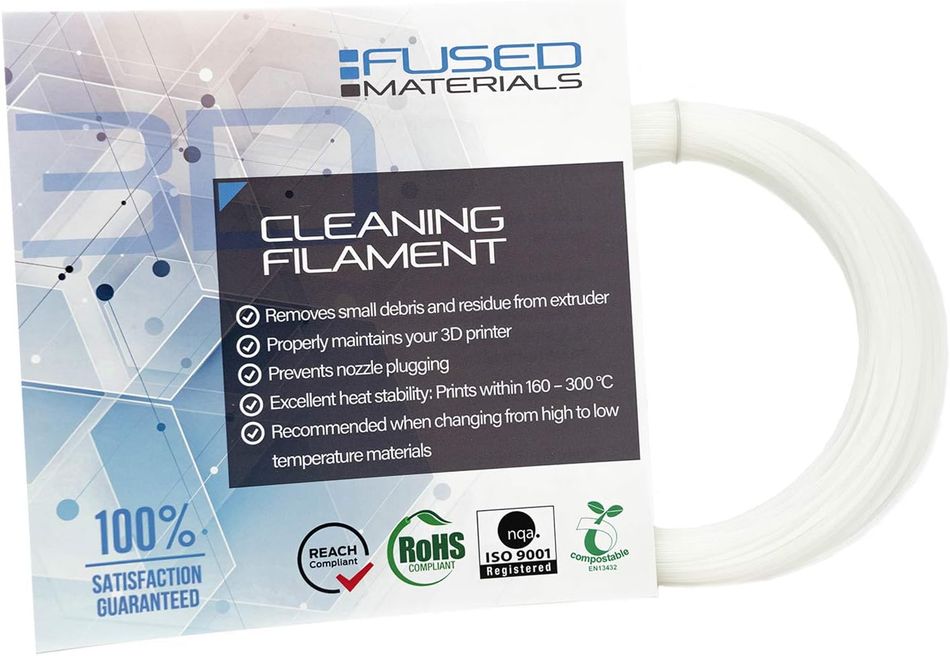
There are a few ways to unclog a nozzle, explained in full in our guide to cleaning 3D printer nozzles. These include:
Running a nylon-based cleaning filament through the printer
Removing the nozzle and pushing a fine-diameter needle through the aperture
Performing a cold/atomic pull
Bathing the nozzle in acetone (for ABS clogs only)[1]
All of these methods can be effective. Running a nylon-based cleaning filament through the printer involves heating the nozzle to extrusion temperature and feeding the filament through it. The cleaning filament, which is designed to pick up residual material, carries away contaminants as it passes through. This process helps remove carbonized buildup and prevents clogs, making it a routine maintenance step for many users.
Other methods target more stubborn blockages. Removing the nozzle and inserting a fine-diameter needle helps physically dislodge hardened debris. A cold pull (or atomic pull) involves heating the nozzle, feeding in filament, then cooling it to a lower temperature before pulling it out, taking contaminants with it. Acetone baths are effective only for ABS clogs, as acetone dissolves ABS but not other materials.
Recommended reading: How to clean 3D printer nozzles and prevent clogs
Decrease Distance Between Nozzle and Bed
If your nozzle is not blocked, then material may be sticking to it because it is too far from the print bed. A large gap reduces the pressure between the filament and its target, causing it to wrap around the nozzle instead of sticking to the build. Adjustment of nozzle height can be done in two ways: either by calibrating it as part of the bed leveling process (which can be done using a piece of paper) or by adjusting the Z-offset.
If you regularly end up with filament residue on the nozzle regardless of the type of filament, you might want to try calibration of the nozzle height during bed leveling. This is an essential piece of 3D printer maintenance anyway, so it is worth carrying out even if you suspect that there may be other causes of the nozzle residue. Some mid-range or premium FDM printers even have an auto bed leveling feature, which significantly speeds up the process. Low-cost machines like the Creality Ender 3 require manual bed leveling.
If the problem only occurs with specific materials, you can try lowering the nozzle height for that particular material by adjusting the Z-offset in your slicer (e.g. Cura) or directly on your 3D printer’s interface. Z-offset tweaks the nozzle height relative to its normal zero position, allowing you to “override” the initial nozzle height to accommodate differences in material behavior. Many printers allow for Z-offset adjustments during printing of the first layer, allowing you to visually assess how well the layer is printing before making the adjustment.
Increase Printing Temperature
Filament failing to make it beyond the tip of the nozzle can be an indicator of poor flow, which can be caused by an insufficient nozzle temperature. By gently increasing the nozzle temp (in increments of 5°C), you may be able to tease the filament fully out of the nozzle and onto the build below. Many filaments have a range of about 40 °C in which they can print successfully; aiming for the upper end of this window can potentially mitigate filament buildup issues.
However, remember that high-temperature printing can have adverse effects on the material such as oozing and stringing, which may be just as detrimental to the print as the initial problem. And going well above the recommended printing temperature can even cause the filament to burn within the hot end, potentially causing a nozzle blockage.
Material flow can also be improved by using your slicer’s flow rate (see next section) or extrusion multiplier setting. This setting instructs the extruder to feed more or less material to the hot end to accommodate for differences in material diameter and other factors.
Check Extrusion and Flow Settings
If your printer extrudes too much plastic, excess material can build up and stick to the nozzle. Over-extrusion is often caused by a high flow rate setting, incorrect filament diameter, or a worn nozzle. For example, if the slicer assumes 1.75 mm filament but the actual diameter is 1.70 mm, too much filament will be pushed through.[2] A worn nozzle with an enlarged opening also extrudes more material than expected, worsening adhesion issues.
When too much filament is deposited, it can curl up at the edges, get caught on the nozzle, or form blobs at layer changes. Signs of over-extrusion include thick, mushy lines and printed widths exceeding the nozzle diameter. To fix this, calibrate steps/mm, measure filament diameter with calipers, and keep the flow multiplier around 100%. If persistent buildup occurs, slightly reducing flow (e.g., 95–98%) can help prevent sticking, especially with flexible filaments.
Improve First-Layer Adhesion
Filament is more likely to get stuck to the nozzle if it is not adhering to the print bed during the first layer. Adhesion can be improved in a few different ways, such as adjusting the build surface, raising the bed temperature, or adjusting cooling settings.
Apply Adhesive To Build Surface
Bed adhesion can be improved by adjusting the surface upon the build plate. One option is to use a sheet of material (such as PEI) on top of the glass bed, while another is to apply a sticky substance such as glue stick or hairspray directly onto the existing build surface. Certain types of tape—painter’s tape and kapton tape, for example—also make good build surfaces when applied in strips onto the existing surface.
Increase Bed Temperature
A heated bed plays an important role in adhesion by keeping the extruded filament warm long enough to bond to the surface before it solidifies. Increasing the bed temperature slightly—within the recommended range for the filament being used—can improve first-layer adhesion. For example, PLA typically adheres well at 50–60°C, while ABS and PETG require higher temperatures around 80–100°C. Be cautious not to overheat, as excessive temperatures can cause warping or excessive stickiness, making it harder to remove prints.
Decrease First-Layer Cooling
Most slicing software automatically reduces or disables cooling for the first few layers to aid adhesion. If filament is lifting or curling, ensure that cooling fans remain off during these layers. If the slicer settings have active cooling enabled from the start, manually reducing fan speed or disabling cooling for the first few layers can allow the filament to stay warm longer, improving adhesion. After a few layers, gradual cooling can then help with part stability and overhang quality.
Use Dry and High-Quality Filament
Filament quality and condition can directly impact nozzle sticking. Hygroscopic filament absorbs moisture, which turns to steam when heated, causing sputtering, bubbles, and uneven extrusion. These inconsistencies can lead to plastic bursts sticking to the nozzle. PETG and nylon, in particular, print poorly when damp, often creating stringy, messy output that coats the nozzle in fine wisps of plastic.
Cheap or inconsistent filament can also be a culprit. Variations in diameter cause over-extrusion or partial jams, leading to globs on the nozzle. Impurities may not melt fully, causing clogs, while dusty filament can burn inside the nozzle and attract buildup. The best solutions are using high-quality, properly stored filament, drying when necessary, and using a filament cleaner to remove dust before printing.
Recommended reading: How To Dry Filament
Upgrade Your Nozzle
Upgrading your nozzle can help prevent filament from sticking by improving material flow and reducing surface adhesion. Standard brass nozzles can develop wear over time, creating rough spots where filament clings and accumulates. Switching to a hardened steel or ruby-tipped nozzle improves durability and provides a smoother extrusion path, reducing the chances of filament buildup. This is also useful if you regularly print with hard filaments like glass or carbon fiber composites, which can easily damage brass nozzles.[3]
Coated nozzles, such as those with a nickel or PTFE coating, offer non-stick properties that help prevent melted filament from adhering to the nozzle’s surface. This is especially useful for sticky materials like PETG or flexible filaments, which tend to cling to untreated brass. A high-quality nozzle also maintains more consistent temperatures, reducing partial clogs and stringing that can contribute to filament sticking.
Additionally, switching to a nozzle of a different size and geometry can improve extrusion efficiency. A slightly larger nozzle diameter (e.g., 0.6 mm instead of 0.4 mm) allows material to flow more freely, reducing pressure buildup that can cause filament to ooze and cling to the nozzle.
Troubleshooting for Different Types of Filament

Virtually any 3D printing material can create filament buildup in or around the nozzle. However, different materials behave in different ways, so some respond better to certain treatments than others. This section looks at how to combat the issue in question for three common FDM materials.
PLA
PLA filament is widely used due to its affordability, as well as its rigidity and low temperature demands. If PLA filament ends up sticking to the nozzle, the following methods are recommended for solving the problem:
DO lower the nozzle height. PLA can be squished down into the build surface, which can help mitigate the issue.
DON’T raise the temperature too high. Although an increase in nozzle and bed temp can reduce the likelihood of material sticking to the nozzle, PLA is sensitive to high temperatures and can potentially burn—potentially making the problem worse by clogging the nozzle.
ABS
ABS filament is tougher and more flexible than PLA, but is susceptible to various printing issues, including filament sticking to the printer nozzle. Ways to prevent ABS nozzle residue include:
DO try to improve first-layer adhesion by making an ABS slurry out of ABS and acetone. This is a proven method for creating very strong adhesion to the print bed, which may help prevent the filament from curling up around the nozzle.
PETG
PETG is a versatile alternative to PLA and ABS that is favored for its good tensile strength and availability in opaque and translucent colors. If your spool of PETG ends up causing nozzle material buildup, try the following:
DO increase nozzle temperature and adjust the build surface to improve adhesion. PETG prints best at 220–260 °C, but going towards the upper limit of this range may help prevent it sticking to the nozzle. Better adhesion can also lead to better results.
DON’T decrease the distance between nozzle tip and bed surface too much. Because of its low viscosity, PETG requires quite a large distance between the build surface and the nozzle; it does not like to be squished down.
TPU
TPU (Thermoplastic Polyurethane) is a flexible, rubber-like filament known for its durability and elasticity, but it can be tricky to print with, especially if it sticks to the nozzle. To address this issue, consider the following recommendations:
- DO slow down the print speed. TPU is flexible, and at higher speeds, it can become more prone to stringing and sticking. Slowing down the print allows the filament to properly adhere to the bed without accumulating on the nozzle.
- DON’T use too much retraction. Excessive retraction settings can cause TPU to stretch and create stringing, which may lead to it sticking to the nozzle. Keep retraction minimal to avoid this issue.
Key Takeaways
Most printer users will experience filament sticking to the nozzle at some point. As we have seen, there are a few reasons why it can happen, and some of these causes are not particularly related to one another.
To take a pragmatic approach, it may be most efficient to start with blockage inspection and bed leveling. Although it might not fix the issue immediately, these are both prudent steps to take for general printer maintenance. If you have a blockage or a poorly calibrated print bed, you might not need to change your print settings at all.
Once those steps have been taken, you can start experimenting with other solutions like build surface adjustment, raising the printing temperature, and decreasing the nozzle height. All of these methods have been proven to reduce nozzle material buildup and can therefore solve the issue of filament sticking to nozzle.
Frequently Asked Questions
Can a dirty nozzle cause filament to stick?
Yes, a nozzle with residue from previous prints can cause filament to catch and build up. Burnt or partially melted plastic can create an uneven surface that prevents smooth extrusion. Regularly cleaning the nozzle with a wire brush or performing a cold pull can help prevent this issue.
How does nozzle material affect filament sticking?
Standard brass nozzles can develop wear and rough spots where filament clings. Upgrading to a coated nozzle (such as nickel or PTFE-coated) or a smoother, wear-resistant material like hardened steel can reduce adhesion and improve extrusion consistency.
Can incorrect printing temperature cause filament to stick to the nozzle?
Yes, if the temperature is too low, filament may not fully melt and can drag along the nozzle instead of flowing smoothly. If it’s too high, certain materials like PETG can become extra sticky and cling to the nozzle. Adjusting the temperature within the recommended range for your filament can help prevent sticking.
Does nozzle size impact filament sticking?
A smaller nozzle (e.g., 0.2 mm) can increase backpressure, leading to more filament buildup around the nozzle. Larger nozzles (e.g., 0.6 mm) allow material to flow more freely, reducing the chances of filament sticking. Choosing the right nozzle size for the material and print settings can help minimize adhesion issues.
References
[1] Günaydın K, Türkmen HS. Common FDM 3D printing defects. InInternational Congress on 3D Printing (Additive Manufacturing) Technologies and Digital Industry 2018 Apr.
[2] Bambu Lab. The filament sticks to the nozzle [Internet]. Bambu Lab Wiki; [cited 2025 Mar 10].
[3] Melo JT, Santana L, Idogava HT, Pais AI, Alves JL. Effects of nozzle material and its lifespan on the quality of PLA parts manufactured by FFF 3D Printing. Engineering Manufacturing Letters. 2022 Apr 21;1(1):20-7.