Cura support settings, from angles to Z distance
Ultimaker’s Cura slicer software gives you many options for generating supports. Here are some of the top Cura support settings explained and tips on troubleshooting support problems.

Last updated on 18 Dec, 2023. 10 minutes read
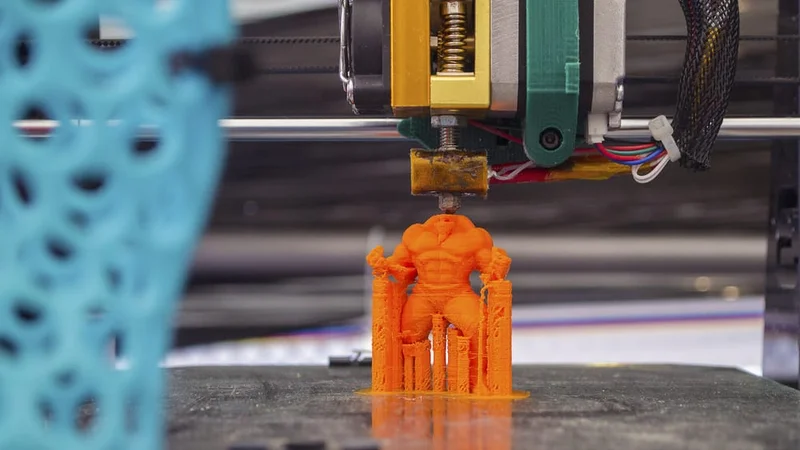
Supports are a necessary feature for 3D printing overhangs and bridges.
Support structures are an integral part of the FDM 3D printing process. In short, they help 3D printers overcome certain design limitations, like geometries with steep angles and overhangs. Today, most slicer programs, including Cura, automatically generate supports, making it easy for makers to use them. But as with most things, the more you know about supports and their settings, the more you can take advantage of them. In this article we’ll look at some of the key Cura print settings for supports and what they do.
When do you need support structures?
In FDM 3D printing, support structures are not required for all 3D models but they can be helpful and even necessary in certain situations. Specifically, supports are needed if your 3D model integrates features like overhangs or bridges.
Overhangs are design features that are characterized by a protruding angle of at least 45°. Most 3D printers can handle printing angles less than 45° because there is enough support provided by the preceding layers. When the angle exceeds that, however, extra support is needed to ensure gravity doesn’t pull the filament down as it prints.
Bridges, for their part, refer to when a horizontal structure connects two vertical points, like the middle line in the letter “H”. 3D printed supports help to ensure that bridges do not collapse or sag throughout the printing process.
Recommended reading: How to Remove Supports from 3D Prints
Cura Support Settings
Cura is an open source slicing engine offered by Ultimaker that is used by millions of people around the world. When it comes to 3D print supports, Cura offers a wide range of settings that influence things like print time, material usage, support geometry, support removal, and more. Below are some of the most important support settings to be familiar with.
Overhang Angle
In Cura support settings, the overhang angle determines what degree an overhang must be before supports are generated. To play it safe, set the overhang angle to 45°. However, some 3D printers can adequately print angles up to 50°-60° depending on the model.
Support Pattern
Cura slicer software has several options for support infill patterns, including line, zigzag, grid, concentric, triangle, cross, and gyroid. Zigzag and line patterns are the most common since they are the fastest to print and easiest to remove from the build. For stronger supports that are less susceptible to the printer’s vibrations, grid, triangle, and gyroid are good options. If you are printing a sphere or circular model, concentric supports are advised.
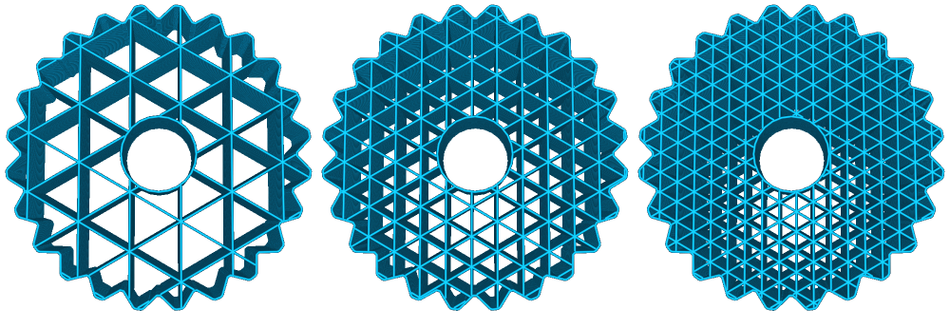
Density
Similar to infill settings, support density determines how dense the internal support pattern will be. In most cases, your support density can be lower than your build’s infill density. This is because the higher the support density, the stronger the supports will be and the harder they will be to remove. For most prints, supports with 20% density are a good place to start. Higher density supports also consume more material, which can increase both the cost of printing and waste materials.
Tree Support
Cura offers two types of supports: traditional linear supports and tree supports. While the former rise vertically from the build platform to support overhangs and bridges, Cura tree supports grow more organically from the build platform like branches. Tree supports are typically hollow and form a sort of shell around the 3D printed model. The tapering structure of tree supports can result in less material usage than linear supports. Tree supports can also be easier to remove.
Support Extruder
The support extruder setting in Cura allows you to specify if you are using a single or dual-extrusion 3D printer. Not only that, if you have a dual-extruder system, you can specify which part of the supports each hot end will print. This means you can choose to print your supports with a combination of build material and soluble filament, such as PVA.
For example, it is possible to print the support infill using the build material while using soluble material for the external shell that connects with the 3D print. You can also opt to print the support roof or support floor using a different extruder and material than the support infill. This can be beneficial if you want to minimize your usage of soluble filament while still benefiting from the easy support removal it offers.
Support Placement
The placement option in Cura support settings lets makers choose where supports are generated. There are two options when it comes to support placement: touching build plate and everywhere.
By selecting “touching build plate”, supports will only be generated from the build plate. This means that only areas that are hanging over the build plate will be supported. This option is the standard, as this support placement is easier to remove without damaging the print.
By selecting “everywhere”, supports will be generated wherever they may be needed, including in crevices or gaps in the model. Typically, this setting is only required for complex geometries that require more support.
Support Brim
With this setting you can add a brim to your support structure. The support brim consists of a printed border (typically consisting of a few concentric layers) on the first layer of the support structure. The brim’s function is to reinforce the supports by improving adhesion to the build plate. You can adjust the width of the brim in Cura’s support brim settings from just a couple millimeters to nearly a centimeter.
Support Z Distance
In slicer settings, the Z distance controls the small gap between the top and bottom of the supports and the printed part. The top distance and bottom distance are essential to removing the supports from the finished print; without them, the supports would be fused to the printed object. The value of the Z distance is dependent on layer height and must be in multiples of the layer height measurement. The smaller the Z distance, the harder the supports will be to remove, but the better the final part surface quality.
Support X/Y Distance
Whereas the Z distance controls the space between the top of supports and the printed overhang, the X/Y distance controls the gap between the supports and the vertical edges of the print.Ideally, you want the X/Y distance to be far enough that the supports can be easily removed without damaging the model’s edges while close enough that smaller overhangs or the beginnings of overhangs are supported. This setting is particularly relevant for non soluble supports.
Support Distance Priority
This setting is applicable in situations where the Z distance and X/Y distance overlap with each other. Essentially, it lets you choose which distance measurement will override the other. In general, the Z distance is more important than the X/Y distance, because it is the axis that is supporting the overhang.
Stair Step Height
If you’ve chosen to print support structures “everywhere” instead of “touching build plate”, it means some of them will be printed on the model. To ensure they can be removed, the supports are printed with a stair-like base. Stair step height therefore enables you to control how big the steps are. The bigger the steps, the smaller the contact points between the support and model will be, resulting in easy support removal. The smaller the steps, the harder the supports will be to remove, but the better surface quality the part will have.
Join Distance
If you are printing supports that are physically very near to each other, it can actually be strategic to join them. The join distance setting lets you set the maximum distance between two support structures before the slicer automatically joins them. Joining thin supports that are near each other can improve support strength and stability.
Horizontal Expansion
Horizontal expansion is an optional setting you can activate to generate sturdier supports. This can be particularly useful for thin support areas. It should be noted, however, that using horizontal expansion will increase the support material usage and printing time.
Support Infill Layer Thickness
To achieve faster printing rates, it is possible to increase the layer thickness for support infills. Because the quality of the support infill is not as important as that of the build, Cura lets you double the layer thickness. For example, if you are printing with a resolution of 1050 microns, you can set the support infill layer thickness to 300 microns to speed things up.
Gradual Support Infill Steps
This setting generates a support infill that increases in density towards the top of the support structure. The idea is to save material and reduce printing time while still providing adequate reinforcement where the support approaches the printed model. For example, if you set the gradual support infill steps to “2” and your support infill is set to 20%, the infill at the top of the supports will be 20% while the infill density for the rest of the print will be 10%.[1]
Minimum Support Area
Cura’s minimum support area setting gives you the option of removing supports that are ineffective. For example, the slicer software may automatically generate supports for very small overhanging parts. If the supports themselves are too thin, they may not provide reinforcement and you are better off removing them. Using minimum support area can cut down on material usage and print time.

Towers
Towers are a type of support that are used specifically for small overhanging features. Even if you have set a minimum support area, you can choose to use towers to support the small overhangs. Towers are essentially thin vertical printed supports that taper towards the top to minimize the contact with the printed part. Unlike traditional linear supports, towers usually have a larger diameter than the area they are supporting.
Enable Support Interface
If you enable support interface in Cura settings, the software will generate what it calls a “dense skin” on the top and bottom of the support structures. This skin will provide better support to the printed model’s overhangs and result in a smoother surface finish, which can minimize the need for post-processing. The downside of implementing a support interface, however, is that it makes supports harder to remove. Cura also gives you the option of setting the interface thickness, pattern, resolution, and density.[2]
Recommended reading: How to Remove Supports from 3D Prints
How to Solve Common Issues with Cura Support Settings
Cura is a powerful tool for 3D printing, but like any complex software, users may encounter issues when working with its support settings. Here are some common issues and potential solutions.
Support Structures are Difficult to Remove
There are a number of reasons you may experience difficulties when trying to remove support structures. One possibility is that the support density is set too high. Higher support densities makes the support structures more solid and therefore harder to remove. Reducing the support density can make the supports easier to remove.
Another possibility is that the support interface is too thick. The support interface is the layer of material between the support structure and the model, and if it's too thick or dense, it can be hard to remove. Lowering the interface thickness and density in the "Support" section of the settings panel can help.
Poor Surface Quality After Support Removal
If the surface quality of the model is poor after support removal, it could be due to the support interface settings. If the interface is too thin, it may not provide a smooth surface for the model. Increasing the interface thickness in the "Support" section of the settings panel can improve the surface quality. Alternatively, the interface pattern could be causing the issue. Some patterns, like "Grid", can leave a rough surface on the model. Changing the interface pattern to something smoother, like "Lines" or "Zig Zag", can improve the surface quality.
Support Structures are Not Generating Where Needed
If support structures are not generating where they're needed, it could be due to the support overhang angle setting. This setting determines the angle at which Cura starts to generate supports. If the overhang angle is too large, supports may not be generated for smaller overhangs. Reducing the support overhang angle can ensure that supports are generated where needed.
By understanding these common issues and how to troubleshoot them, users can optimize their Cura support settings to achieve successful prints with minimal issues. Remember, the optimal settings can vary depending on the specific model and the desired print quality, so don't be afraid to experiment and fine-tune the settings as needed.
Conclusion
Cura's advanced support settings offer a high degree of customization, allowing users to optimize their 3D prints according to the specific requirements of their models. By understanding these settings and how to adjust them, users can achieve successful prints with minimal material usage and post-processing effort. In the end, knowing the various options and settings for support generation in Cura software will enable you to produce custom supports that meet the needs of your 3D prints and your goals—whether it’s optimal part quality, material reduction, or easy removal.
Recommended reading: Improving your 3D printing success rate with Ultimaker Cura
Frequently Asked Questions (FAQs)
Q: Why are my support structures difficult to remove?
A: If your support structures are difficult to remove, it could be due to a high support density or a thick or dense support interface. Reducing the support density or adjusting the interface thickness and density can make the supports easier to remove. Additionally, increasing the support Z distance value in Cura can facilitate support removal after printing.
Q: Why is the surface quality of my model poor after support removal?
A: If the surface quality of your model isn’t quite up to standard after support removal, it could be due to a few things, including the removal method, or support interface settings, or a rough interface pattern. Increasing the interface thickness or changing the interface pattern to something smoother can improve the overall surface quality.
Q: Why are support structures not generating where needed?
A: If support structures are not generating where they're needed, it could be due to a large support overhang angle. Reducing the support overhang angle can ensure that supports are generated where needed.
Q: What is the support interface in Cura?
A: The support interface is a thin layer of material that is printed between the support structure and the model. This layer serves as a buffer, making it easier to remove the supports without damaging the model's surface.
References
[1] Ultimaker Support, May 10, 2022. “Infill settings”. [Internet] https://support.ultimaker.com/hc/en-us/articles/360012607079-Infill-settings [Accessed May 27, 2022]
[2] Ultimaker Support, March 9, 2022. “Support settings”. [Internet] https://support.ultimaker.com/hc/en-us/articles/360012612779-Support-settings [Accessed May 27, 2022]