How to Remove Supports from 3D Prints
Everything you need to know about 3D printing supports and how to facilitate their removal post printing.

Last updated on 08 Jul, 2024. 8 minutes read
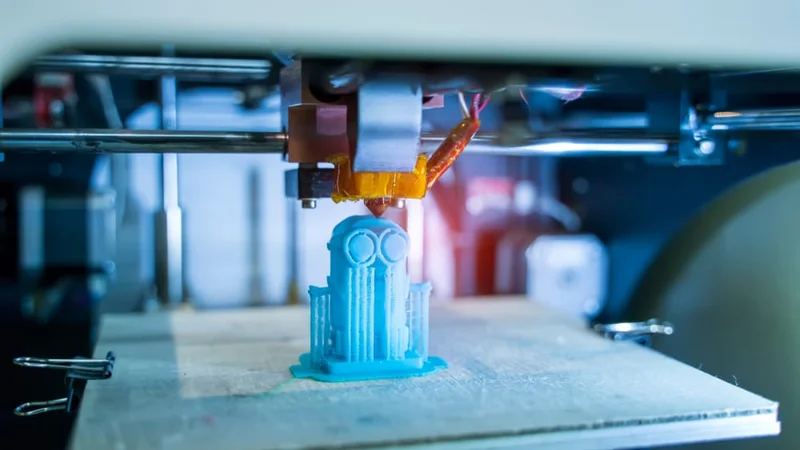
Supports enable 3D printers to produce parts with overhangs and bridges.
Design freedom is one of the main benefits that 3D printing offers. The technology allows users to create parts with complex structures and internal infill geometries. But there are some limitations to what 3D printing can do. For instance, fused deposition modeling (FDM) 3D printers struggle to print geometries with bridges or overhangs that exceed angles of 45 degrees.[1] But that doesn’t mean people have to avoid printing parts with such features. 3D printed support structures enable complex shapes with overhangs and fine details to be printed without trouble.
Supports are typically generated in slicing software and are applied automatically to areas of your 3D model that require the extra help. In addition to holding certain types of geometries up, supports can also help improve bed adhesion, reducing the risk of warping.
All that said, 3D printed parts with support structures do require some extra post processing. Specifically, it is important to remove the support structures carefully—either manually or using a solvent—to ensure that your 3D print is structurally sound and visually flawless. In this article, we’ll discuss the different types of support structures available for FDM 3D printing and explain the various methods for removing them without damaging your 3D print.
Removing support structures
Once you have your supports and model 3D printed, the next step is to remove the supportive structures. The support removal method depends entirely on the type of material you have used for the supports. In general, there are two ways to remove supports: manually or using a solvent.
Manual Support Removal
If you have a single-extruder 3D printer, you will likely be 3D printing your supports using the same filament that your part is made of. For example, if you are printing a PLA model, the supports will also be made from PLA filament. This means that they must be removed manually.
Because most support structures have a low density, it is possible in some cases to simply break them off from your 3D print. This technique does increase the risk of breaking or damaging your 3D printed part. For more precise support removal, you can use a knife, needle-nose pliers or flush cutters to carefully cut and break off the extraneous 3D printed supports. Carefully heating a knife blade can help to seamlessly remove the support from the print surface. The most important thing to keep in mind is to work gently, especially for harder to reach supports.
Z-Distance and Support Removal
To facilitate the removal of supports, many users turn to Z-distance settings in their slicer programs. The Z-distance refers to the gap between the top and bottom of the supports and the printed model. This distance ensures that the supports are not completely fused to the 3D model for easier removal. In general, a smaller Z-distance (measured in multiples of the layer height) will result in a higher print quality but harder support removal, while a larger Z-distance will make supports easier to remove but may influence the surface quality of the final part.[2]
Recommended reading: Cura support settings, from angles to Z distance
Smoothing parts after support removal
Once you’ve removed or broken off most of the support structures you can then go over the rough spots with some damp sand paper. This will smooth out the surface where structures were attached and polish the printed part. Alternatively, you can use a solvent, such as acetone or nail polish remover, to smooth out any blemishes caused by support removal. These manual finishing techniques can also be used to reduce the appearance of layer lines.
Recommended reading: Smoothing PLA 3D prints with sandpaper, solvents, and more
We should point out that safety is important in the support removal process, and protective eyewear and gloves are recommended to shield against the inevitable debris and sharp edges encountered during support removal.
Soluble support structures
If you have the chance to work with a dual extrusion 3D printer, support removal can be far easier, requiring little to no manual intervention. This is because you can print with two different types of filament: a classic build material (like PLA or ABS) for your model, and a soluble print material (like PVA or HIPS) for the support structures.
With soluble supports, you simply have to take the 3D printed object from the print bed and submerge it in a liquid bath. PVA filaments will dissolve easily in warm water, while HIPS must be placed in a solution of Limonene. In both cases, it is important not to submerge the parts in water that is too hot, as it can warp the actual model. Keeping the water moving while your part is submerged will also help to dissolve the supports faster. If you are in a particular rush, you can let the supports soften for about 10 minutes and then cut the bulk of them off using pliers. Place the part back in the bath to remove the remaining traces of support.[3]
A final note about PVA is that if your soluble material of choice: be sure to store the filament in a dry place. If it absorbs too much moisture from the air, the filament can clog up your 3D printer nozzle. When working with soluble supports, it is also important to exercise caution and use proper safety precautions like PPE and good ventilation.
Recommended reading: How to Dry Filament
Types of support structures
When it comes to FDM, there are two main types of 3D printing support structures: linear supports and tree supports.
Type of Support | Characteristics | Applications |
Linear Supports | Vertical columns or grids, consistent support | Ideal for angled and flat overhangs and bridges |
Tree Supports | Branch-like structure, fewer contact points and support interfaces | Ideal for complex geometries and angled overhangs |
Linear Supports
Linear supports, also known as accordion supports or lattice supports, are the most popular style of support structure. Linear supports are characterized by straight vertical columns that grow upwards from the build platform to support overhangs and bridges. This style is popular because it is highly effective at supporting these features.
In Cura slicer software, linear supports are called “normal” and users have the option to choose from various support patterns, including grid, triangle, concentric, and line.[2] You can also choose the support density and whether to print supports with a wall—though this is typically only recommended when printing with a soluble support material.
While linear supports are the gold standard for supporting overhang features in 3D printed models, they do have a slight downside. Because they support so much of the overhang, they can be tricky to remove, increasing the risk of damaging or marking the final part.
Tree Supports
Tree supports, or tree-like supports, are characterized by more organic structures that grow up from the build plate. Named for their similarity to tree branches, tree supports are most effective when printing angled overhangs. Because they have fewer contact points with the supported print, they are not very effective for holding up bridges or flat overhangs. That being said, tree supports are easier to remove than linear supports, since there are fewer touch points.
Tree supports are usually hollow, which reduces the amount of material required to print them. Like linear supports, slicer software will automatically generate the structures, so you don’t have to. Users can, however, choose to adjust a number of settings for tree supports, including branch distance (i.e. how far apart the touchpoints are on the 3D printed model), branch diameter, and diameter angle.
Recommended reading: Tree supports: Better looking prints with less wasted material
How to Minimize 3D Supports
One of the most important steps to facilitate support removal is to minimize the need for supports in the design and pre-printing stages. Designing with support removal in mind can save significant time and effort. Here are some strategies:
Optimize Print Orientation: Orient your model to minimize the need for supports. For example, positioning your 3D model on the build platform horizontally rather than vertically can reduce the amount of support material needed.
Design with Supports in Mind: When designing the model, incorporate features that reduce the need for supports, such as chamfers, fillets, and flat surfaces.
Use Support Settings in Slicing Software: Adjust support settings in your slicing software to reduce density and improve ease of removal. Consider using tree supports for complex geometries, a technique that has evolved with advances in slicing algorithms.
Conclusion
In the end, supports are essential to 3D printing: they let you create complex geometries with overhangs and bridges that would otherwise be impossible to print using extrusion systems. This means that, whether you’re a beginner maker or an experienced one, support removal is an important step in the 3D printing process. By choosing the proper slicer settings, using the right tools and working carefully, you can significantly enhance the quality of your 3D prints. Implementing these methods not only improves the aesthetics of your prints but also their functional integrity. Remember to plan your support structures carefully, use appropriate removal techniques, and always maintain your tools to achieve the best results.
Frequently Asked Questions
Q: What is the easiest way to remove supports from 3D prints?
A: The easiest way to remove supports from 3D prints is to use a soluble support filament, which can dissolve in water or specific solvent. For those who don’t have access to dual-extrusion 3D printing capabilities, however, the easiest way to remove supports is using good quality cutting tools, like an X-acto knife and needle-nose pliers.
Q: What are the best tools for removing supports from 3D prints?
A: Precision knives, needle-nose pliers, tweezers, and flush cutters can all be effective tools for removing supports. Each tool should match the size and delicacy of the supports and the print.
Q: How does support design influence removal?
A: There are two types of support designs: linear and tree. Generally, tree supports are easier to remove because they have fewer contact points with the 3D model, however this type of support can take longer to generate in slicer software and is not ideal for supporting bridges.
Q: How can I prevent my 3D print from getting damaged during support removal?
A: Using the right tools and working carefully are key to removing supports without damaging the 3D print. It is also possible to use heat tools to soften the support and facilitate removal or to heat the cutting tools directly for a smoother cut.
Q: Are there specific materials that make support removal easier?
A: Yes, using soluble support materials like PVA or HIPS, which dissolve in water or limonene respectively, can make support removal easier and reduce the risk of damage.
Q: How can I minimize the need for supports in my 3D prints?
A: Optimize the print orientation, design with supports in mind by incorporating features like chamfers and fillets, and adjust support settings in your slicing software to minimize support material usage.
Q: Can heating supports help in their removal?
A: Yes, gently heating the supports with a heat gun on a low setting can soften the material, making it easier to remove without harming the print. Alternatively, it is possible to heat your cutting tools just before removing the supports.
Q: What is the best way to smooth surfaces after support removal?
A: Sanding with progressively finer grits, using precision files for detailed areas, and solvent smoothing techniques like acetone vapor for ABS prints can effectively smooth surfaces.
References
[1] “What is important to know about 3D printing supports?” [Internet]. Sculpteo, 2024. https://www.sculpteo.com/en/3d-learning-hub/design-guidelines/understanding-3d-printing-supports/
[2] “Support Settings” [Internet]. Ultimaker, March 3, 2024. https://support.ultimaker.com/hc/en-us/articles/360012612779-Support-settings
[3] “How to dissolve Ultimaker PVA” [Internet]. Ultimaker, November 8, 2022. https://support.ultimaker.com/hc/en-us/articles/360011959100-How-to-dissolve-Ultimaker-PVA
[4] "Tree supports: What are they and how do they work?" [Internet]. Ultimaker, 2024. https://ultimaker.com/learn/how-to-use-tree-supports