3D Printing Brims (vs Rafts vs Skirts): How to Get Started
Brims, rafts, and skirts are FDM 3D printing techniques that can enable better bed adhesion and print stability. Here’s how and when to use them.

Last updated on 04 Apr, 2024. 14 minutes read
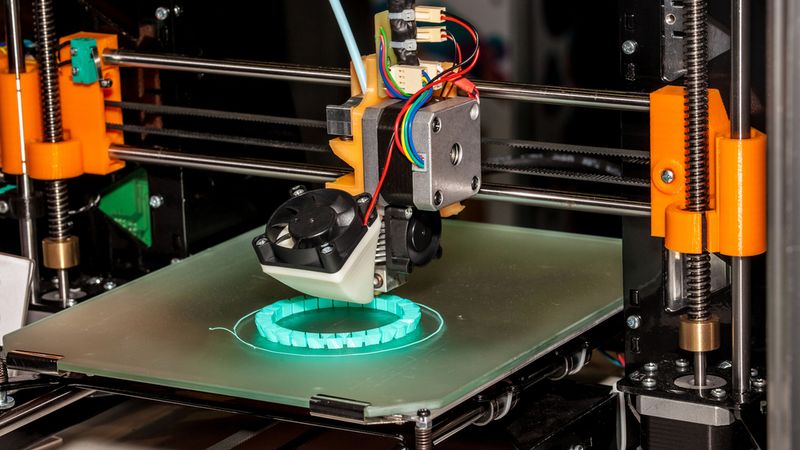
FDM 3D printing techniques, like skirting, can improve build outcomes.
No time now? Save for later.
We only use your email to send this link. Privacy Policy.
If you are struggling with proper bed adhesion and warping when 3D printing, there are some tried and true techniques for improving print results—especially for ABS and higher temperature materials that are prone to warping. If used correctly, brims, rafts, and skirts each have their benefits and can make the difference between a successful or failed print. In the following article, we illustrate what each 3D printed feature is, when to use it, when not to use it, and how to get it set up in your slicer software.
3D Printing Brim
What is a brim?
A brim is a 3D printed border that attaches to and extends from the edges of the 3D printed part. Unlike a skirt, the brim is actually connected to the 3D printed part, effectively giving it a greater surface area to adhere to the print bed. Unlike a raft, the brim does not go underneath the 3D printed part’s first layer.
Brims are an effective technique for securing a part to the build platform for better first layer adhesion, which in turn can minimize the risk of warping and part failure. Brims can also help to anchor the outer edges of the print to the build surface for better stability and can create a wider footprint for bed adhesion for small or narrow parts.
When you should use brims
There are a number of situations in which you might employ a 3D printed brim. For instance, if you are using a higher temperature filament with a greater ratio of shrinkage and warping—like ABS or PP (polypropylene)—activating a brim can promote better layer adhesion and subsequently reduce warping.
Brims are also handy for increasing the footprint of 3D printed parts. This is especially useful for parts with a small base or footprint that might become unstable in the printing process. Integrating a brim will effectively anchor the part to the print bed and stabilize it as the extruder deposits more layers.
Recommended reading: What Causes 3D Print Warping (PLA, PETG, ABS) and How to Prevent It
When not to use a brim
While brims are a tried and tested way to achieve better adhesion, particularly for parts with a smaller footprint, they are not the only solution. In fact, there are times that using a brim can be of no help at all. For example, if the part you are printing already has a wide base, the addition of a brim can be redundant (and use more material than is actually needed). Moreover, if part accuracy and tight tolerances are a high priority, brims may not be the best solution, as brim removal can influence the dimensional accuracy of final prints.
Finally, in cases where you are performing a 3D print test to ensure a level bed or even filament flow, a brim may not be necessary, as they use more material than say a skirt, which can help determine whether the bed is level and if filament is flowing properly. Ultimately, brims are most useful for solving bed adhesion issues, not calibration tests.
Slicer settings for brims
Depending on the slicer software, generating a brim around your 3D model might fall under the Skirt settings. If this is the case, simply set the skirt offset (the distance of the skirt from the edge of the part) to zero. Below are some of the key slicer settings to be aware of for using brims:
Brim Width: This measurement designates how wide the brim around your 3D printed part will be. In most slicer settings, the default width will be about 8 mm. In general, the wider the brim, the better the first layer adhesion. (It’s worth noting that the wider the brim, the more material is used.)
Brim Lines: This setting is also related to the brim width. Here, you can choose how many lines your print head extrudes to create the brim.
Removing brims
Slicer settings play an important role in determining the removal of brims. In the best case scenarios, brims can be peeled off of printed parts manually, resulting in minimal surface marks. In some cases however, you may need the help of additional tools, like needle-nose pliers, knife, or deburring tool, to gently remove the brim from the edge of the print. If there are any visible marks on the printed object once the brims have been removed, sanding can help to smooth out the edges.
The pros & cons of 3D printing brims
Pros
Brims can prevent warping by anchoring the part to the build platform through a wider surface area. Warping occurs when the printed material cools unevenly, causing the edges of the object to lift from the build plate. By adding a brim, you can create a more stable base for the object, reducing the risk of warping and ensuring a higher-quality print.
Brims improve first layer adhesion for the printed part, especially for warp-prone materials like ABS and PP. By increasing the surface area of the object in contact with the build plate, a brim can help to secure the print and prevent it from detaching during the printing process. This is particularly useful for objects with small contact areas or complex geometries that may be prone to warping or detachment.
Compared to rafts, parts printed with brims have a smoother first layer surface finish. This is because they only have to be removed from the perimeter of the part, not the entire base of it.
Brims consume less filament than rafts. Because brims typically consist of fewer layers than rafts and do not cover the entire base of the printed object, they require less filament than rafts, thus generating less material waste.
Cons
Brims must be removed from the actual print. In some cases, removal consists simply of peeling the brim away from the part. In others, however, you may require a cutting tool to remove it.
Printed parts with brims may need post-processing, such as sanding, to smooth out the contact points on the edges where the brim was connected. This adds time and labor to the printing process and can influence the dimensional accuracy of final prints.
Brims can generate material waste. Although the amount of filament used for a brim is generally small compared to the overall print, it can still contribute to material waste, especially when printing multiple objects with brims. This can be a concern for those looking to minimize material usage and reduce costs.
3D Printing Raft
What is a raft?
A raft is essentially a 3D printed platform on which parts are printed. A raft usually consists of a grid-like 3D printed structure, which sits underneath and extends beyond the borders of the first layer of the 3D model, acting as a base.
In FDM 3D printing, first layer adhesion to the build platform is vital to ensuring that your 3D prints turn out well. Poor adhesion can lead to warped and defective parts. Rafts are a technique used by makers to improve first layer adhesion and stabilize parts throughout the printing process.
When you should use rafts
Rafts can be very effective in certain circumstances. First and foremost, if you are 3D printing with ABS filament—a material prone to warping—a raft can improve adhesion by ensuring your print’s first layer sticks to the top layer of the raft. Higher temperature thermoplastic filaments like ABS are also more likely to warp without a printed heat bed. Using a raft if you don’t have a heated build platform can help lessen the chances of warpage.
Rafts can also be used in cases where the 3D model has an unbalanced structure–for example, a part with a heavier top and smaller footprint. In this case, using a raft can stabilize the object as it is printed. Another scenario in which a 3D printed raft has benefits is if your build platform is damaged or warped. A raft can create a flat, level base for your part to be printed on.[1]
Recommended reading: 3D Printer Bed Adhesion: 8 Ways to fix 3D Print Not Sticking to Print Bed
When not to use a raft
Rafts are not universally applicable and should be used with restraint, due to the amount of material they consume. As we saw above, rafts are a good solution when the build surface is warped or damaged, as they can provide a level base for your print. In cases where you are working with a new or good quality print surface, a raft shouldn’t be needed. Moreover, if you have a heated bed, rafts may not be necessary for improved adhesion—a brim will usually suffice. Like brims, rafts can influence the dimensional accuracy of a part depending on how smooth the removal process is. If your print requires a smooth, precise base, then a raft may present challenges.

Slicer settings for rafts
Most slicer software programs, like Cura and Simplify3D, have raft integrations built in, so you don’t have to design them yourself. That being said, you may want to adjust some settings for the best outcome. The main slicer settings for rafts are:
Layer Thickness: There are three distinct layer thickness settings when it comes to rafts: base layer thickness, middle thickness, and top layer thickness. The former is the first layer of the raft to be printed. To promote optimal bed adhesion, this layer should be thickest (i.e. 0.36 mm).[2] Raft middle thickness will be smaller than the base layer and larger than the top layer. The top layer thickness should correspond to the layer thickness of the printed part (0.12mm is standard).
Air Gap: When printing a raft, there is the option to integrate an air gap in between the raft top layer and the first layer of your 3D print. This gap encourages raft removal.
Extra Margin: In raft generation, the extra margin determines the surface area of the raft on the build platform. The larger the raft, the better the adhesion. Raft offset may also come up. This is the width of the raft from the edge of the printed model.
Print Speed: This setting determines how quickly your raft will be 3D printed. To maximize bed adhesion, a slower printing speed is suggested.
Removing rafts
One of the most important steps to facilitate raft removal occurs before printing actually begins, in slicer settings. In raft settings, the “air gap” is critical in determining how easy a raft will be to remove. The air gap essentially refers to the amount of space the printer will leave between the top layer of the raft and the first layer of the print, weakening the adhesion between the two. With a suitable air gap (in Cura, the default is 0.3 mm), it can be possible to remove rafts by hand, by ripping or gently pulling them off. In other cases, it can be helpful to use a putty knife to gently pry the corners of the raft away from the print, before removing it manually. If you find that the raft has become fused to your print, it may be because the printing temperature is too high.
The pros & cons of 3D printing rafts
Pros
Rafts improve bed adhesion, especially for materials prone to warping like ABS. By creating a stable and well-adhered foundation for the object, rafts can help to prevent warping and detachment from the build plate, ensuring a successful print.
Rafts can create a level printing surface if the build plate is uneven or damaged. If the build plate is not perfectly level or has surface irregularities, a raft can provide a flat and even surface for the object to be printed on, reducing the risk of print failure due to poor adhesion or uneven layers.
Rafts minimize the risk of warping for parts made on non-heated build platforms. By providing additional support and stability, a raft can increase the likelihood of a successful print, saving time, material, and frustration.
Rafts can also be beneficial for printing objects with complex geometries or significant support structures. By providing a stable base for these structures, rafts can help to ensure that the final print accurately reflects the intended design and maintains its structural integrity throughout the printing process.
Cons
The bottom layer of your 3D printed part may have a rougher surface than if it was 3D printed directly on a smooth build surface. So it may require additional post-processing, such as sanding or filing, to achieve a smooth and clean finish.
While removal of the raft can be easy, simply peeling away from the 3D printed part, that is not always the case. Removal of the raft can be difficult and time-consuming. In worst-case scenarios, it can even damage or break the final printed object.
Increases the overall amount of printing time. Because rafts consist of multiple layers that cover and extend beyond the surface area of the print, they take longer to print than skirts or brims.
Materials used for printing rafts typically end up in the waste. Rafts typically use more filament than skirts or brims, which can contribute to material waste and increased costs, especially when printing multiple objects with rafts.
3D Printing Skirt
What is a skirt?
In 3D printing, a skirt is a printed border around the 3D printed object, which does not touch the printed part. If you opt for a skirt, the 3D printer will begin by extruding filament lines to create the border before starting to build the rest of the part.
This technique helps to prime the nozzle ahead of printing the 3D model and can lower the risk of filament blobs, which can cause defects in final prints.[2] Printing the skirt as a border around the part’s perimeter is also helpful for checking calibration. It allows makers to identify any potential problems with a level bed before the real printing begins.
When you should use skirts
Skirts can improve printing results for most FDM 3D print jobs. The printed border on the build surface allows the melted filament to start flowing smoothly before the critical initial layer of the part is deposited. In other words, any filament inconsistencies in the first minutes of printing will be in the skirt, not your final part, leading to better first layer adhesion and minimizing the chance of warping.
Unlike rafts and brims, skirts do not offer any physical support to your 3D printed part. So, while they do encourage better first layer adhesion thanks to nozzle priming, they may not provide the support needed for certain part geometries.
When not to use a skirt
Generally speaking, 3D printing skirts are not a reliable solution when you are aiming to improve bed adhesion and minimize the risk of warping. As we saw, skirts can influence bed adhesion by priming the nozzle, but they do not offer the same physical base that brims and rafts do. Therefore, it is advisable to avoid skirts when the goal is to increase the surface area of your print to improve adhesion or to create a level build surface for your print.
Slicer settings for skirts
Slicer programs allow users to customize a number of settings related to skirts to control the distance of the skirt from the part, the thickness of the skirt, and more. These are the main skirt slicer settings to be aware of:
Line count: you can choose how many lines you want your skirt to consist of. While some slicer software programs have one line as the default, it can be beneficial to choose more. This allows you to confirm any leveling or setting changes made after the first line are working.
Distance: Skirt distance determines the separation distance between the perimeter of the printed part and the skirt.
Layers: You can set the number of layers your skirt should consist of. Usually one layer is sufficient, but adding another can make the skirt easier to remove from the print bed.[3]
Removing skirts
Out of the three options, skirts are by far the easiest to remove. Because skirts are not attached to the printed object, they only have to be removed from the print bed. Typically, skirts can be easily removed by using a spatula to gently pry them off the print bed. If you are having difficulty with skirt removal, you can try increasing the number of layers (a skirt with 3-4 layers will be easier to remove than a single layer).
The pros & cons of 3D printing skirts
Pros
Skirts are effective for priming nozzles and ensuring that by the time the first layer of the print is extruded, the filament is flowing smoothly. This can help prevent issues such as under-extrusion or filament oozing at the start of the print, leading to better print quality.
Skirts can also be used to validate bed leveling. If the skirt does not adhere properly to the build plate or appears uneven, you can make necessary adjustments without wasting time or material on a failed print. This can save both time and resources, especially when printing large or complex objects.
Skirts are also useful for checking the first layer adhesion and ensuring that the print bed is clean and free of debris. If the skirt adheres well to the build plate, it is a good indication that the first layer of the actual print will also adhere properly. If the skirt does not adhere well, you can clean the build plate or adjust the bed leveling before starting the main print.
Cons
Skirts do not provide physical support to improve first layer adhesion for the printed part. Unlike brims or rafts, skirts are not connected to the object, so they cannot help with improving bed adhesion for prints with small contact areas or complex geometries.
While using a minimal amount of filament, skirts do still generate material waste. Additionally, the time spent printing the skirt can add up, particularly for large or complex prints.
In some cases, skirts may not be sufficient to address issues with bed adhesion or print quality. For example, if the print has a small contact area with the build plate or is prone to warping, a brim or raft may be a more effective solution.
Recommended reading: Best Ender 3 (V2,Pro) Cura Slicer Settings: Temperature, Speed, Retraction, More
Conclusion
Brims, rafts, and skirts are helpful tools in every maker’s toolkit. Each technique serves a specific purpose and is suited for different situations, depending on the object's geometry, contact area with the build plate, and the likelihood of warping or detachment. Now that you know what each 3D printing feature does and where it offers the most advantages, you’ll be able to improve your 3D printing outcomes.
Frequently Asked Questions (FAQs)
Q: What is a brim in 3D printing?
A: A brim is a 3D printed border that is attached to the base of a model. Not unlike the brim of a hat, 3D printed brims increase the surface area of the print’s base encouraging better first layer adhesion.
Q: When is a brim the best choice for 3D printing?
A: Opt for a brim if the printed object has a small contact area with the build plate or features complex geometries that may be prone to warping or detachment. Brims can improve bed adhesion by increasing the surface area in contact with the build plate and by providing additional support for overhangs or intricate details.
Q: When should I use a skirt in 3D printing?
A: 3D printed skirts are an ideal option when the printed object has a good surface area in contact with the build plate and does not require additional adhesion support. Skirts help to prime the extruder and to identify potential issues with bed leveling or nozzle height before the main print starts.
Q: When should I use a raft in 3D printing?
A: Activate rafts if the printed object has a very small contact area with the build plate, requires significant support structures, or has a high risk of warping or detachment. Rafts provide a stable foundation for the printed part and can also help in cases where the build surface is damaged or uneven.
Q: Can I use a combination of skirt, brim, and raft techniques in a single print?
A: While it is technically possible to use a combination of these techniques, it is generally not necessary or recommended. Each technique serves a specific purpose, and using more than one technique in a single print may lead to unnecessary material waste, increased print time, and additional post-processing.
Q: How do I remove a brim or raft from my printed object?
A: To remove a brim or raft from your printed object, carefully use cutting tools, such as a hobby knife or flush cutters, to separate the brim or raft from the object. For a smoother finish, you may need to sand or file the edges where the brim or raft was attached.
References
[1] ModBot, August 7, 2021. “How And When To Use Skirts, Brims, And Rafts For 3D Printing”. [Internet] https://www.youtube.com/watch?v=p4R3F1as-1I [Accessed March 23, 2022].
[2] The 3D Printer Bee. “Cura Raft | Best Settings to Ensure Good Bed Adhesion”. [Internet] https://the3dprinterbee.com/cura-raft-settings/ [Accessed March 24, 2022].
[3] Simplify3D, 2022. “Rafts, Skirts and Brims”. [Internet] https://www.simplify3d.com/support/articles/rafts-skirts-and-brims/ [Accessed March 24, 2022].
in this article
1. 3D Printing Brim2. 3D Printing Raft3. 3D Printing Skirt4. Conclusion5. Frequently Asked Questions (FAQs)6. ReferencesNo time now? Save for later.
We only use your email to send this link. Privacy Policy.