Troubleshooting the 3D Printing Elephant Foot Phenomenon
3D printing elephant foot is a common issue that most 3D printer users will have experienced. Typically caused by excessive heat or poor nozzle calibration, the issue can be solved in several ways.

08 Jun, 2023. 12 minutes read
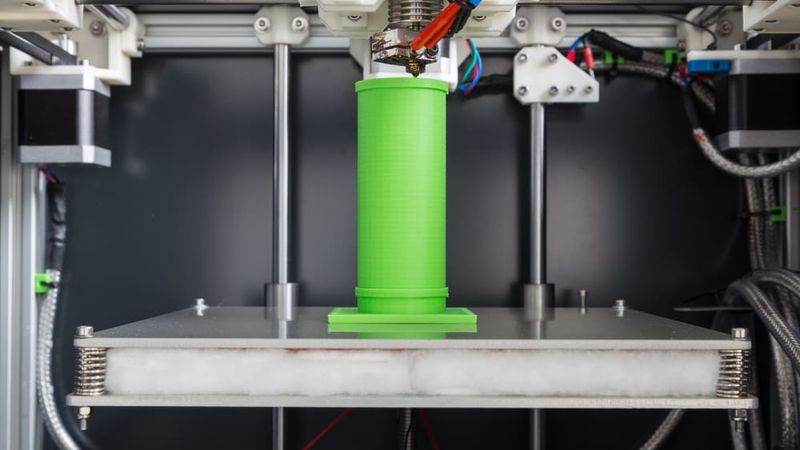
Elephant foot is a common 3D printing issue
3D printing, also known as additive manufacturing, revolutionizes the way we create objects. This technology allows us to fabricate complex shapes and structures that would be difficult or impossible with traditional manufacturing methods.
However, like any technology, it comes with its unique challenges. Among them is a phenomenon called "elephant foot." The 3D printing elephant foot issue, common especially among beginners, can significantly impact the quality of the final print. By understanding the 3D printing elephant foot phenomenon and the strategies to mitigate it, you can greatly enhance the precision and aesthetics of your 3D printed parts.
This guide explains how to recognize 3D printing elephant foot, lists the main causes of it, and explains how to fix it.
The Elephant Foot Phenomenon in 3D Printing
The term "elephant foot" refers to a specific type of distortion commonly observed in 3D printed objects. This phenomenon typically manifests as an outward flaring or bulging at the base of a printed part, which visually resembles the foot of an elephant, hence the name. This distortion can be as small as a few hundred microns, but in severe cases, it can extend several millimeters beyond the intended dimensions of the part.
The occurrence of elephant foot is closely linked to the physics of the 3D printing process itself. During printing, each layer of material is heated and then rapidly cooled to solidify it. The first few layers, being closest to the heated print bed, remain warm for longer periods, leading to an extended period of plasticity. This extended plasticity, combined with the weight of the subsequent layers, results in the base layers spreading outwards, creating the characteristic bulge of elephant foot.
Recommended reading: 3D print ghosting causes and potential solutions
Causes of Elephant Foot
A number of factors can contribute to elephant foot. One is the elevated temperature of the print bed, which is often necessary to keep the initial layers of the print adhered to the build platform.[1] High bed temperatures, typically in the range of 60 to 110 °C depending on the material, keep the bottom layers in a semi-melted state for an extended period. As more layers are added, they exert pressure on the base layers, causing them to spread out, resulting in elephant foot. Inadequate cooling from the printer’s fan can worsen the effect.
Bed leveling inaccuracies can also exacerbate the 3D printing elephant foot issue. If the distance between the nozzle and the bed is too small, the first layer of the print is squished onto the bed more than intended. This excessive squishing can cause the material to spread outward beyond the intended footprint, contributing to elephant foot. The issue can be more pronounced in printers with manual bed leveling due to the potential for human error.
Other potential factors that can contribute to elephant foot include environmental factors, the design of the object being printed, and high infill densities. High infill can produce more internal stress in a part as it cools and shrinks, which can push the bottom layers outwards. This is especially true if the infill cools at a different rate than the outer walls, creating a thermal gradient that leads to uneven shrinkage.
Implications of Elephant Foot
The elephant foot phenomenon has several critical implications for 3D printing, affecting both aesthetics and functionality. In terms of aesthetics, the outward spread at the base disrupts the intended design, leading to a distorted profile. This distortion can be particularly problematic for prints intended to be visually accurate models or prototypes, where precision is of utmost importance.
Functional implications arise when the 3D printed object is meant to fit into an existing assembly or when multiple parts of a model need to fit together. The outward bulge at the base of the printed object can affect tolerance, causing the part to be larger than intended and preventing it from fitting properly. For example, in the case of a socket and plug design, the plug might not fit into the socket if the base of the plug has an elephant foot. Similarly, a part designed to slot into a specific space may not fit if the base is larger than anticipated.
The structural integrity of the printed object can also be compromised. The bottom layers in a print with an elephant foot are generally more stressed due to the spreading, which can lead to weaknesses. The print may be more likely to crack or break along these lines of stress, especially under load or impact.
Troubleshooting Elephant Foot
Given the implications of the elephant foot phenomenon, it is crucial to know how to mitigate or entirely fix elephant foot in 3D printing projects. Here we will explore several troubleshooting techniques, including calibration, design choices, and slicer settings.
Calibration
Proper calibration of the 3D printer is a vital step in preventing the elephant foot phenomenon, with bed leveling and nozzle height the most important elements to consider.
Bed Leveling
The build plate's alignment and levelness are fundamental to the quality of the first layer and, by extension, the entire print. A build plate that is too close to the nozzle during the first layer's printing can cause the extruded filament to spread out more than intended, leading to the elephant foot effect.
To calibrate the build plate, start by heating it to the usual printing temperature to account for thermal expansion, a factor that can slightly alter the plate's levelness. Use a piece of paper or a feeler gauge to adjust the distance between the build plate and the nozzle. The paper or gauge should slide between the two with a small amount of resistance. Repeat this process at several points across the build plate to ensure uniform levelness.
Recommended reading: Ender 3 Pro Bed Leveling: A Comprehensive Guide
Z-axis Adjustment
Another hardware issue that can cause elephant foot is the Z-axis. Users of Creality Ender 3 printers in particular have found that the issue is sometimes caused by excessive tightness of the eccentric nuts for the wheels of the Z-axis. Loosening these nuts can help reduce elephant foot.
Additionally, loosening the two screws holding the large Z-axis screw to the X-axis carriage can help with the issue.
Design Adjustments
Chamfers
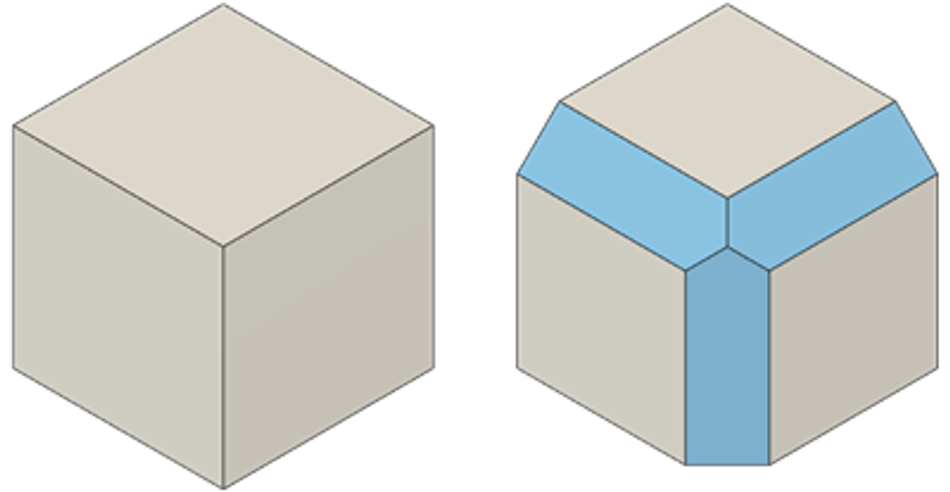
Adding a chamfer — a sloping edge — to your CAD 3D model is one way to combat 3D printing elephant foot. Most design software applications allow for easy implementation of chamfers to existing surfaces.
A chamfer can mitigate the effect of elephant foot because it makes each of the first few layers slightly smaller than the next, effectively offsetting the spread of elephant foot. The size of the chamfer can also be precisely adjusted, allowing users to incorporate small chamfers for minor instances of elephant foot and wider chamfers for more severe cases.
Slicer Settings
Bed Temperature
The temperature of the heated bed can play an important role in preventing elephant foot. Although a heated bed helps with first-layer adhesion, it can also result in insufficient cooling, causing the first layers of the print to remain soft for too long and allowing them to spread out under the weight of subsequent layers. Reducing the print bed temperature can therefore reduce the effect of elephant foot.
Consider the recommended temperature range for the given filament and use a temperature at the lower end of this range. If this causes adhesion issues, try to address those issues via other means, such as adding an adhesive substance like glue to the bed surface.
First Layer Settings
The various slicer settings for the first layer are crucial when combating elephant foot. The first layer height should be set to approximately 100% of the nozzle diameter. A lower value can cause the filament to spread out and form an elephant foot.
The first layer speed should be slower than the rest of the print. A speed of about 50% of the normal print speed is recommended.[2] Printing the first layer slowly allows the filament more time to adhere correctly to the build plate and cool down, reducing the chances of it spreading out.
The first layer extrusion rate, which controls how much filament is extruded, can also impact the elephant foot phenomenon. If too much filament is extruded, it may spread out and cause an elephant foot. An extrusion rate of about 95% to 100% of the standard rate is typically sufficient for the first layer.
The first layer fan speed can also help prevent elephant foot, as cooling helps the first layers solidify faster. However, as with lowering the bed temperature, this can have the negative effect of reducing bed adhesion, so consider implementing other techniques like build surface preparation to maintain good adhesion.
Expansion Compensation
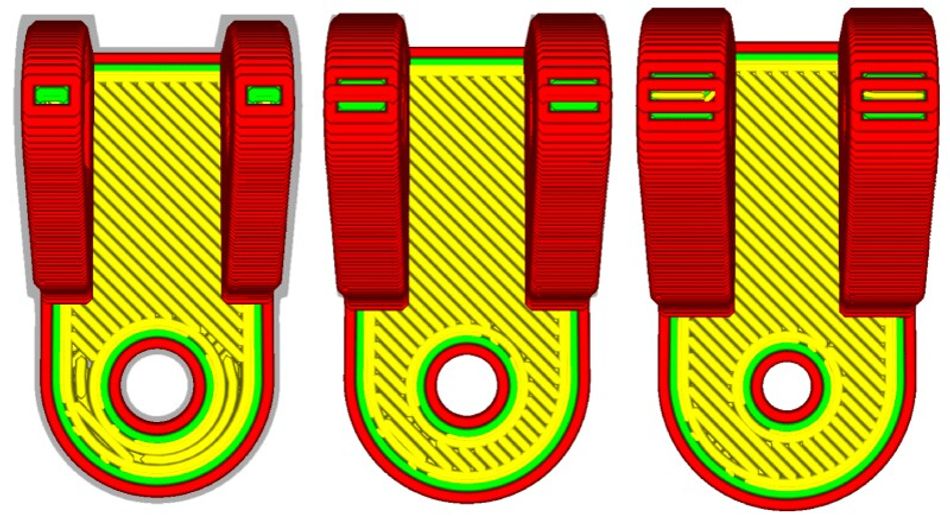
Most slicers offer a printer setting that is specifically designed to offset the effect of elephant’s foot. In Cura, this setting is called “initial layer horizontal expansion” and is found under wall settings. The setting has different names in different slicers:
Cura: Initial Layer Horizontal Expansion
Slic3r: Elephant Foot Compensation
PrusaSlicer: Elephant Foot Compensation
Simplify3D: Horizontal Side Compensation (must be tuned to first layer only)
The function of this setting is to compensate for the deformation of printed plastic in the first layer. To reduce elephant’s foot, a negative value should be input, as this will effectively decrease the XY dimensions of the first layer. Measure the distance of your existing elephant foot. If it is 0.1 mm, use a value of -0.1 mm for the expansion compensation parameter.
Rafts
A raft is an extra layer of material that is printed underneath the object, effectively serving as a platform, that is later removed from the print and discarded. Using a raft means the negative effects of elephant foot are applied to the raft, rather than the print itself. However, rafts require extra material and therefore increase the cost of the print.
When setting up a raft, users should be mindful of the air gap between the raft and the model, which is typically between 0.1 mm and 0.3 mm. This gap allows the raft to be easily removed after printing while still providing the necessary support. For the raft layers, a 0.3 mm layer height is often used, as it provides a good balance between print time and quality.
Environment
Ambient Temperature
The ambient temperature around the printer can affect the cooling rate of the extruded filament. A higher ambient temperature might slow down the cooling rate, causing the base layers to remain soft for longer. This softened state allows the weight of the upper layers to push down on the base layers, leading to the elephant foot effect.
Ideally, the ambient temperature should be stable and within a range that allows the filament to cool sufficiently without solidifying too quickly. For example, PLA prints well at an ambient temperature of 20-25°C, whereas ABS might require a slightly higher temperature due to its higher melting point. This range varies with the type of filament material used.
Airflow
Airflow around the 3D printer can also influence the cooling rate of the filament. It is therefore important to maintain a controlled and steady airflow around the printer. This can be achieved through careful placement of the 3D printer and the use of enclosures for printers that do not have built-in covers.
Post-Processing Techniques
Sanding
One of the most common post-processing techniques is sanding, which can effectively reduce the prominence of elephant foot on a printed object. Sanding involves the use of sandpaper or other abrasive materials to smooth out the uneven bottom layers of the print. For best results, start with a lower grit (rougher) sandpaper, such as 100 grit, to remove the bulk of the elephant foot. Then, progressively move to higher grit (finer) sandpapers, such as 400 and then 800, to refine the surface and achieve a smooth finish.
Filing
A file can be used for a more aggressive removal of the elephant foot, especially for larger prints or those made from tougher materials. When filing, it's essential to maintain a consistent angle and pressure to avoid creating new deformities. Files come in various sizes and coarseness levels, so choosing the right one for your specific needs can impact the final result.
Chemical Smoothing
Chemical smoothing is a more advanced technique that can remove elephant foot and improve the overall finish of a print. In this process, a solvent is used to slightly dissolve the surface of the print, effectively smoothing out any imperfections. For example, acetone can be used for ABS prints, while a mixture of 91% isopropyl alcohol and salt can be used for PLA prints.[3]
Although it results in a smooth finish, chemical smoothing is not the most accurate technique for removing elephant foot. The solvent must be applied manually to the protruding areas with a rag; vapor smoothing will not work as this will also remove material from the intact areas.
Heat Treatment
Heat treatment is another technique that can help in reducing elephant foot. By gently heating the affected area with a heat gun, the plastic becomes soft and can be carefully reshaped. This method is particularly effective for materials with a lower glass transition temperature, such as PLA. However, it requires a steady hand and careful control of the heat gun to avoid overheating and potentially warping the print.
Recommended reading: 3D print post-processing steps: supports, sanding, smoothing, more
Conclusion
3D printing, despite its many advantages, is not without its challenges, and the elephant foot phenomenon is one of them. This common defect can significantly affect the accuracy and aesthetics of a print. However, it is not an insurmountable problem. Through careful calibration and adjustment of slicer settings, it is possible to minimize and even eliminate the occurrence of elephant foot. Post-processing methods can also be employed to improve the quality of prints affected by this phenomenon. Understanding these strategies is crucial to achieving optimal results.
Frequently Asked Questions (FAQs)
1. What causes elephant foot in 3D printing?
The elephant foot effect in 3D printing typically results from excessive pressure exerted on the first few layers of a print. This pressure can be a result of incorrect bed leveling, excessive bed temperature, or a combination of factors.
2. How can I prevent elephant foot in 3D printing?
Preventing 3D printing elephant foot primarily involves proper calibration of the printer, including bed leveling, z-axis calibration, and setting the correct bed temperature, as well as adjustment of slicer settings, particularly those pertaining to the first layer.
3. Can elephant foot be fixed after a print is complete?
Yes, elephant foot can be addressed post-print through various post-processing techniques such as sanding, filing, chemical smoothing, or heat treatment. However, these methods should be performed carefully to avoid damaging the print.
4. How does the environment affect 3D printing and elephant foot?
Environmental conditions, such as ambient temperature and humidity, can influence the behavior of the material during printing. An ambient temperature that's too high or too low can also affect the cooling rate of the printed layers, potentially causing elephant foot.
References
[1] Skrzypczak NG, Tanikella NG, Pearce JM. Open source high-temperature RepRap for 3-D printing heat-sterilizable PPE and other applications. HardwareX. 2020 Oct 1;8:e00130.
[2] Šantak I, Duspara M, Cumin J, Kovačević B, Maglić L, Stoić A. Simulation of First Layer Adhesion Errors in 3D printing. TEAM2022. 2022 Sep 21:307.
[3] Gao H, Kaweesa DV, Moore J, Meisel NA. Investigating the impact of acetone vapor smoothing on the strength and elongation of printed ABS parts. Jom. 2017 Mar;69:580-5.
in this article
1. The Elephant Foot Phenomenon in 3D Printing2. Causes of Elephant Foot3. Implications of Elephant Foot4. Troubleshooting Elephant Foot5. Calibration6. Design Adjustments7. Slicer Settings8. Environment9. Post-Processing Techniques10. Conclusion11. Frequently Asked Questions (FAQs)12. References