How to Create Procedural Textures for Engineering
Procedural texturing is a technique that can be used to generate surface textures for a variety of applications. This article will guide you through the steps involved in generating and applying a roughness texture, along with three other natural surface treatments: leather, wood, and marble.
09 Jun, 2021. 5 minutes read
If you have been struggling to apply textures to your CAD parts, let us show you how quick and easy it is in nTopology.
This article was first published on
ntopology.comWhat is Procedural Texturing?
Procedural texturing is a method of generating surface textures using mathematical procedures or algorithms. This technique allows for high performance and scalability in texturing workflow, and we can apply the resulting textures to any new part.
Surface textures have various applications, from creating aesthetic effects to increasing mechanical grip and decreasing aerodynamic drag. Other applications include textures that need to appear “natural,” meaning those with no apparent repeating unit cells (i.e., leather-like surfaces instead of knurling).
Manually drawing the geometries required to achieve textures can be challenging, and it can be even more challenging to scale and conform them to complex parts. Scalability is where procedural texturing can offer considerable advantages over manually modeling surface features.
While creating procedural textures may not seem completely intuitive initially, it can become the ultimate creativity tool in your arsenal once you’ve mastered the process. nTopology’s implicit modeling engine is natively compatible with procedural texturing algorithms. Field-driven design allows users to control the size, shape, or strength of the texture in any way they desire.
Applying a Roughness Texture
Roughness is perhaps the most straightforward procedural texture, and understanding how to generate and apply it to a surface can be the foundation for the more advanced textures discussed below. Producing a rough surface involves three easy steps: generating noise, scaling the noise, and applying it to a part.
Step 1: Generating Noise
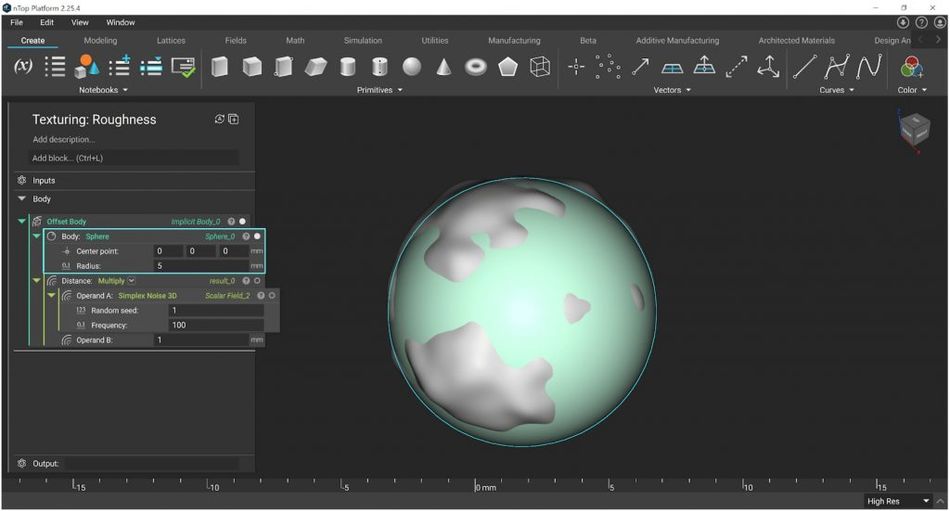
Roughness begins with a Simplex Noise 3D block.
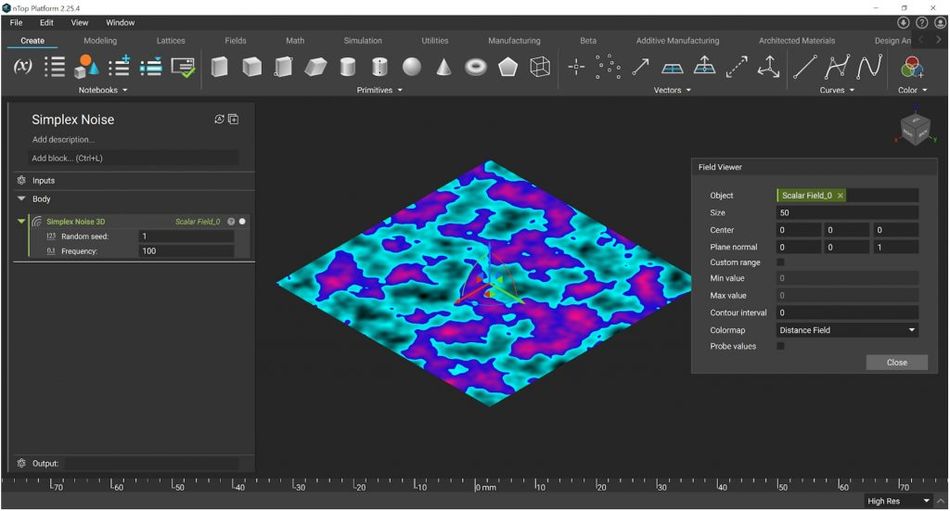
Using the field viewer in nTopology, you can see that the noise ranges from -1 to 1. (Pro tip: Press “F’ to open the field viewer and toggle “Probe Values” and hover over the field to see the range.)
The best way to see how the frequency input influences the texture is by changing the random seed. This technique is handy if you want to layer multiple noise functions without coinciding or if you want to randomize the texture of different parts.
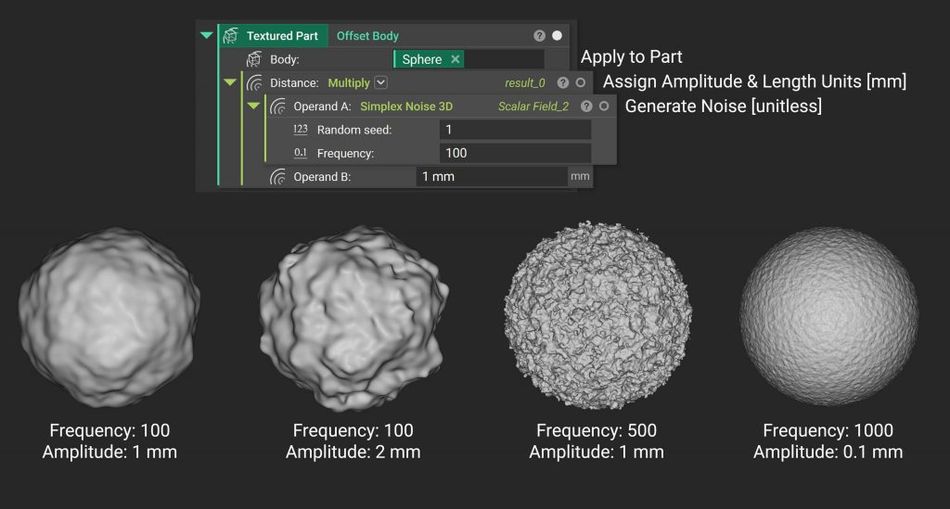
Step 2: Scaling the Noise
To change the shape of the texture, you’ll need to assign length units. Using a multiply block sets units to the surface texture and controls the amplitude of the noise. Imagining this as a digital signal or 3D oscilloscope may help.
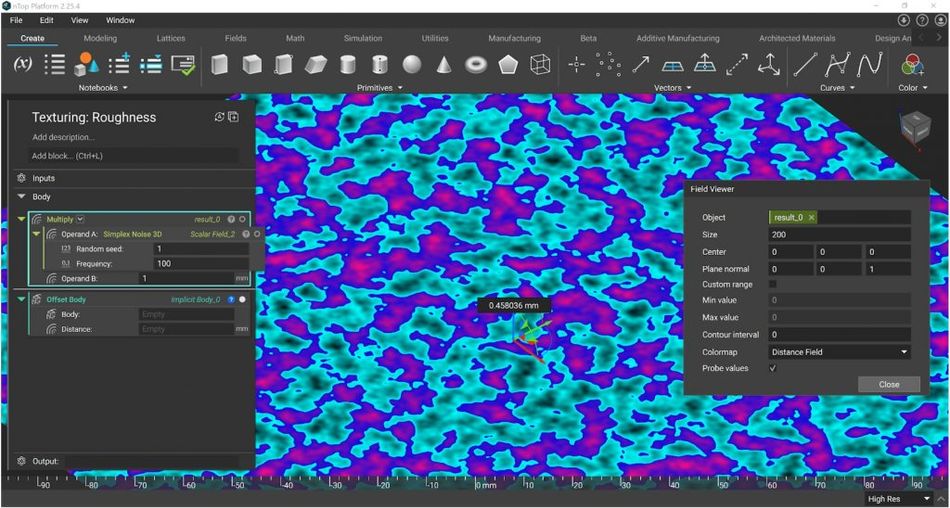
The resulting field now has units of length and can be used in an Offset block to add or remove material. In the example below, the original sphere is shown in green, and the offset texture in grey. The magnitude of this multiplying value controls the depth or strength of the texture and can be varied spatially — as indicated by the field icon.
Step 3: Applying the Texture to any Part
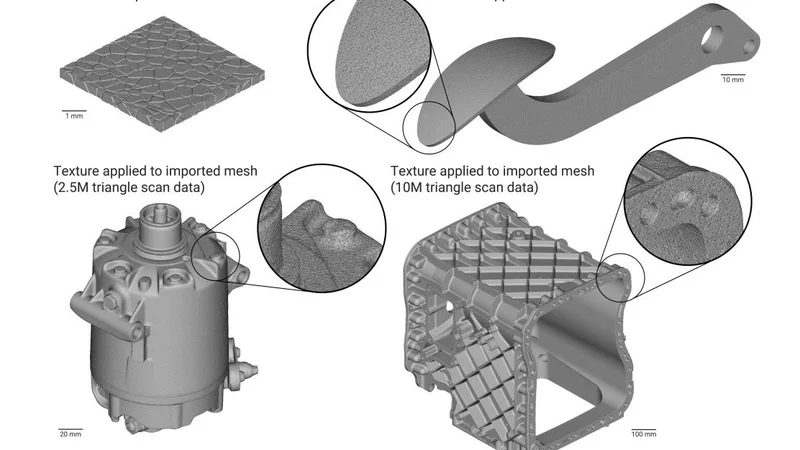
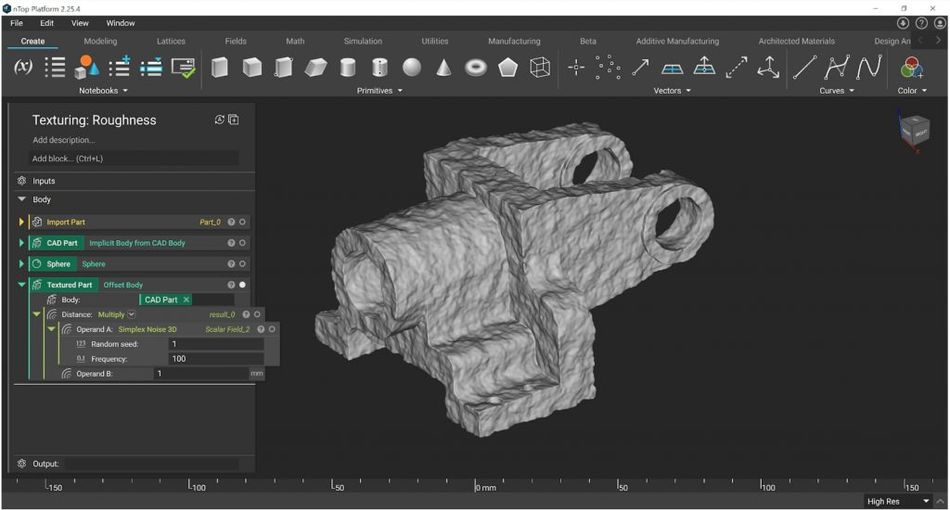
By organizing the notebook, you can now swap any part into this roughness texturing workflow, including imported CAD or mesh files, once you’ve converted it to an implicit body. Here’s the result when applied to an imported CAD part — a simple bracket.

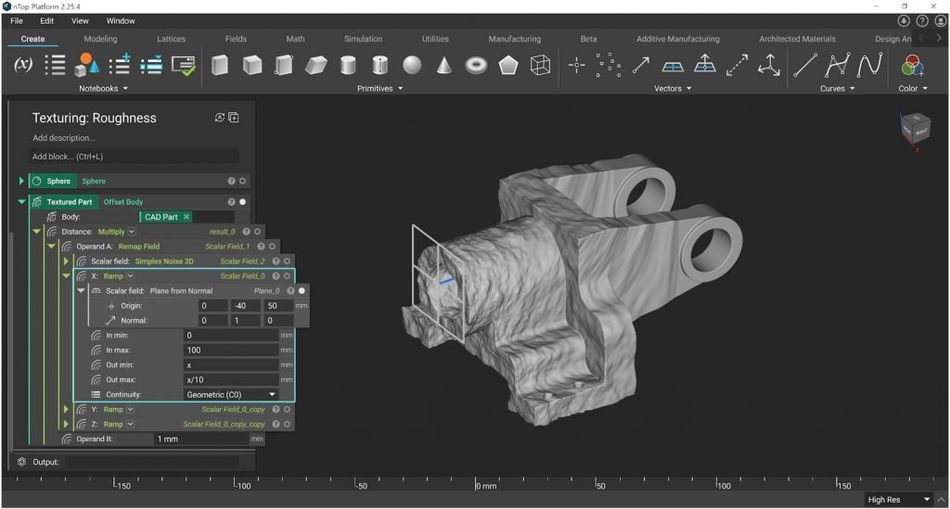
We can use ramp blocks also to control the frequency of the texture. Here we’re using a Remap Field block to warp the underlying noise field. A ramp block is used in each of the X, Y, Z inputs. Each input is respectively divided by 10 as we move away from the plane.
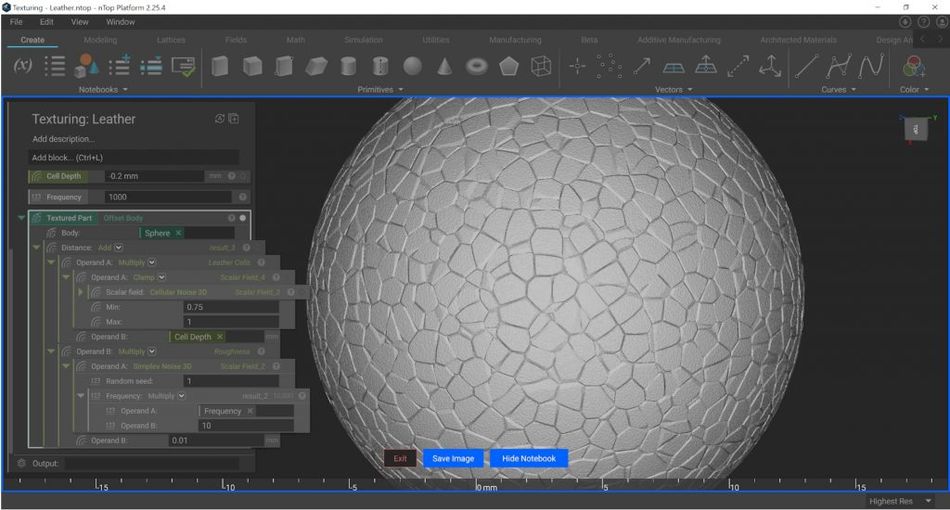
Applying a Leather Texture
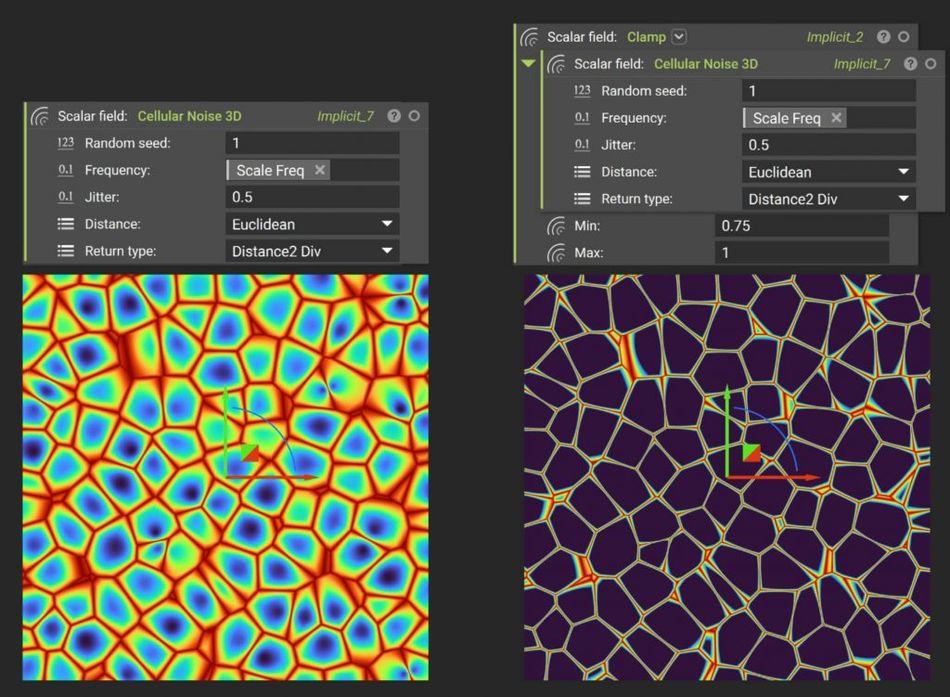
Cellular Noise is another block that’s available to nTopology. This block is useful for replicating natural textures such as leather. Here are the different types of textures that the nTopology’s Cellular Noise 3D block can return.
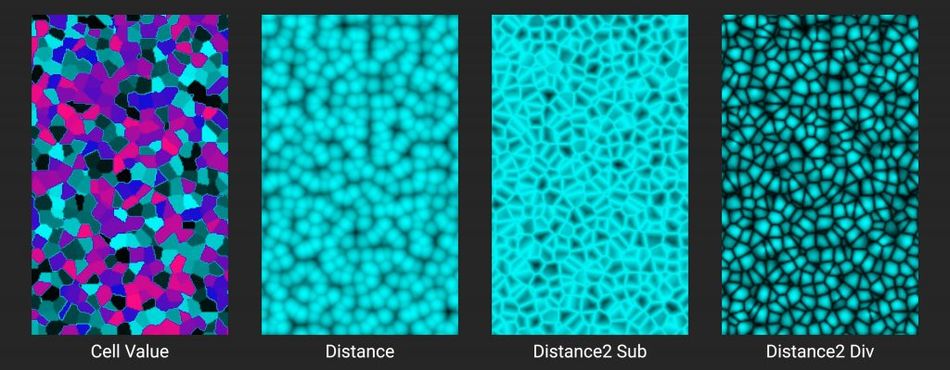
We can apply this texture to any part following very similar steps as shown earlier. We will use the Distance2 Div output to create a leather texture as it is the closest to the effect we are aiming for.

Between our Noise and Multiply blocks, we use a Clamp. This block applies a threshold to the noise signal. Normally, the texture has an aptitude between 0 to 1. By applying the clamp, we limit the amplitude of the noise between 0.75 and 1 only. This step will create flat spots rather than mountains in our leather cells. It is easier to visualize the effect of this operation in the Field Viewer.
Since we want to “etch” this field into a part, we have to use a negative value in the Multiply block. This operation offsets the creases of the texture (i.e., the high spots in the field) inwards.
Finally, to make the texture appear more realistic, we can add a fine layer of roughness to the leather. In this example, we used variables to keep the frequencies proportional to one another. We set the roughness to 10x the frequency of the Cellular Noise. For best results, make sure to use only a small amplitude for the random roughness.
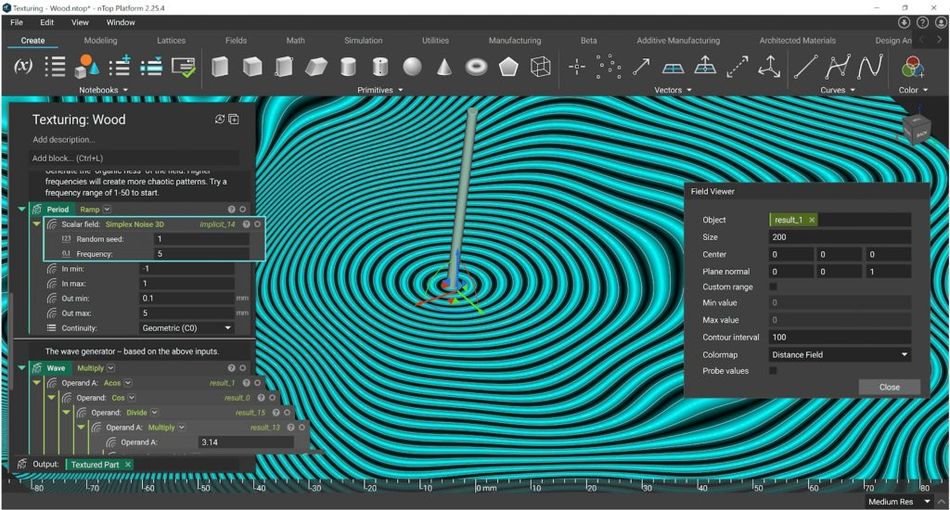
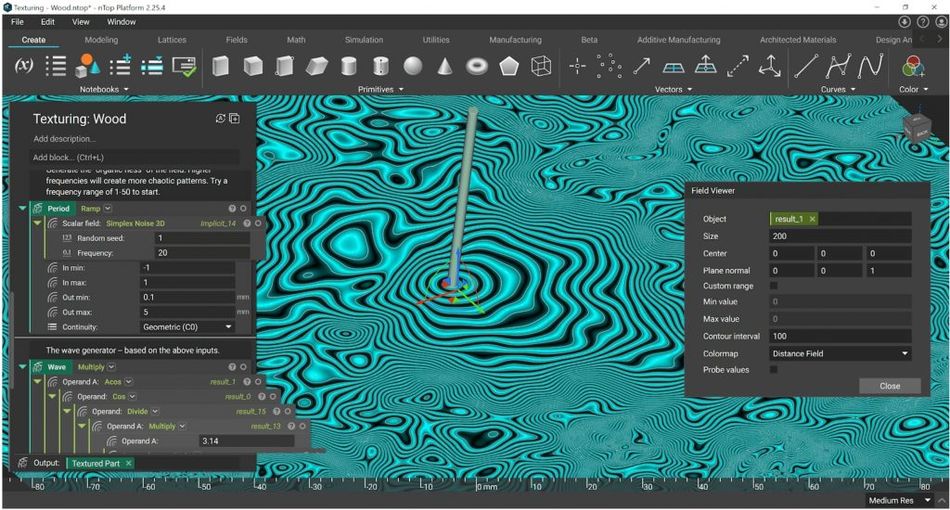
Applying a Wood Texture
To create a texture that resembles wood, we need to take advantage of another set of blocks that are available in nTopology: trigonometric functions. We can use trigonometric functions to create any textures that have a wavy appearance. In this example, we use them to resemble the rings of wood.

The frequency of the waves can be linked to noise functions, allowing us to control how chaotic the rings appear. But be aware that if you use too high a frequency, the texture may start to resemble some sort of magnetic material instead.
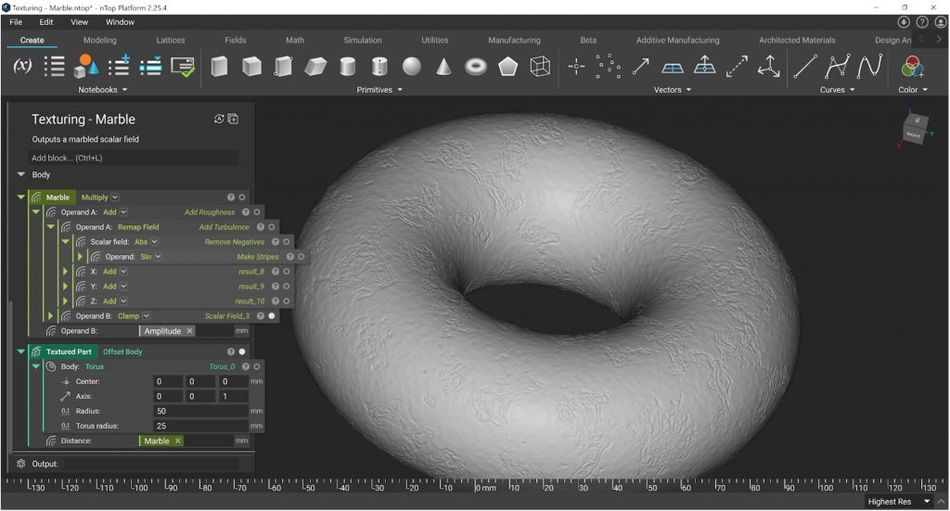
Applying a Marble Texture
As a final bonus, here is a sample file of a Marble texture. This example combines everything we have covered so far: noise functions, remaps, clamps, and trigonometric functions. The best approach to understand each step that we followed here is to use the field viewer.
Recommended reading: Meshing in FEA, CFD & Manufacturing
Key takeaways
Procedural texturing techniques are computationally efficient and scalable. nTop users typically design swatches of procedural textures and then package them as reusable custom blocks that can be applied to any part.
- Understanding roughness is a good springboard for mastering more complex textures.
- You can create complex natural textures like marble by combining functions, effects, and pre-existing blocks.
- Build swatches of procedural textures and easily reuse them on different parts and applications.
This article was first published on the nTopology blog.